Savory Stuffed Brussel Sprouts

Stuffed brussel sprouts with parmesan and herbs on an appetizer plate

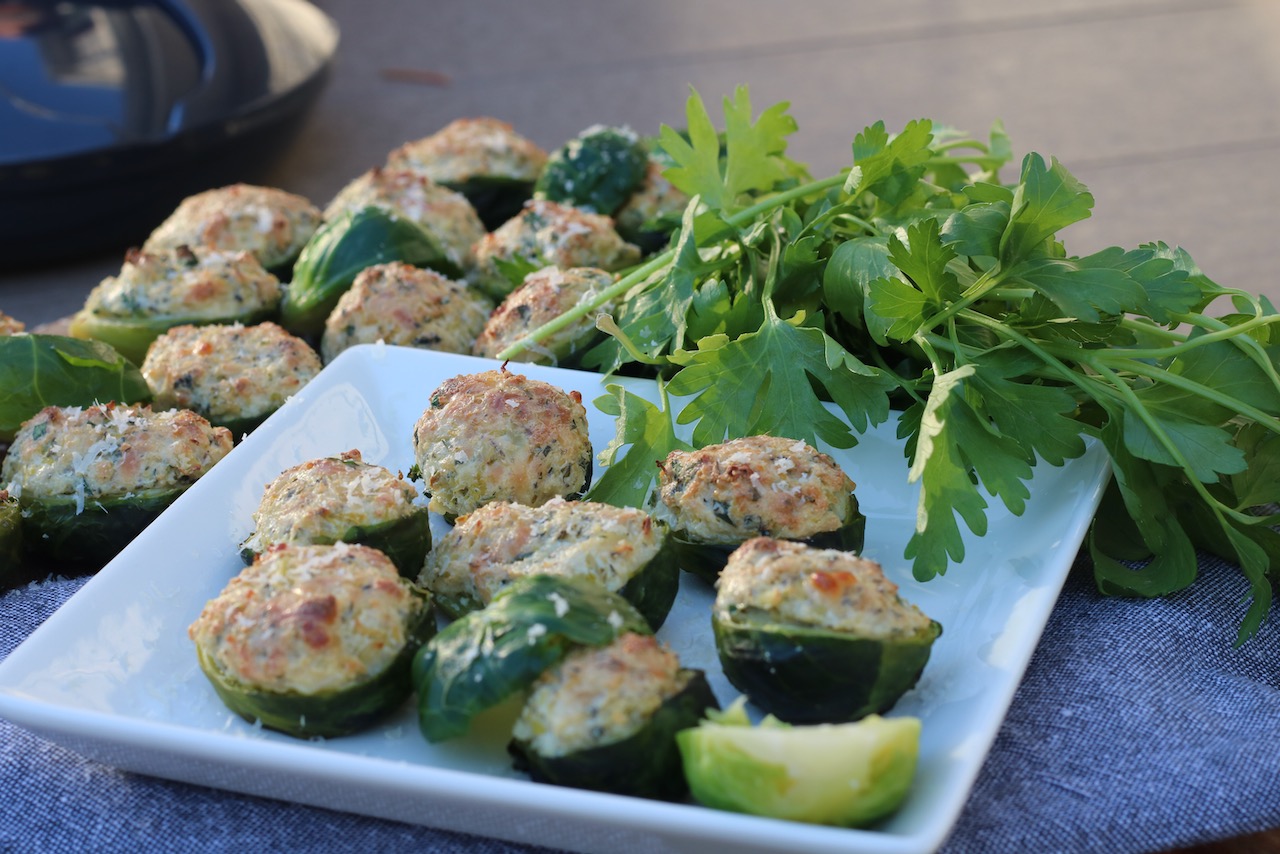
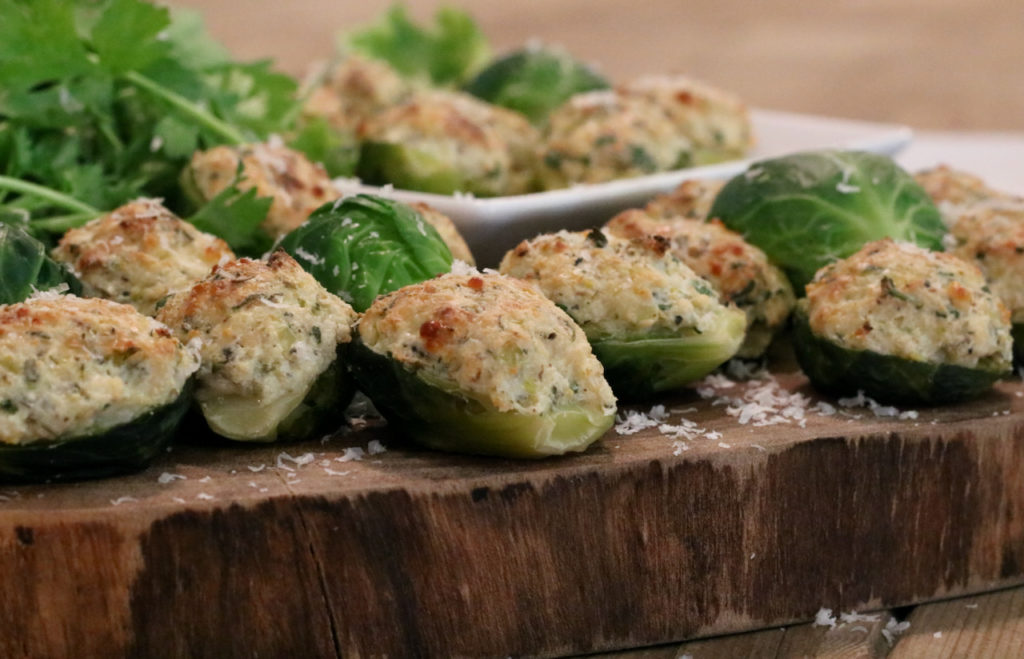
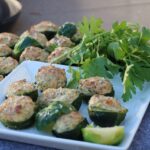
Baked to golden perfection, these delectable bites have the slight crunch of the Brussels sprouts and the creamy, cheesy filling, creating a palate-pleasing dish that’s both elegant and comforting.

How to make stuffed Brussel sprouts

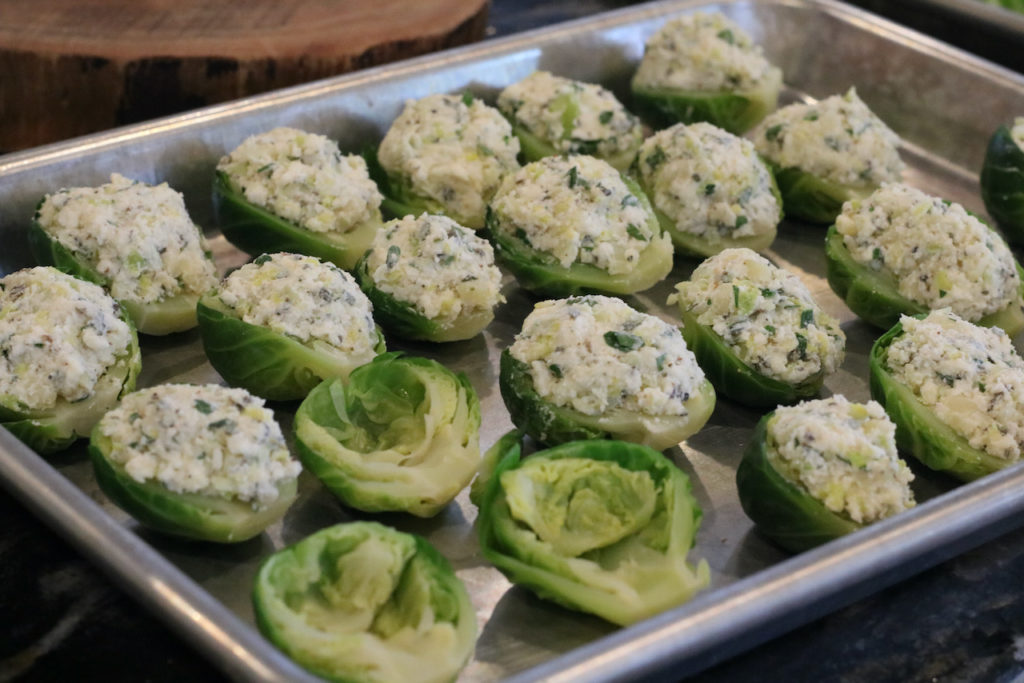
Start by blanching, halving and then carefully hollowing out the center of a large Brussel sprout. Mix together a creamy stuffing of of ricotta cheese, grated parmesan, a variety of aromatic herbs and panko breadcrumbs. Bake until golden perfection and serve.

Stuffed brussel sprouts

I came across this gem of a recipe for stuffed Brussel Sprouts by Jerry James Stone who has an awesome vegetarian food blog. He takes incredible photos and produces killer “how -to” videos like the one below.

Stuffed Brussel sprouts can be time consuming to make at first, but they can be made in advance and are totally worth it. And like most things, the more you do it, the better you get at it. I have made them enough times that now I can bang them out pretty quickly, but it wasn’t always that way. You just have to get the hang of it but trust me- it’s worth it!

Stuffed-brussel-sprouts

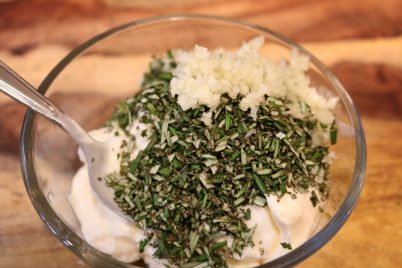
This recipe combines the cored out pieces of Brussel sprouts with garlic, breadcrumbs, herbs, ricotta cheese, and parmesan cheese and then stuffs them back into the shells of the Brussel sprouts. The result is pure, bite sized deliciousness!

*This recipe is Gluten Free Adaptable

To make this appetizer gluten free, be sure to use Gluten Free breadcrumbs.

Stuffed Brussel Sprouts

Cored out Brussel sprouts are stuffed with a blend of garlic, breadcrumbs, herbs, ricotta cheese, and parmesan cheese then baked to golden perfection.

Ingredients

  • 15 Large Brussels sprouts
  • 1 cup whole milk ricotta
  • 1 cup Parmesan shredded
  • ½ cup panko bread crumbs
  • 3 cloves garlic minced
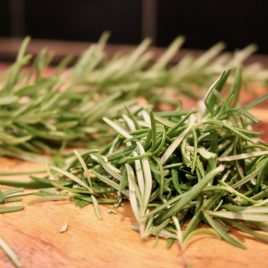
  • 1 tablespoon dried thyme
  • 1 tablespoon dried basil
  • 1 teaspoon dried marjoram
  • 1 teaspoon dried sage
  • 1 teaspoon kosher salt
  • pinch of pepper
  • Olive oil

Instructions

  • Preheat the oven to 400 degree F.
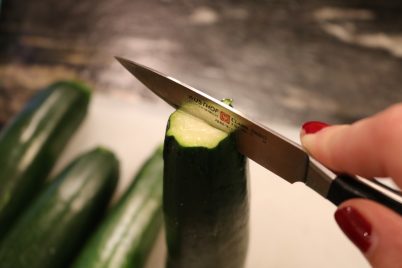
  • Wash the sprouts, trim the ends and halve them through the core. 
  • Fill a pot with water and bring it to a boil. Add the sprouts cut-side down. Cook for 1-2 minutes, remove them, separate them, and let them cool.
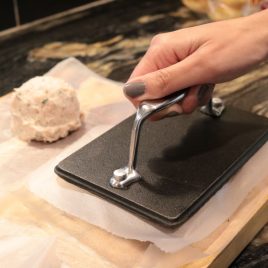
  • Core the sprouts. (Tip: Watch the video above for this next step. James teaches us how to quickly core the Brussels sprouts in just a few minutes.)
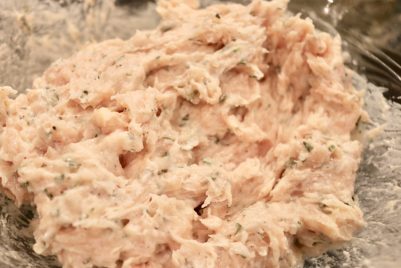
  • Finely chop the cored out Brussels sprouts pieces. Add the chopped sprout insides and 3 cloves of minced garlic to a sauce pan. Sauté over a medium-high heat. Cook until the chopped sprouts are tender and the mixture is aromatic. 
  • Mix the sprout & garlic mixture with the ricotta, Panko bread crumbs, parmesan cheese, thyme, basil, marjoram and dried sage. Add a dash of salt and taste the mixture. You want it to taste a bit overly salted because it will be less salty once they are baked.
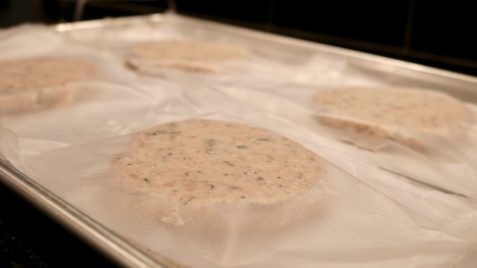
  • Using a small spoon, fill the Brussels sprouts with the stuffing. Over fill them. 
  • Bake for about 20 minutes at 400 degrees or until the caps are crispy and slightly burnt.

Caesar Salad

caesar dressing

Homegrown and Homemade

Apparently, lettuce likes summer rain because I’ve had a bumper crop of lettuce this season and that’s about the only think I am loving about this wet season that we are having.

With so many leafy varieties doing so well in our garden this year, I’ve really had a chance to work on matching the different textures and flavors of the varietals with different meals, and finding the perfect dressings to accompany them. The delicate, silky nature of the butter lettuce and red oak varieties take well to simple dressings like a lemon vinaigrette. Anything more than a squeeze of fresh lemon, splash of olive oil, salt and pepper overpowers the delicate eaves.. When I match those varieties with a heavier meal, like chicken parmesan, I find the meal to be harmonious. On the other hand, the romaine is hearty and can stand up to a bolder flavor and a thicker texture- which is why it’s the preferred lettuce choice for a classic, tangy caesar dressing.

Caesar dressing is very, very popular. I am confident that it is the most common item on menus across the country, meaning that just about every restaurant has a version of caesar salad on it. Given it’s popularity, it amazes, and disappoints me, that nine out of ten times I order it, it’s really not impressive. Some places serve more of a vinaigrette version, while others are garlic forward and creamy, some with raw egg, others with cream. Personally, I like a tangy, creamy, salty caesar. I don’t see how it can be any other way.

Having never made homemade caesar dressing before, I really wasn’t sure where to start or how to select a good recipe. So I decided to make three versions, one of which contained no egg. I was hoping I was going to like it the no egg version but unfortunately it came in last in the taste test. You simply need the egg.

The winning recipe turned out to be Michael Chirarello’s recipe. Over time I have tweaked it slightly to create a version that we really enjoy.

The Recipe

Caesar Salad Dressing

Prep Time10 minutes
Course: condiment, Side Dish
Cuisine: American, Italian
Keyword: dressing

Ingredients

  • 1 large egg yolk- at room temperature
  • 1.5 tablespoons of dijon mustard
  • A dash of dry mustard if you have it.
  • 4 quality anchovy filets
  • 1 tsp minced garlic
  • 2 teaspoons fresh lemon juice
  • dash worcestershire sauce
  • 1 cup olive oil
  • 1/2 cup good quality parmesan cheese. I like a parmesan/romano mix

Instructions

  • Place the egg yolk, mustard, anchovies, garlic, vinegar, lemon juice, and a dash of Worcestershire sauce in a blender or food processor. Blend until pureed. With the motor running, add the olive oil in a slow stream. If the dressing stops moving in the blender, stop the machine, add the warm water and then continue until all the oil is added. To finish, add the cheese and pulse to incorporate. Taste and adjust your seasonings.
  • Toss with Romaine lettuce leave and croutons, if desired. 

[/vc_column_text][/vc_column][/vc_row]

Gorgeous Granola!

Homemade Granola Bars

Grab and Go Granola Bars

Granola bars are the perfect afternoon snack or breakfast on the go, and enjoyed by people of all ages. But the good ones can be quite expensive! Not only is this recipe better than any granola bar I ever purchased, but they go a long way and stay fresh for at least one week!

Since I discovered this delicious recipe I haven’t purchased a single granola bar from a store and I am confident that if you try this recipe,  you won’t be either. It seems like a lot of ingredients but once you have them on hand, they will be in your pantry and ready for your second and third batch, which you are certain to make. Like anything homemade, the end result is superior to anything store bought.

Feaster’s Tip:

Make sure to use a sharp, strong knife when you cut the Granola into bars.

Granola Bars

Prep Time15 minutes
Cook Time25 minutes
Total Time40 minutes
Course: Breakfast, Snack
Servings: 16 average size granola bars

Ingredients

  • 2 cups old-fashioned oatmeal
  • 1 cup sliced almonds
  • 1 cup shredded coconut loosely packed
  • 1/2 cup toasted wheat germ
  • 3 tablespoons unsalted butter
  • 2/3 cup honey
  • 1/4 cup light brown sugar lightly packed
  • 1 1/2 teaspoons pure vanilla extract
  • 1/4 teaspoon kosher salt
  • 1 cup rough chopped dried cranberries
  • 1/2 cup dried wild blueberries

Instructions

  • Preheat the oven to 350 degrees. Line a sheet pan with parchment paper.
  • Toss the oatmeal, almonds, and coconut together on a sheet pan and bake for 10 to 12 minutes, stirring occasionally, until lightly browned. Don’t burn it! Transfer the mixture to a large mixing bowl and stir in the wheat germ. Reduce oven temp to 300 degrees F.
  • Place the butter, honey, brown sugar, vanilla, and salt in a small saucepan and bring to a boil over medium heat. Cook and stir for a minute then pour over the toasted oatmeal mixture. Add the fruit and mix well.
  • Pour the mixture into the prepared pan. Dampen your fingers and lightly press the mixture evenly into the pan into the thickness and shape you want. (I like half inch deep.) Bake for 25 to 30 minutes, until light golden brown. Cool for at least 3 hours at room temperature before cutting into squares with a sharp, sharp knife. (I like to let it sit for about 5-6 hours.) Store in an airtight container with parchment in between the layers. Serve at room temperature. 

Notes

These stay fresh for at least a week in a good container, such as a glass pyrex dish with a cover.

Italian Stuffed Zucchini

Italian Style stuffed zucchini

Stuff your way to satisfied

Zucchini is an extremely versatile vegetable that grows easily and abundantly in the summer months. One of the many dishes you can make with this Italian squash is to stuff it. It makes for individual portions and you can get extremely creative with your stuffings.

This particular version of stuffed zucchini is inspired by classic baked stuffed shells. Rather than stuff the pasta shells with a ricotta mixture and topped with tomato sauce, I stuff zucchinis. The zucchini adds texture and introduces a vegetable element, both which  are typically absent from the original dish.  The flavors are reminiscent of a vegetable lasagna, but better. In addition to this dish tasting really good, there are actually quite a few other reasons I love this recipe.

  • It’s carb and gluten free
  • It’s super easy to make
  • It can be made in advance (always a fan)
  • It’s great to make for a party
  • It travels well
  • It’s inexpensive
  • Served as individual portions

Serve the Italian style stuffed zucchini along side a simple salad of mixed greens. Mmm, Mmm Good!

Feaster’s Tip

  • This is a great starter recipe for those just learning their way around the kitchen.
  • Pierce a few spots in the bottom of the zucchini to let excess liquid drain out so the inside isn’t soggy.

The Recipe

Ricotta Stuffed Zucchini

Stuffed zucchinis are an excellent party dish because they can be prepared in advance and baked right before serving. They stay hot for a long time and are easy to serve as individual portions.
Prep Time15 minutes
Cook Time30 minutes
Total Time45 minutes
Course: Main Course
Cuisine: Italian

Ingredients

  • 3 Zucchini
  • 2 cups Ricotta cheese
  • 1 Large egg
  • 1/3 cup Grated Parmesan cheese
  • 1 cup Frozen Spinach (drained & dried of all excess water)
  • Kosher salt & fresh ground pepper
  • Your favorite marinara sauce
  • shredded parmesan cheese for topping (optional)

Instructions

  • Pre-heat the oven to 375 degrees F.
  • Slice the zucchini in half longways. 
    Slicing a Zucchini lengthwise
  • Hollow them out into ‘zucchini boats.’ You want to leave about a 1/2 inch of flesh.
    Making Zucchini shells
  • Pierce the zucchini using a thin pairing knife to allow excess moisture to drain.
    Piercing a zucchini
  • Season with Salt & Pepper
    Seasoning zucchini with salt & pepper
  • Combine ricotta, egg, grated parmesan, spinach, pinch of salt & pepper and mix well. 
    cheese stuffing for zucchini
  • Stuff cheese mixture generously into the zucchini halves. 
    ricotta cheese in zucchini shells
  • Spoon marinara sauce over zucchini and bake for about 30 minutes or until you can piece the zucchini easily with a knife, but are firm enough to still hold their shape. Add cheese for the last few minutes of cooking. 
    stuffed zucchini in oven
  • Let zucchini rest for about 10 minutes and garnish with shredded parmesan, if using. 
    Zucchini stuffed with ricotta cheese

Notes

These can be prepared up to 24 in advance. To do so, stuff zucchini and store in refrigerator until ready to bake and serve. 

[/vc_column_text][/vc_column][/vc_row][vc_row][vc_column][/vc_column][/vc_row]

Slow Cooker Buffalo Chicken

Slow Cooker Buffalo Chicken

A two Ingredient recipe that will blow your mind & taste buds away!

Thats right, I said it- Two Ingredients is all you need to make Slow Cooker Buffalo Chicken. Simply combine chicken breasts and Frank’s hot sauce in the slow cooker and you are done! Okay, you need water too, but hopefully you have a running faucet and I don’t need to include that as an ingredient.

About slow cooker Buffalo Chicken.

When I first tested this recipe (many, many years ago), I thought there would be no way boneless, white meat chicken, cooked for hours, could be anything but dry and bland. Simply put, I was wrong! It came out juicy, satisfying, and without the toppings, completely guilt free. I don’t think it gets better than that. It’s low calorie, carb free (KETO) & gluten free, yet completely satisfying! It’s basically magic!

How to make Slow Cooker Buffalo Chicken

Are you ready for how easy this is? Simply add 3-4 boneless chicken breasts to a slow cooker, combine equal parts water and Frank’s hot sauce into a measuring cup. (About 1/2 cup of each but this amount can vary depending on how many or few chicken breasts you are making.) Pour the Hot Sauce and Water mixture over the Chicken Breasts until just covered. Turn your crockpot on low for about 6 hours until chicken falls apart easily with a fork. Drain, shred, top with extra hot sauce if desired and serve!

A Winning Game Day Recipe

Slow Cooker Buffalo Chicken is guaranteed WIN for game day gatherings. It’s easy, tasty, make-ahead & serves a crowd. Simply prepare the chicken and serve alongside slider buns with a store-bought or and easy and delicious Homemade Blue Cheese Dressing.

Blue Cheese Dressing
This homemade creamy blue cheese dressing is perfect over a salad, heirloom tomatoes, or for dipping wings, shrimp or veggies. You will never buy store bought again!

Pro Tips:

  • This recipe calls for classic hot sauce, NOT Tabasco or Sriracha.
  • You can double this recipe – just make enough hot sauce & water mixture to just cover the chicken. Do not over cover, just coat and barely cover the top of the chicken.

Serving Suggestions

  • Buffalo Chicken Sliders: For a party, serve this with potato slider buns, lettuce and blue cheese dressing and let everyone make their own sliders.
  • Buffalo Chicken Quesadillas: This shredded buffalo chicken makes an awesome filling for a quesadilla
  • Buffalo Chicken Burritos or Wraps: Stuff a Burrito with Spicy, healthy Buffalo chicken, lettuce, tomato and Blue Cheese or Cheddar Crumbles!
  • Lettuce Wraps & Salads: Keep it carb free and gluten free by serving the shredded buffalo chicken in a lettuce wrap or on a salad.
Slow Cooker Buffalo Chicken
Print Recipe
5 from 2 votes

Slow Cooker Buffalo Chicken

If you want a guaranteed WIN on game day, Slow Cooker Buffalo Chicken is it! It does not get any easier than this and you won’t believe the outcome.
Prep Time5 minutes
Cook Time6 hours
Course: Appetizer, finger food, game day, Main Course, party food
Cuisine: American
Keyword: buffalo, chicken, crock pot, easy appetizer, sliders

Ingredients

  • 4-6 boneless chicken breasts
  • 1/2 cup Frank’s Red Hot sauce
  • 1/2 cup water
  • Your favorite fixings like rolls, blue cheese & lettuce

Instructions

  • Place chicken in bowl of slow cooker. 
  • Combine hot sauce and water in a measuring cup and mix to combine. Pour over and toss with the chicken. 
  • The chicken should be submerged. If you need more continue to add equal parts hot sauce and water until chicken is just covered. 
  • Cover and cook in slow cooker for 4-6 hours on low until the meat easily shreds with a fork. 
  • Drain meat and shred chicken. (if you want it extra spicy, toss with more hot sauce or your favorite wings sauce at this stage. Be sure to add in small qualities and taste. Or serve on the side.)
  • Serve with slider buns, romaine lettuce (cut to size), blue cheese dressing, and whatever other toppings you like! (Cheese and chopped scallions are also great toppings!)

Notes

This recipe is scalable based on your crowd. 4 average sized boneless chicken breasts will make 10-12 sliders based on how much you fill them. 

Crockpot Sweet & Sour Meatballs

sweet and sour meatballs

The easiest app you’ll ever make!

I like to do things up a little ‘fancy’ in the kitchen, especially for a party. However, striking a balance between fresh, delicious homemade food, and managing to produce it all, can be challenging for the best of home cooks. So every good host needs a few semi- homemade tricks up their sleeve. This is one of them. It’s a true “Set it and Forget it” recipe.

sweet and sour meatballs
Perfect party food for kids and grown ups alike!

These marvelous morsels of meat have made an appearance at more of our gatherings and parties than I care to admit! The ingredients are certainly not fancy, but the result is delicious, and just what a host needs in their back pocket as an addition to any occasion, and for any age guest.

Next time you have a need to please a crowd, be sure to give this ‘easy as pie’ recipe a try. I can guarantee you someone will ask for the recipe!

Sweet & Sour Crockpot Meatballs

This is truly a ‘set it and forget it’ recipe!
Prep Time5 minutes
Cook Time2 hours
Total Time2 hours 5 minutes
Course: Appetizer
Cuisine: American

Ingredients

  • 2.5 lbs Frozen Cocktail Meatballs
  • 6 – 8 oz Heinz Chili Sauce
  • 6 – 8 oz Grape Jelly

Instructions

  • Mix the jelly and chili sauce in a bowl to combine it and break up the jelly a bit. 
  • Place meatballs in a crockpot.
  • Pour the mixture over the meatballs and stir to coat.
  • Place the crockpot on low for about 2 -2.5 hours or until heated through. Gently stir once or twice during cooking. 

[/vc_column_text][/vc_column_inner][/vc_row_inner][/vc_column][/vc_row]

Black Bean Brownies

Black Bean Brownies

Did you say Black Bean Brownies? Yes. I did.

Lets just face it together. Low cal and fat free foods are not as good as the ‘real’ thing. It’s sad, but true. Fat tastes good. This is a problem for me since my life motto is that every bite should be the best bite.  I rarely alter anything to make it low fat. Instead, I just cook with fresh, lean ingredients and avoid high fat food. (most of the time!) But these brownies are so good for something that are so modified, that even I can’t deny that this is a great way to treat yourself to a sweet treat and not feel the least bit guilty!

I have been making this recipe for a few years now and I always trick everyone! I love watching people’s faces when I tell them it’s a brownie made out of black beans! The consistency is more similar a cake style brownie than the fudgy type, but considering it’s made from egg whites and black beans, I can live with it. Trust me- you can too.

Black Bean Brownies

Course: Dessert
Cuisine: American
Servings: 8

Ingredients

  • 1 15 oz. can of organic black beans drained and rinsed
  • 1/2 cup agave syrup
  • 1/2 cup self rising flour *see Feaster’s note
  • 1/2 cup egg whites
  • 1/4 cup good quality unsweetened cocoa
  • 2 tablespoons good quality vanilla extract
  • 1 teaspoon baking powder
  • 6 tablespoons Nestle’s mini semi-sweet chocolate chips

Instructions

For Brownies

  • Preheat oven to 350 degrees. Spray a 8×8 baking dish with nonstick cooking spray. 
  • In a food processor, combine all the ingredients except the chocolate chips and process until smooth, occasionally scraping the sides of the processor. 
  • Stir in the chocolate chips with a spoon. Pour into the baking dish and bake for about 20 – 25 minutes or until a toothpick comes out of the center clean.
  • Cool completely and ice with cream cheese frostings or a light sprinkle of confectionary sugar. 

For Cream Cheese Frosting

  • Combine 4 oz cream cheese, a 1/2 tsp vanilla and 2 tablespoons confectionary sugar and process until smooth. Tweak to taste.

Notes

If you don’t have any self rising flour, just make your own. 1 cup all-purpose flour 1/2 teaspoon salt 1 1/5 teaspoons baking powder Stir or sift together the flour, salt and baking powder

A ‘Chopped’ Challenge

It was a cold December evening and my friends and I were sitting around celebrating the holidays when we had an idea. We wanted to host an in-house ‘Chopped Challenge.’ (If you don’t know what ‘Chopped’ is, it’s a Food Network show where competitors compete over 3 rounds of Appetizer, Entree and Dessert.) This seemed like a great idea until we sat down a few weeks later to figure out how the heck we could pull this off! We edited the rules a bit and decided there was only one way to find out- proceed as planned!

Well, the night was a huge success. Although, I have to admit, it was a lot of work! The competitors, myself included, were all exhausted! Everyone agreed it was all well worth it because we had a ton of fun and we all somehow managed to produce surprisingly impressive food out of some rather strange combinations of ingredients. I still don’t know how we all created edible entrees with peanut butter cups and lamb!

We had scoring sheets for each round and 3 judges were picked from a hat for each round. This kept it fair and kept everyone involved. What we found most surprising was how serious everyone took it! The competitors, the judges and the basket master were all fully committed to the challenge!

Now, I must admit that I may have had a tad more fun than the others because in the end, I did take home the win! But, the real win was having a night with old and new friends and looking around the room and seeing everyone talking and laughing and knowing the food brought us all together. After all, that’s what Feast & Merriment is all about.

So what were the secret ingredients for each round what did we make with them?

Appetizer Ingredients

Jalapeños
Egg Roll Wrappers
potato chips
Fresh Salmon

Chrissy: Roasted Jalapeño and salmon Macaroni and Cheese with potato chip topping in a Fried eggroll shell shaped into a bowl.
Noelle: Fried dumpling with salmon, corn, beans, jalapeños, potato chips with a tomatillo dipping sauce
Mike: Southwestern Eggroll with salmon, tomatoes, jalapeños, beans and potato chips with Velveta cheese

Entree Ingredients

Fresh English Peas
Butternut Squash
Peanut Butter cups
Loin Lamb chops

Chrissy: Pan seared lamb served over butternut squash pureed with marscapone cheese and peanut butter with a touch of chocolate and topped with sautéed peas, onions and parmesan cheese.
Noelle: Indian curry of Lamb, squash and peas served over a bed of rice with a peanut butter cup hot chocolate on the side
Mike: Burrito stuffed with rice, black beans, peas, tomatoes, onions and squash and lamb topped with a chocolate and cheese sauce

Dessert Ingredients

Passion Fruit
Rasberries
Beets
Chocolate Milk

Chrissy: Grilled Challah bread stuffed with melted Brie, chocolate and passion fruit jam with a raspberry drizzle accompanied by Beet and orange ice cream
Noelle: Beet and raspberry mousse served in a dessert shell with a chocolate milk shooter
Mike: Fried dough with fruit topping alongside a chocolate milk shooter

Ina’s Caramelized Bacon with Pecans and Cayenne

Caramelized Bacon on a Sheet pan

An indulgent delight

When Ina Garten’s cookbook Foolproof was released, of course I had to have it! I did what I always do with her cookbooks- I read it from cover to cover over a glass of wine (or two!) and marked every recipe I wanted to try.

My first recipe was a simple choice – Ina’s Caramelized Bacon appetizer with Pecans and Cayenne. How could I not?! I have since made it several times and let me tell you…This appetizer doesn’t stand a chance of a single leftover piece!

Bacon crumble topping in a food processor
Combine sugar, nuts and spices in a food processor
Ina's caramelized bacon
Press the mixture onto the bacon on a flat surface then use a spatular to move them to a baking rack.
Caramelized Bacon on a Sheet pan
Press the mixture onto the bacon on a flat surface then use a spatular to move them to a baking rack.

This salty, sweet and spicy recipe is one that every cook should have it in their recipe arsenal for when you really want to ‘WOW’ your crowd! I made a few small changes to Ina’s recipe; I cut down on the salt, bumped up the cayenne and added a step to make it easier to execute the recipe.

Along the way I came up with a few tips to make these easier to make and wrote them into the recipe steps below.

The Recipe

Spicy Caramelized Bacon with Pecans

Ingredients

  • 1/2 cup light brown sugar
  • 1/2 cup chopped or whole pecans
  • 1 tsp kosher salt
  • 1 tsp fresh ground black pepper
  • 1/4 tsp cayenne pepper
  • 2 tbsp pure maple syrup
  • 1/2 lb good quality, thick sliced bacon

Instructions

  • Preheat over to 375 degrees. Line a baking sheet with aluminum foil or parchment paper. Place a baking rack on top of that. 
  • Combine the sugar and pecans in a food processor and process until the pecans are finely ground. Add the salt, pepper and cayenne pepper and pulse to combine. Add the maple syrup and pulse again to moisten the crumbs.
    Bacon crumble topping in a food processor
  • Cut each bacon slice in half. Use the back of a spoon to spread the pecan mixture evenly onto the bacon slices. You will use all the mixture. Place the bacon onto the backing rack without them touching. (I used a small spatula to assist with this move.)
    Caramelized Bacon on a Sheet pan
  • Bake for 25-30 minutes until the topping is very browned, but not burnt. (If its under baked the bacon will not crisp as it cools.) While it is hot, transfer the bacon to cool on paper towels.
    Caramelized Bacon on a Sheet pan
  • Serve at room temperature. 

Notes

These can be made early in the day and stored out at room temperature.

Traditional Italian Struffoli

A bowl of round, traditional Italian struffoli beside a vintage pastry cutter, set on an open cookbook with a recipe visible, evoking a cozy, homemade baking atmosphere.

From my family to yours.

Christmas season means something different to everyone. One of the traditions I loved most when I was a kid was ‘struffoli making day.’ Although, I always pronounced it ‘struffola’ so I could use an expert opinion on that!

More of us than were necessary gathered in the kitchen and we began the day long process of mixing, rolling and frying. On that day, my great grandma GiGi was the boss in the kitchen. She had a gigantic wooden cutting board used only for struffoli day. That came out, the oil went on, and the flour went everywhere. The flour was probably everywhere because they let me help and I was just a little kid. But I was a kid who loved being in the kitchen with her great grandma, grandma, aunt and mom and whoever else was around that day. I never liked to miss anything so it was probably easier to let me help than listen to me whine! (Which I’ll admit, is still true to this day!) In the end the reward was simple- mounds of miniature, honey covered fritters. And with each bite that everyone took, my pride grew because ‘I helped!’ I remember that feeling like it was yesterday.

After many years of buying struffoli from the bakery, and tasting other people’s when offered, and being constantly disappointed because none of them ever tasted anything like I remember them tasting from GiGi’s kitchen, it was time to take matters into my own hands. I was starting to think that it was just a memory and that they actually aren’t any good at all! I decided to take on a struffoli challenge to find out if I had a bad memory, or everyone else in the world just had a bad recipe.

I researched recipes online and I decided to compare four recipes that got positive reviews only to discover how different they all were. I was frustrated. I called my aunt and she said she could tell me over the phone how GiGi made them. Ok…well that was a start. I called my mom and she said she thought she had GiGi’s recipe somewhere and that night, as a surprise, she handed over the recipe preserved in a ziplock bag, along with many others. After reviewing it, I became more skeptical then ever about the struffoli of my past. The recipe wasn’t anything like the ones I found online! For starters, it had a lot less ingredients.

There was only one thing to do…A Struffoli throw down. Giada DeLaurentiis VS my great grandma, Virginia Sabitini.

The challenge would require that both recipes be made on the same day to ensure quality control. The flour brand was the same, the oil was the same temperature, the same brand of butter. In the end, after a very, very long night, I had a clear winner and I’m proud to say it was GiGi’s recipe.

GiGi’s recipe produced struffoli that was light, airy and crisp and tasted just how I remembered them. Giada’s were too dense and I didn’t care for the overall flavoring.

Now that I am armed with a piece of my childhood and a recipe that has survived the times, I can continue this tradition with my nieces and friends…and with you.

Ingredients

  • 7 large eggs
  • 3/4 cup sugar
  • 1/4 teaspoon kosher salt
  • 3 tsp. vanilla
  • 1/2 stick butter (about 4 tbs) melted
  • 5 cups flour- sifted
  • 4 tbs baking powder
  • canola oil
  • 1.5-2 pounds honey
  • Non-parelis- sprinkles

Directions

  1. Combine dry ingredients in the bowl of a stand mixer. In a separate bowl or in a food processor, Beat eggs & sugar together and slowly add melted butter.
  2. With the mixer on low, slowly incorporate the egg mixture into the flour. mix slowly until mixture starts to form a ball of dough, It will be soft but not sticky. Add flour as needed.
  3. On a floured board, form dough into a ball and wrap in plastic wrap and place in fridge for 20 – 30 minutes. Heat your oil. (You know when it is the correct temperature when you start to see it moving slightly and Giada DeLaurentiis offers a great tip: A 1″ piece of bread will fry in 3 minutes.
  4. Slice off dough as needed and keep the rest in the fridge as you work. On a floured board make 1/2 inch ‘snakes.’ (This was always my job as a kid! I was always told I was ‘the best snake maker!’)
  1. Cut your ‘snakes’ into 1/2 pieces.IMG_3416
  2. Fry for about 2-3 minutes per batch, being careful to not over crowd the pot. Monitor your oil temp and adjust as needed. IMG_3424
  3. Drain on paper towel. IMG_3425
  4. Ok, so here is where it get s a little tricky because you need to use your judgement. GiGi’s recipe doesn’t say HOW much honey to use! I would guess that for the entire recipe you would need approximately 1.5 – 2 pounds of honey. Heat the honey in a pot and let it boil for about a minute. Place the fried balls into a large bowl and pour in enough honey to lightly coat the fritters.After it all settles, a surprising amount of honey will pool at the bottom of the serving dish so you need to decide how much you want to use. My mom said that Gigi wouldn’t coat them too liberally so you could dip the ones without much honey into the pool of the honey if you wanted to. Which leads to me to GiGi’s greatest advise ever given: You can always put the salt in but you can’t take the salt out! So be mindful of your honey amounts- you can always drizzle on more.
  5. Moving quickly, plate your struffuli as desired. Lightly sprinkle on rainbow nonpareils while honey is still sticky as it cools quickly.
IMG_3429

Chicken Rosemary Burgers

chicken rosemary burger

Elevate your burger game

My brother in law loves ketchup. Personally, I think its a full blown addiction. One night we were dining together and I made one of my favorite burger recipes. As I went to serve them, he went into the fridge and pulled out the ketchup and went to use it on my perfectly seasoned burgers and I yelled “STOP!”

“What?” He paused. “It’s a burger. I need to put ketchup on it!”

“Pleaseeee” I begged. “Just first try it without any ketchup! If you still think it needs ketchup after then I won’t say another word.”

He didn’t use the ketchup. And you won’t either.

Giada De Laurentiis’s Chicken Rosemary Burger are a refreshing change from the everyday beef burgers that often lack so much flavor, and frankly that I am sick of. These burgers, on the other hand, are jam packed with flavor, are light and yet equally, if more more, satisfying than your average beef or turkey burger.

Not all burgers are created equal, and they aren’t all made with beef!

The original recipe for these chicken burgers comes from Giada De Laurentiis. However, her instructions made the dish a little confusing and very messy to make. Over the years, I have made these burgers so many times that I have developed the perfect tricks to making these delicious burgers easier to make and without any sticky mess. If you follow my steps and use the tools I recommend, this recipe is a total slam dunk for a great, tasty and easy weeknight meal.

How to make Chicken Rosemary Burgers:

Feaster’s Tips

  • Make patties at least one hour in advance or up to 24 hours. Cook right before serving.
  • Use a large sized ice cream scoop instead of your hands to portion out 4 equal patties. (This is so much easier and unexplainably less messy.
  • Press out burger portions between Glad Press & Seal Plastic wrap using a sandwich press. (I don’t know Press & Seal works so well for this, but it does! Once I discovered this, there was no going back.) When it is time to cook the patties, simply peel one side off, place the chicken patty into the pan, and peel back the remaining square of wax paper.
  • Optional: Brush the cut side of each roll with the olive oil and Grill for 1 to 2 minutes until slightly golden.
  • Recommended side dishes: chips, fries or a side salad.

The Recipe

Chicken Burgers with Garlic-Rosemary Mayonnaise

Prep Time20 minutes
Cook Time12 minutes
Total Time30 minutes
Course: entree
Cuisine: American
Keyword: burger, chicken, rosemary
Servings: 4 people

Equipment

  • Sandwich press or heavy bottom pan
  • Press & Seal style plastic wrap
  • Non Stick griddle pan or frying pan

Ingredients

  • 1 cup mayonnaise
  • 1/4 cup chopped fresh rosemary leaves
  • 1 clove garlic minced
  • 1 pound ground chicken
  • 1/2 teaspoon kosher salt
  • 1/4 teaspoon freshly ground black pepper
  • 4 potato rolls
  • 1/4 cup olive oil
  • 1 cup baby arugula divided

Instructions

  • Make the mayonnaise: In a small bowl, mix together mayonnaise, garlic, and rosemary and set aside or refridgerate. (You can do this up at least one days in advance if needed.)
  • In a large bowl, add the ground chicken, 1/2 teaspoon salt, 1/4 teaspoon pepper, and 1/2 of the mayonnaise mixture. Use 2 forks to fold and flod the mixture until well combined. It will be a wet mixture that resembles a batter.
  • Cut out 4 squares of Glad Press & Seal (or something similar but not saran wrap!) and lay flat. Use a large ice cream scoop to create four portions and scoop one onto each pre-cut square. Create 4 more plastic squares and top each patty. Use a sandwich press or the pottom of a flat pot /pan to gently press chicken misture into 4 perfect patties.
  • Refridgerate patties 1 – 24 hours.
  • Preheat a non-stick griddle pan to med-high. Cook burgers for about 5 minutes per side.
  • Assemble the burgers: Spread a dollop of the remaining mayonnaise mixture on the tops and bottoms of the buns. (Toasted buns are a plus here!) Place the chicken burgers on the bottom halves of the buns. Top each with 1/4 cup of arugula and finish with the top half of the bun.
    chicken rosemary burger

Make Ahead Gravy

Turkey gravy in gravy boat

How to make gravy ahead of time and why you should

Crafting the perfect gravy is an art of flavors and textures. It requires several steps, lots of attention and respect but the end result crowns your holiday roast with unparalleled warmth and depth of flavor. Learning the basics of a gravy recipe is the key to a lifetime of good gravy oozing over every roast that adorns your table.

The basics of Making a Gravy

To make gravy, you begin by collecting the flavorful drippings from the roasted turkey (or chicken) and then separating the fat from the drippings. Once separated, you combine the dripping with broth and gradually whisk in a thickening agent such as flour or cornstarch. Then you continually stir until the mixture turns into a thick, rich, velvety consistency. Season to taste.

Mashed potatoes and beef covered in gravy
The Perfect Gravy smothered over mashed potatoes and Roast Beef

The Problem with Gravy

Imagine this- you have a turkey to carve, potatoes to mash, vegetables to plate, amongst the pile of dishes, pots and pans piling up in your sink…. and now you have to stop and dedicate your full attention for anywhere from 7-10 minutes to make fresh gravy (and actually get it to the table hot.) This is a legitimate challenge. This is why so many people turn to jarred and dehydrated forms of gravy. I have yet to come across a premed gravy that comes close to homemade so the reality is, you have to make it yourself. It’s just the simple fact of the matter.

So I set out to perfect a gravy that I could make ahead of time.

Make ahead Gravy is a Game Changer for the Cook

brown gravy in a gravy boat featured on Make ahead gravy recipe page

Option 1: The “Day of” approach

In the “Day of” approach to make ahead gravy, simply to make it ahead of time the day you are serving it. This is for those serious cooks who understand a Turkey should rest for at least two hours or more before attempting to carve and serve it. (Gordon Ramsay advises to rest a turkey for as long as it cooks and because he is the world’s most recognized and decorated Chef, I’m going to go with him on this and not my mother’s approach of oven to table!) While the turkey or chicken is resting, this gives you plenty of time work with the drippings and make a gravy and keep it warm until time to serve. I this case, I recommend a mini slow cooker. It works perfectly for keeping the gravy hot for hours.

Option 2: The “Make Ahead” gravy approach

I often make gravy weeks in advance so I don’t need to worry about it at all on the big day. It does take advance planning and some effort, but the results are worth it.  Here is how you do it:

Step 1- Advance Roasting for Drippings

Up to 3 months in advance, roast a whole chicken, chicken parts, a turkey or turkey parts. The goal here is to collect as many droppings as possible so a turkey breast or white meats parts are not what you want to use here- you need a whole bird or dark meat to produce a good amount of delicious drippings. (Plan a meal around your roasting, but reserve the drippings because that is what we are after. I usually make chicken salad, sandwiches or soup with the meat.)

Step 2- Strain the Drippings

Pass the drippings through a sieve to produce a clean liquid, free from bits and pieces that have no business in our gravy.

Step 3- Separate the Drippings

If you have a gravy separator, now is the time to use it to remove the fat and then portion out your drippings. If you do not have a separator, refrigerate the drippings in glass. After the drippings set, the fat will rise to the top and harden. I leave it overnight. Skim and discard the fat layer.  The drippings will have hardened and become gelatinous. Separate the drippings in 1/4 cup portions, or any portion you choose

Step 4- Make & Freeze Gravy

You have a choice to either freeze the drippings so they are ready to make the gravy when you want to. Or, make the gravy entirely and then freeze. If you are going to make the gravy to freeze, follow this recipe:

Recipe

  1. Add 2 tablespoons (or up to 1/4 cup depending on how savory you like the gravy) to a small sauce pan and heat until liquified.
  2. Add 2 cups of good quality Turkey or Chicken broth and bring to a gentle simmer.
  3. Meanwhile, in a small bowl or cup, combine 1/4 cup cold water and 2 tablespoons of Corn Starch and mix until smooth. Whisk the cornstarch mixture into the hot liquid.
  4. Stirring constantly, bring to a gentle boil for one minute.
  5. Season with Salt & Pepper to taste.
  6. Let it cool completely and freeze. It will become gelatinous.

Note: These portions may need to be altered based on the brand of ingredients you are using and the consistency you want to achieve.

Step 5- Reheating

Defrost in the refrigerator 1-2 days in advance of using. When ready to serve, place the gravy in a small sauce pan. The gravy will hold the shape of the storage container. Don’t  panic! This is right. Reheat the gravy slowly, over a low heat. Once it starts to break down and loosen up, you can use an immersion blender or simply continue to whisk- it will return to its proper consistency. Once hot and silky smooth, it is ready to serve.

Pro Tip!

Clear off your stove top and set your gravy aside until ready to serve by using a mini slow cooker, typically used for dips and fondue. It keeps the gravy nice and hot for hours. Simply make the gravy 30 min to an hour in advance of needing it and then I transfer it to the mini pot.

A mini crock pot typically used for dips will keep gravy hot for hours
Make Ahead Mashed Potatoes
Light, fluffy mashed potatoes are everyone’s favorite side dish! With these tips for make ahead mashed potatoes, the cook can enjoy the mash as much as the guests.