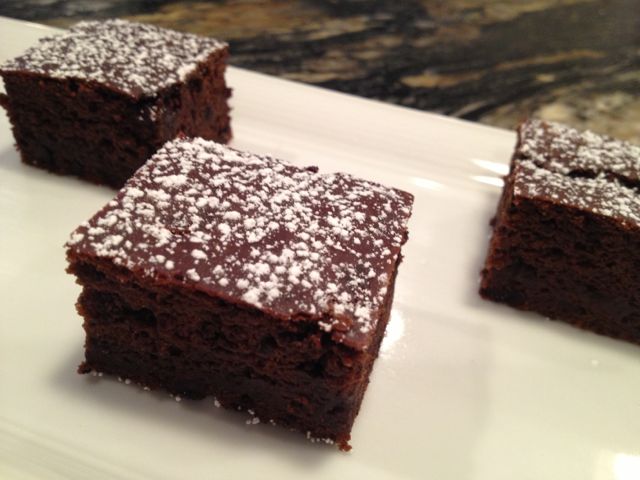
Lets just face it together. Low cal and fat free foods are not as good as the ‘real’ thing. It’s sad, but true. Fat tastes good. This is a problem for me since my life motto is that every bite should be the best bite. I rarely alter anything to make it low fat. Instead, I just cook with fresh, lean ingredients and avoid high fat food. (most of the time!) But these brownies are so good for something that are so modified, that even I can’t deny that this is a great way to treat yourself to a sweet treat and not feel the least bit guilty!
I have been making this recipe for a few years now and I always trick everyone! I love watching people’s faces when I tell them it’s a brownie made out of black beans! The consistency is more similar a cake style brownie than the fudgy type, but considering it’s made from egg whites and black beans, I can live with it. Trust me- you can too.
1 15oz.can of organic black beansdrained and rinsed
1/2cupagave syrup
1/2cupself rising flour*see Feaster’s note
1/2cupegg whites
1/4cupgood quality unsweetened cocoa
2tablespoonsgood quality vanilla extract
1teaspoonbaking powder
6tablespoonsNestle’s mini semi-sweet chocolate chips
Instructions
For Brownies
Preheat oven to 350 degrees. Spray a 8×8 baking dish with nonstick cooking spray.
In a food processor, combine all the ingredients except the chocolate chips and process until smooth, occasionally scraping the sides of the processor.
Stir in the chocolate chips with a spoon. Pour into the baking dish and bake for about 20 – 25 minutes or until a toothpick comes out of the center clean.
Cool completely and ice with cream cheese frostings or a light sprinkle of confectionary sugar.
For Cream Cheese Frosting
Combine 4 oz cream cheese, a 1/2 tsp vanilla and 2 tablespoons confectionary sugar and process until smooth. Tweak to taste.
Notes
If you don’t have any self rising flour, just make your own. 1 cup all-purpose flour 1/2 teaspoon salt 1 1/5 teaspoons baking powder Stir or sift together the flour, salt and baking powder
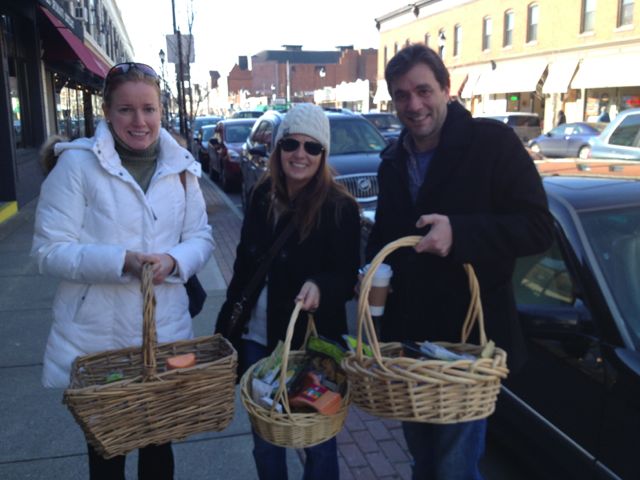
It was a cold December evening and my friends and I were sitting around celebrating the holidays when we had an idea. We wanted to host an in-house ‘Chopped Challenge.’ (If you don’t know what ‘Chopped’ is, it’s a Food Network show where competitors compete over 3 rounds of Appetizer, Entree and Dessert.) This seemed like a great idea until we sat down a few weeks later to figure out how the heck we could pull this off! We edited the rules a bit and decided there was only one way to find out- proceed as planned!
Well, the night was a huge success. Although, I have to admit, it was a lot of work! The competitors, myself included, were all exhausted! Everyone agreed it was all well worth it because we had a ton of fun and we all somehow managed to produce surprisingly impressive food out of some rather strange combinations of ingredients. I still don’t know how we all created edible entrees with peanut butter cups and lamb!
We had scoring sheets for each round and 3 judges were picked from a hat for each round. This kept it fair and kept everyone involved. What we found most surprising was how serious everyone took it! The competitors, the judges and the basket master were all fully committed to the challenge!
Now, I must admit that I may have had a tad more fun than the others because in the end, I did take home the win! But, the real win was having a night with old and new friends and looking around the room and seeing everyone talking and laughing and knowing the food brought us all together. After all, that’s what Feast & Merriment is all about.
So what were the secret ingredients for each round what did we make with them?
Appetizer Ingredients
Jalapeños Egg Roll Wrappers potato chips Fresh Salmon
Chrissy: Roasted Jalapeño and salmon Macaroni and Cheese with potato chip topping in a Fried eggroll shell shaped into a bowl. Noelle: Fried dumpling with salmon, corn, beans, jalapeños, potato chips with a tomatillo dipping sauce Mike: Southwestern Eggroll with salmon, tomatoes, jalapeños, beans and potato chips with Velveta cheese
Chrissy: Pan seared lamb served over butternut squash pureed with marscapone cheese and peanut butter with a touch of chocolate and topped with sautéed peas, onions and parmesan cheese. Noelle: Indian curry of Lamb, squash and peas served over a bed of rice with a peanut butter cup hot chocolate on the side Mike: Burrito stuffed with rice, black beans, peas, tomatoes, onions and squash and lamb topped with a chocolate and cheese sauce
Dessert Ingredients
Passion Fruit Rasberries Beets Chocolate Milk
Chrissy: Grilled Challah bread stuffed with melted Brie, chocolate and passion fruit jam with a raspberry drizzle accompanied by Beet and orange ice cream Noelle: Beet and raspberry mousse served in a dessert shell with a chocolate milk shooter Mike: Fried dough with fruit topping alongside a chocolate milk shooter
When Ina Garten’s cookbook Foolproofwas released, of course I had to have it! I did what I always do with her cookbooks- I read it from cover to cover over a glass of wine (or two!) and marked every recipe I wanted to try.
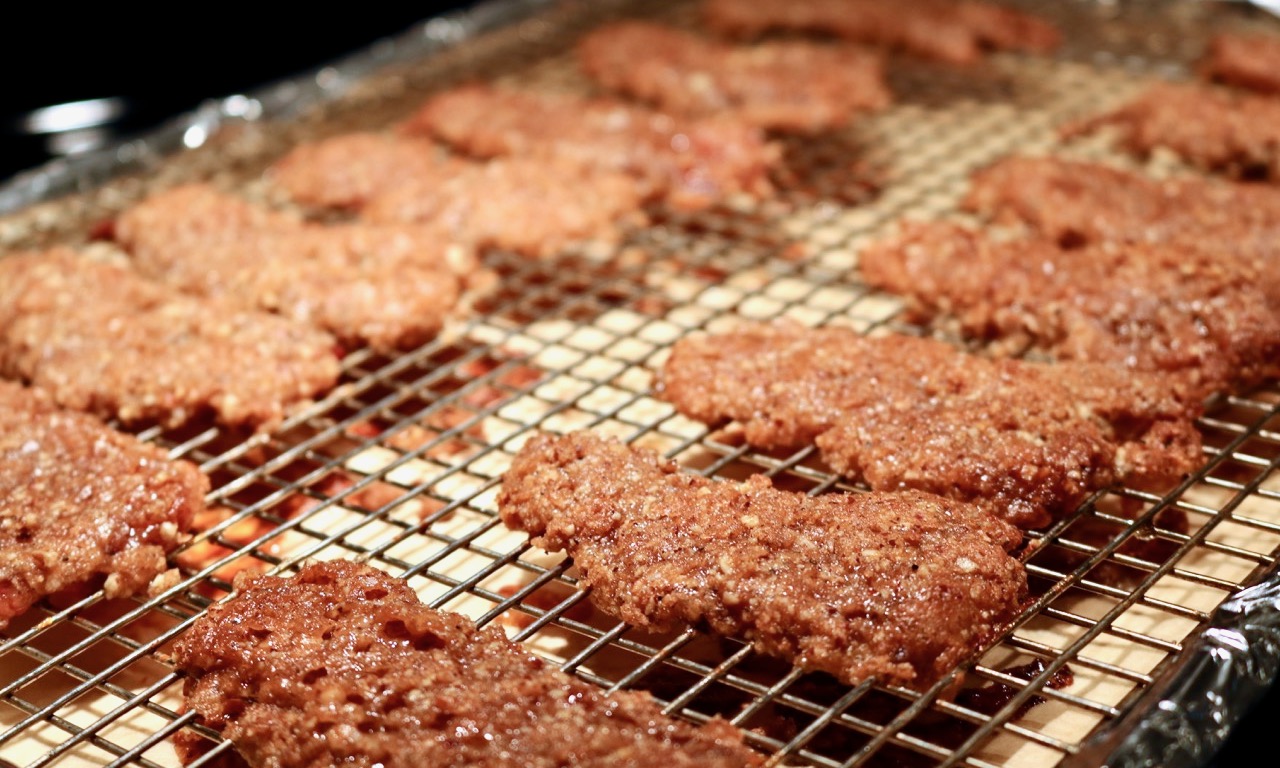
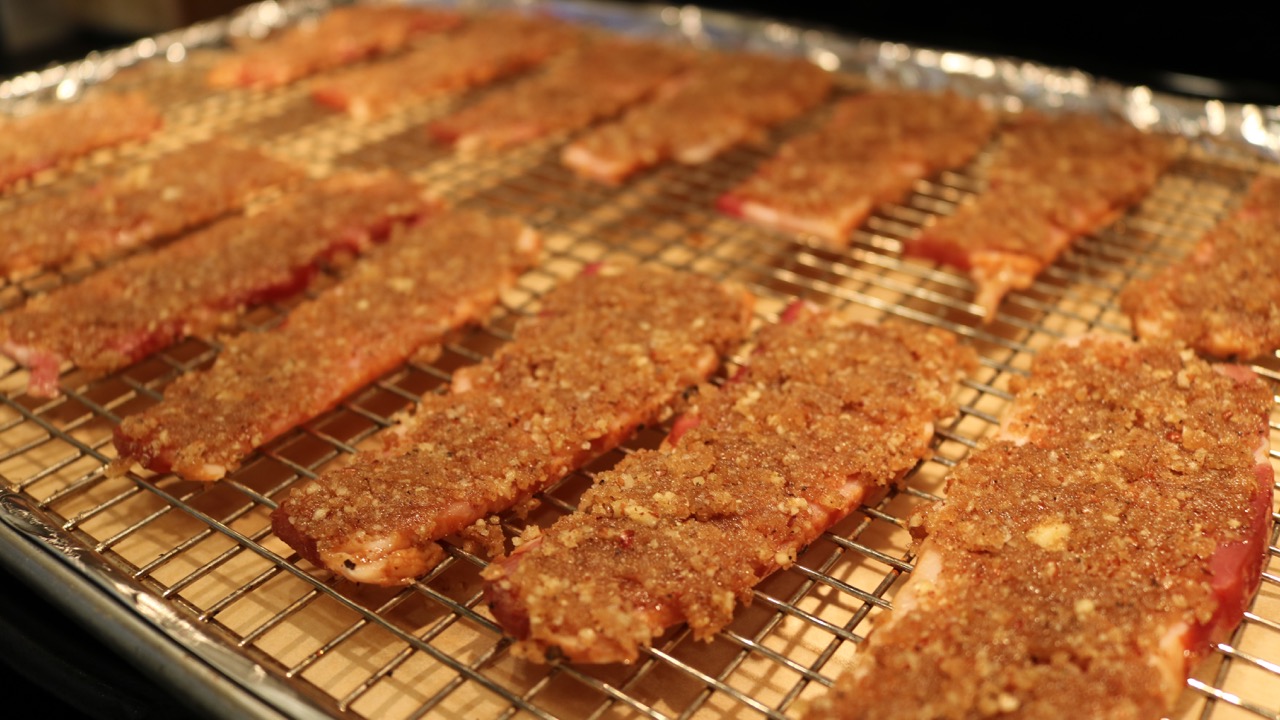
My first recipe was a simple choice – Ina’s Caramelized Bacon appetizer with Pecans and Cayenne. How could I not?! I have since made it several times and let me tell you…This appetizer doesn’t stand a chance of a single leftover piece!
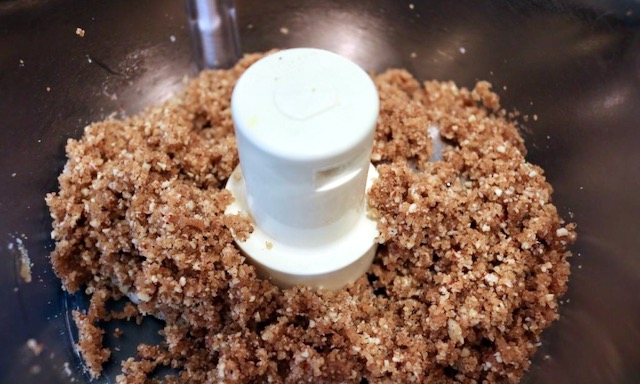
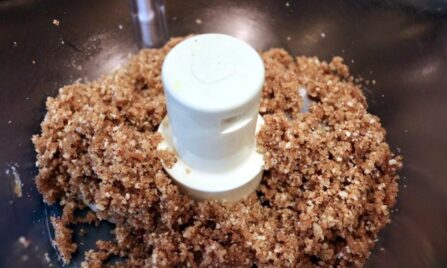
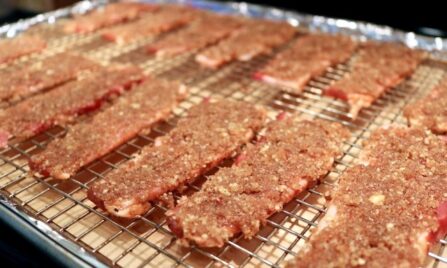
Combine sugar, nuts and spices in a food processorPress the mixture onto the bacon on a flat surface then use a spatular to move them to a baking rack.Press the mixture onto the bacon on a flat surface then use a spatular to move them to a baking rack.
This salty, sweet and spicy recipe is one that every cook should have it in their recipe arsenal for when you really want to ‘WOW’ your crowd! I made a few small changes to Ina’s recipe; I cut down on the salt, bumped up the cayenne and added a step to make it easier to execute the recipe.
Along the way I came up with a few tips to make these easier to make and wrote them into the recipe steps below.
Preheat over to 375 degrees. Line a baking sheet with aluminum foil or parchment paper. Place a baking rack on top of that.
Combine the sugar and pecans in a food processor and process until the pecans are finely ground. Add the salt, pepper and cayenne pepper and pulse to combine. Add the maple syrup and pulse again to moisten the crumbs.
Cut each bacon slice in half. Use the back of a spoon to spread the pecan mixture evenly onto the bacon slices. You will use all the mixture. Place the bacon onto the backing rack without them touching. (I used a small spatula to assist with this move.)
Bake for 25-30 minutes until the topping is very browned, but not burnt. (If its under baked the bacon will not crisp as it cools.) While it is hot, transfer the bacon to cool on paper towels.
Serve at room temperature.
Notes
These can be made early in the day and stored out at room temperature.
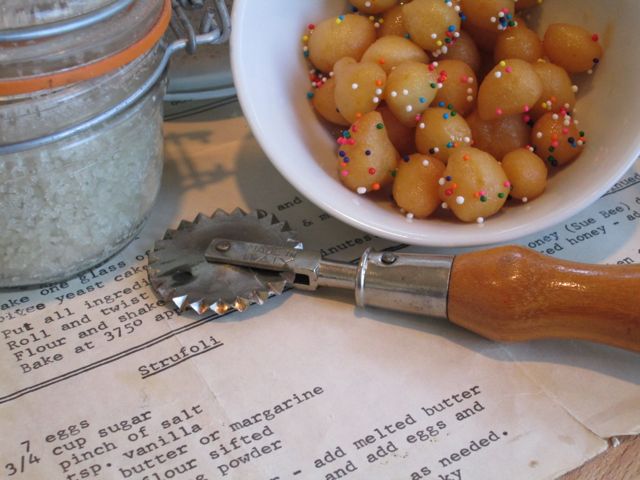
Christmas season means something different to everyone. One of the traditions I loved most when I was a kid was ‘struffoli making day.’ Although, I always pronounced it ‘struffola’ so I could use an expert opinion on that!
More of us than were necessary gathered in the kitchen and we began the day long process of mixing, rolling and frying. On that day, my great grandma GiGi was the boss in the kitchen. She had a gigantic wooden cutting board used only for struffoli day. That came out, the oil went on, and the flour went everywhere. The flour was probably everywhere because they let me help and I was just a little kid. But I was a kid who loved being in the kitchen with her great grandma, grandma, aunt and mom and whoever else was around that day. I never liked to miss anything so it was probably easier to let me help than listen to me whine! (Which I’ll admit, is still true to this day!) In the end the reward was simple- mounds of miniature, honey covered fritters. And with each bite that everyone took, my pride grew because ‘I helped!’ I remember that feeling like it was yesterday.
After many years of buying struffoli from the bakery, and tasting other people’s when offered, and being constantly disappointed because none of them ever tasted anything like I remember them tasting from GiGi’s kitchen, it was time to take matters into my own hands. I was starting to think that it was just a memory and that they actually aren’t any good at all! I decided to take on a struffoli challenge to find out if I had a bad memory, or everyone else in the world just had a bad recipe.
I researched recipes online and I decided to compare four recipes that got positive reviews only to discover how different they all were. I was frustrated. I called my aunt and she said she could tell me over the phone how GiGi made them. Ok…well that was a start. I called my mom and she said she thought she had GiGi’s recipe somewhere and that night, as a surprise, she handed over the recipe preserved in a ziplock bag, along with many others. After reviewing it, I became more skeptical then ever about the struffoli of my past. The recipe wasn’t anything like the ones I found online! For starters, it had a lot less ingredients.
There was only one thing to do…A Struffoli throw down. Giada DeLaurentiis VS my great grandma, Virginia Sabitini.
The challenge would require that both recipes be made on the same day to ensure quality control. The flour brand was the same, the oil was the same temperature, the same brand of butter. In the end, after a very, very long night, I had a clear winner and I’m proud to say it was GiGi’s recipe.
GiGi’s recipe produced struffoli that was light, airy and crisp and tasted just how I remembered them. Giada’s were too dense and I didn’t care for the overall flavoring.
Now that I am armed with a piece of my childhood and a recipe that has survived the times, I can continue this tradition with my nieces and friends…and with you.
Ingredients
7 large eggs
3/4 cup sugar
1/4 teaspoon kosher salt
3 tsp. vanilla
1/2 stick butter (about 4 tbs) melted
5 cups flour- sifted
4 tbs baking powder
canola oil
1.5-2 pounds honey
Non-parelis- sprinkles
Directions
Combine dry ingredients in the bowl of a stand mixer. In a separate bowl or in a food processor, Beat eggs & sugar together and slowly add melted butter.
With the mixer on low, slowly incorporate the egg mixture into the flour. mix slowly until mixture starts to form a ball of dough, It will be soft but not sticky. Add flour as needed.
On a floured board, form dough into a ball and wrap in plastic wrap and place in fridge for 20 – 30 minutes. Heat your oil. (You know when it is the correct temperature when you start to see it moving slightly and Giada DeLaurentiis offers a great tip: A 1″ piece of bread will fry in 3 minutes.
Slice off dough as needed and keep the rest in the fridge as you work. On a floured board make 1/2 inch ‘snakes.’ (This was always my job as a kid! I was always told I was ‘the best snake maker!’)
Cut your ‘snakes’ into 1/2 pieces.
Fry for about 2-3 minutes per batch, being careful to not over crowd the pot. Monitor your oil temp and adjust as needed.
Drain on paper towel.
Ok, so here is where it get s a little tricky because you need to use your judgement. GiGi’s recipe doesn’t say HOW much honey to use! I would guess that for the entire recipe you would need approximately 1.5 – 2 pounds of honey. Heat the honey in a pot and let it boil for about a minute. Place the fried balls into a large bowl and pour in enough honey to lightly coat the fritters.After it all settles, a surprising amount of honey will pool at the bottom of the serving dish so you need to decide how much you want to use. My mom said that Gigi wouldn’t coat them too liberally so you could dip the ones without much honey into the pool of the honey if you wanted to. Which leads to me to GiGi’s greatest advise ever given: You can always put the salt in but you can’t take the salt out! So be mindful of your honey amounts- you can always drizzle on more.
Moving quickly, plate your struffuli as desired. Lightly sprinkle on rainbow nonpareils while honey is still sticky as it cools quickly.
My brother in law loves ketchup. Personally, I think its a full blown addiction. One night we were dining together and I made one of my favorite burger recipes. As I went to serve them, he went into the fridge and pulled out the ketchup and went to use it on my perfectly seasoned burgers and I yelled “STOP!”
“What?” He paused. “It’s a burger. I need to put ketchup on it!”
“Pleaseeee” I begged. “Just first try it without any ketchup! If you still think it needs ketchup after then I won’t say another word.”
He didn’t use the ketchup. And you won’t either.
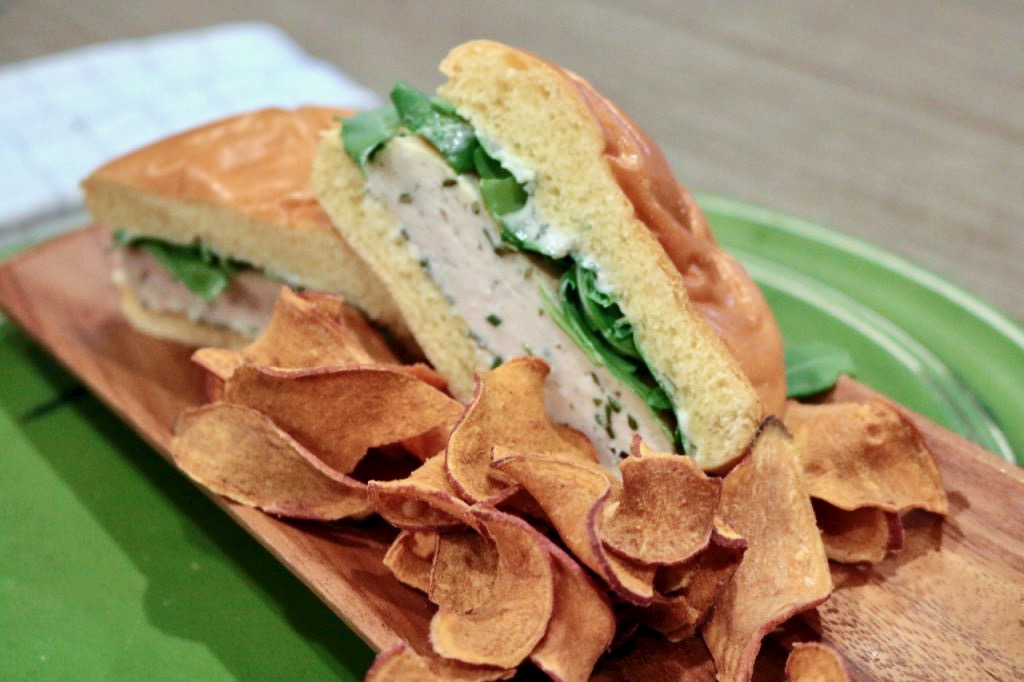
Giada De Laurentiis’s Chicken Rosemary Burger are a refreshing change from the everyday beef burgers that often lack so much flavor, and frankly that I am sick of. These burgers, on the other hand, are jam packed with flavor, are light and yet equally, if more more, satisfying than your average beef or turkey burger.
Not all burgers are created equal, and they aren’t all made with beef!
The original recipe for these chicken burgers comes from Giada De Laurentiis. However, her instructions made the dish a little confusing and very messy to make. Over the years, I have made these burgers so many times that I have developed the perfect tricks to making these delicious burgers easier to make and without any sticky mess. If you follow my steps and use the tools I recommend, this recipe is a total slam dunk for a great, tasty and easy weeknight meal.
How to make Chicken Rosemary Burgers:
Feaster’s Tips
Make patties at least one hour in advance or up to 24 hours. Cook right before serving.
Use a large sized ice cream scoop instead of your hands to portion out 4 equal patties. (This is so much easier and unexplainably less messy.
Press out burger portions between Glad Press & Seal Plastic wrap using a sandwich press. (I don’t know Press & Seal works so well for this, but it does! Once I discovered this, there was no going back.) When it is time to cook the patties, simply peel one side off, place the chicken patty into the pan, and peel back the remaining square of wax paper.
Optional: Brush the cut side of each roll with the olive oil and Grill for 1 to 2 minutes until slightly golden.
Recommended side dishes: chips, fries or a side salad.
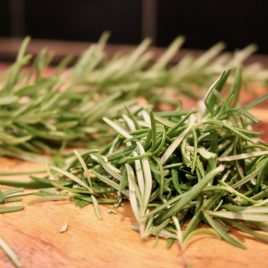
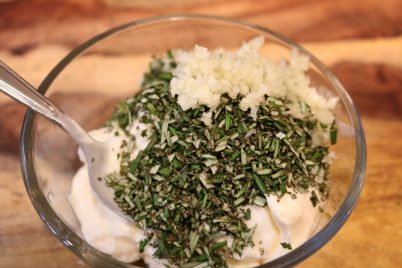
Make the mayonnaise: In a small bowl, mix together mayonnaise, garlic, and rosemary and set aside or refridgerate. (You can do this up at least one days in advance if needed.)
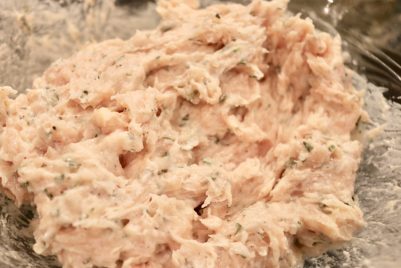
In a large bowl, add the ground chicken, 1/2 teaspoon salt, 1/4 teaspoon pepper, and 1/2 of the mayonnaise mixture. Use 2 forks to fold and flod the mixture until well combined. It will be a wet mixture that resembles a batter.
Cut out 4 squares of Glad Press & Seal (or something similar but not saran wrap!) and lay flat. Use a large ice cream scoop to create four portions and scoop one onto each pre-cut square. Create 4 more plastic squares and top each patty. Use a sandwich press or the pottom of a flat pot /pan to gently press chicken misture into 4 perfect patties.
Refridgerate patties 1 – 24 hours.
Preheat a non-stick griddle pan to med-high. Cook burgers for about 5 minutes per side.
Assemble the burgers: Spread a dollop of the remaining mayonnaise mixture on the tops and bottoms of the buns. (Toasted buns are a plus here!) Place the chicken burgers on the bottom halves of the buns. Top each with 1/4 cup of arugula and finish with the top half of the bun.
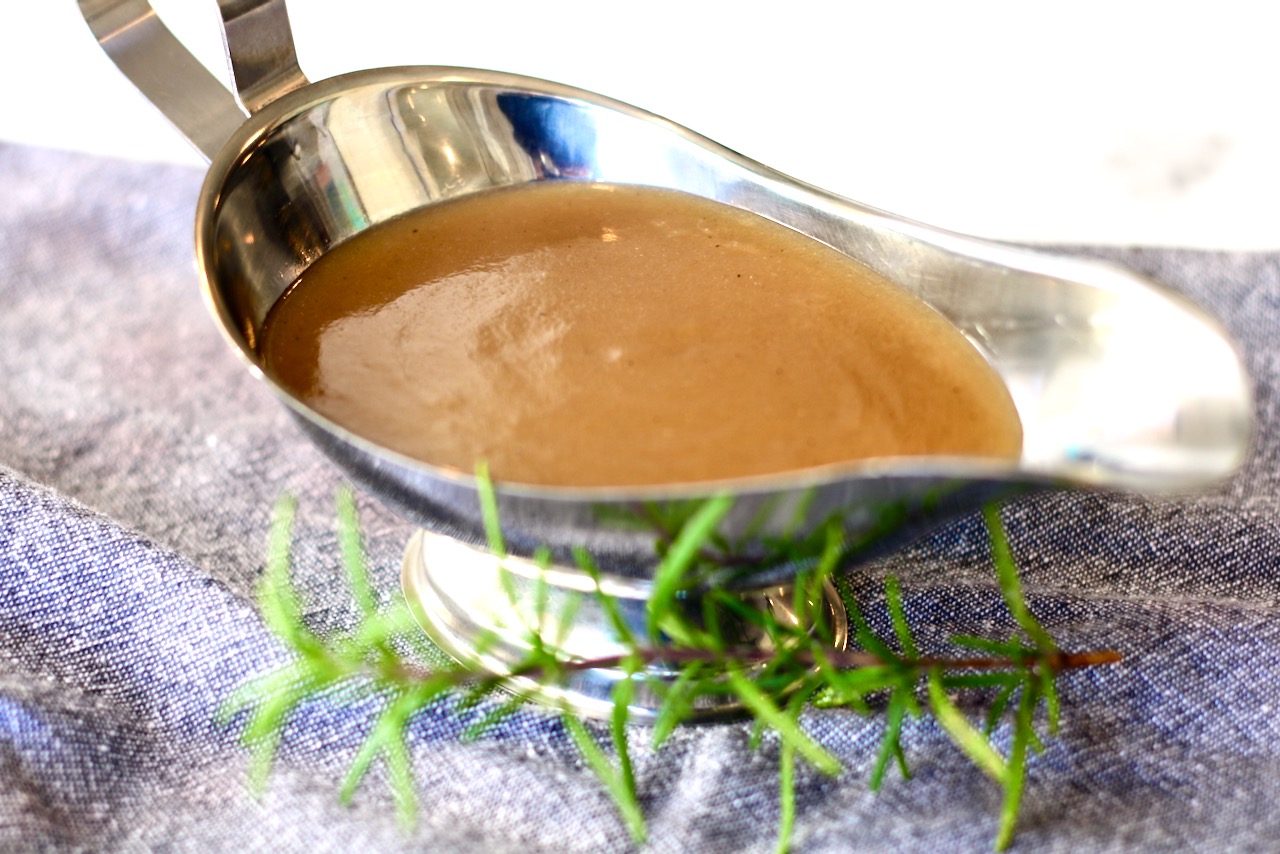
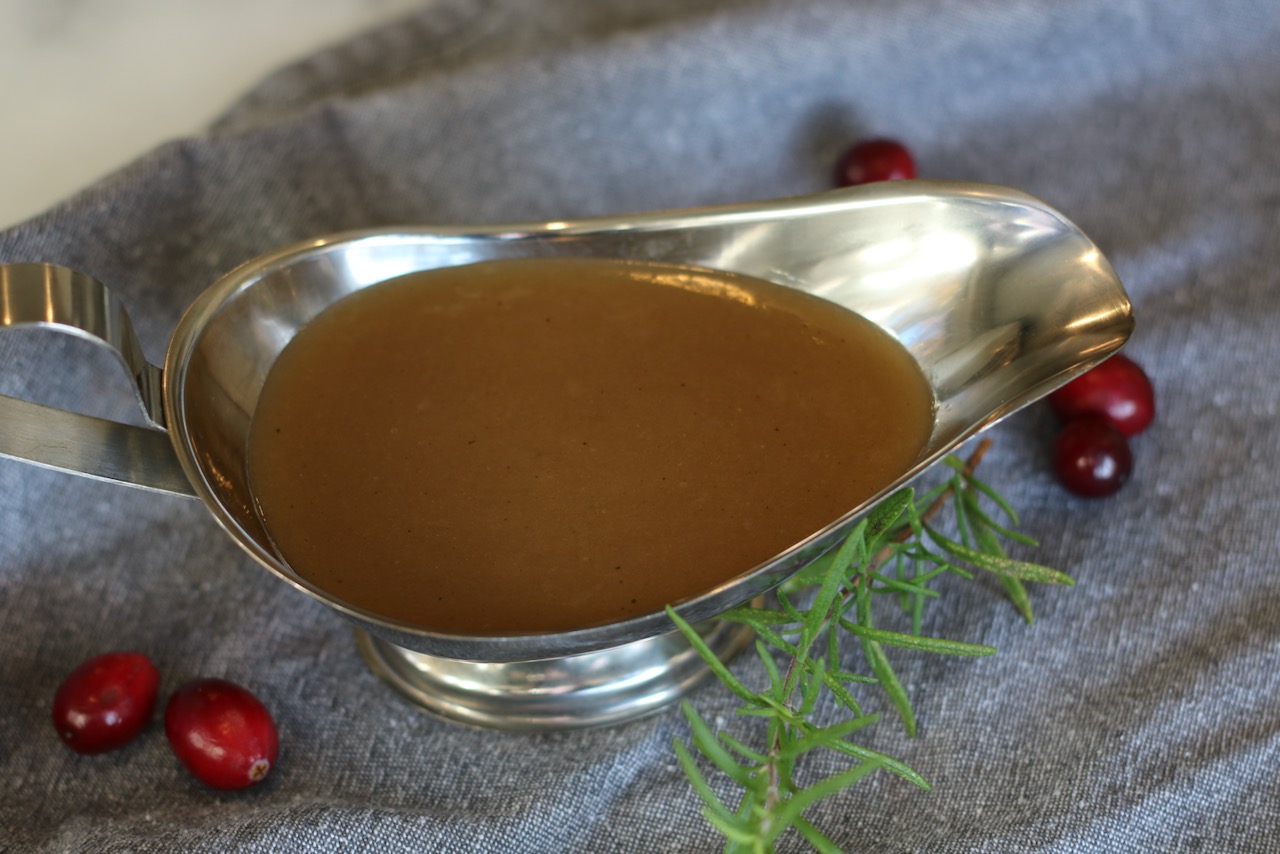
How to make gravy ahead of time and why you should
Crafting the perfect gravy is an art of flavors and textures. It requires several steps, lots of attention and respect but the end result crowns your holiday roast with unparalleled warmth and depth of flavor. Learning the basics of a gravy recipe is the key to a lifetime of good gravy oozing over every roast that adorns your table.
The basics of Making a Gravy
To make gravy, you begin by collecting the flavorful drippings from the roasted turkey (or chicken) and then separating the fat from the drippings. Once separated, you combine the dripping with broth and gradually whisk in a thickening agent such as flour or cornstarch. Then you continually stir until the mixture turns into a thick, rich, velvety consistency. Season to taste.
Imagine this- you have a turkey to carve, potatoes to mash, vegetables to plate, amongst the pile of dishes, pots and pans piling up in your sink…. and now you have to stop and dedicate your full attention for anywhere from 7-10 minutes to make fresh gravy (and actually get it to the table hot.) This is a legitimate challenge. This is why so many people turn to jarred and dehydrated forms of gravy. I have yet to come across a premed gravy that comes close to homemade so the reality is, you have to make it yourself. It’s just the simple fact of the matter.
So I set out to perfect a gravy that I could make ahead of time.
Make ahead Gravy is a Game Changer for the Cook
Option 1: The “Day of” approach
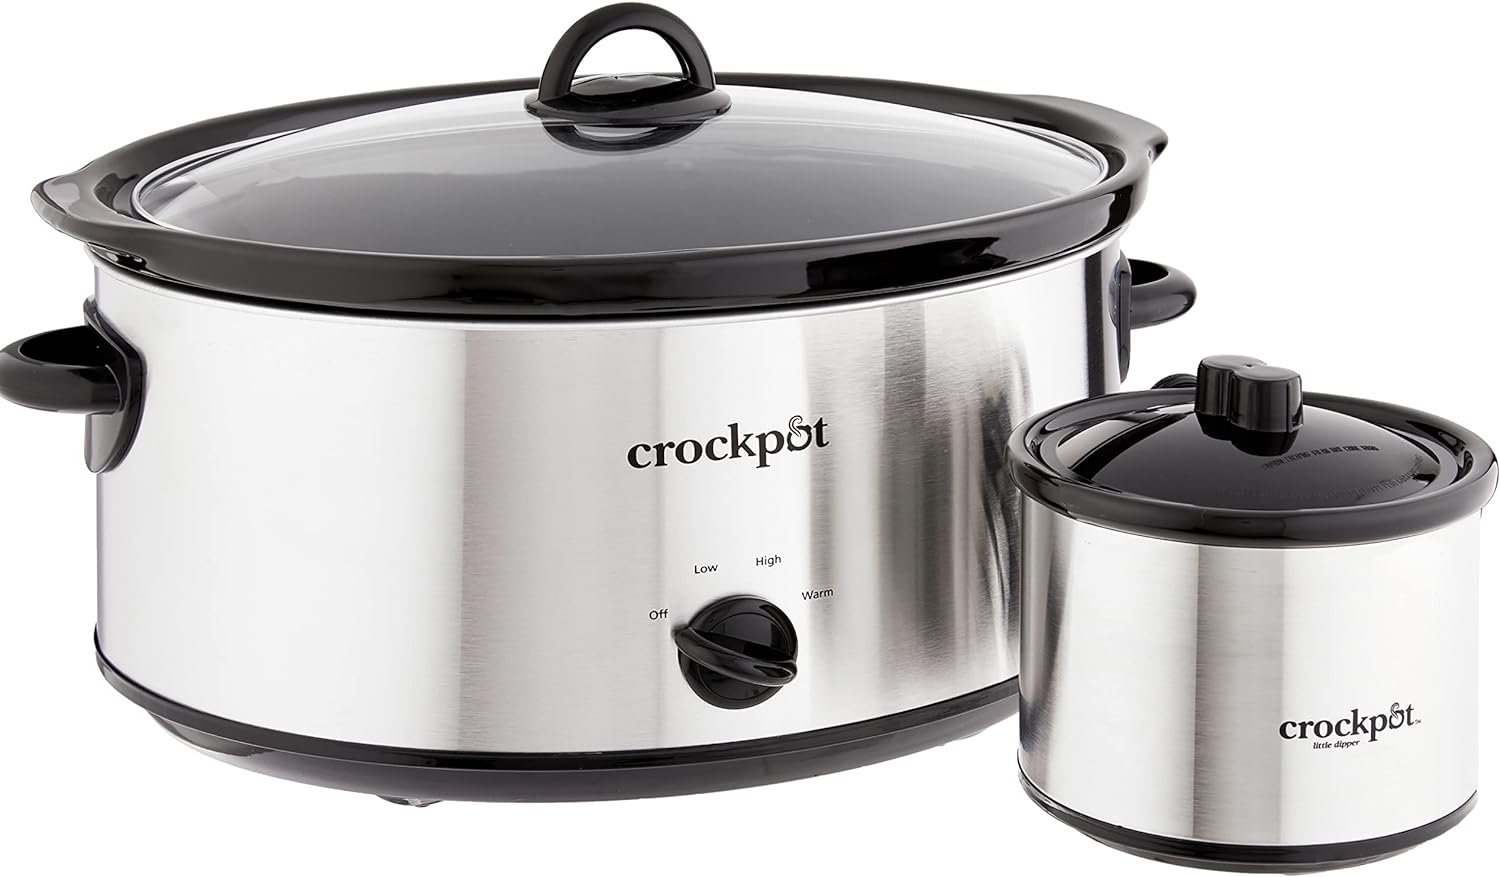
In the “Day of” approach to make ahead gravy, simply to make it ahead of time the day you are serving it. This is for those serious cooks who understand a Turkey should rest for at least two hours or more before attempting to carve and serve it. (Gordon Ramsay advises to rest a turkey for as long as it cooks and because he is the world’s most recognized and decorated Chef, I’m going to go with him on this and not my mother’s approach of oven to table!) While the turkey or chicken is resting, this gives you plenty of time work with the drippings and make a gravy and keep it warm until time to serve. I this case, I recommend a mini slow cooker. It works perfectly for keeping the gravy hot for hours.
Option 2: The “Make Ahead” gravy approach
I often make gravy weeks in advance so I don’t need to worry about it at all on the big day. It does take advance planning and some effort, but the results are worth it. Here is how you do it:
Step 1- Advance Roasting for Drippings
Up to 3 months in advance, roast a whole chicken, chicken parts, a turkey or turkey parts. The goal here is to collect as many droppings as possible so a turkey breast or white meats parts are not what you want to use here- you need a whole bird or dark meat to produce a good amount of delicious drippings. (Plan a meal around your roasting, but reserve the drippings because that is what we are after. I usually make chicken salad, sandwiches or soup with the meat.)
Step 2- Strain the Drippings
Pass the drippings through a sieve to produce a clean liquid, free from bits and pieces that have no business in our gravy.
Step 3- Separate the Drippings
If you have a gravy separator, now is the time to use it to remove the fat and then portion out your drippings. If you do not have a separator, refrigerate the drippings in glass. After the drippings set, the fat will rise to the top and harden. I leave it overnight. Skim and discard the fat layer. The drippings will have hardened and become gelatinous. Separate the drippings in 1/4 cup portions, or any portion you choose
Step 4- Make & Freeze Gravy
You have a choice to either freeze the drippings so they are ready to make the gravy when you want to. Or, make the gravy entirely and then freeze. If you are going to make the gravy to freeze, follow this recipe:
Recipe
Add 2 tablespoons (or up to 1/4 cup depending on how savory you like the gravy) to a small sauce pan and heat until liquified.
Add 2 cups of good quality Turkey or Chicken broth and bring to a gentle simmer.
Meanwhile, in a small bowl or cup, combine 1/4 cup cold water and 2 tablespoons of Corn Starch and mix until smooth. Whisk the cornstarch mixture into the hot liquid.
Stirring constantly, bring to a gentle boil for one minute.
Season with Salt & Pepper to taste.
Let it cool completely and freeze. It will become gelatinous.
Note: These portions may need to be altered based on the brand of ingredients you are using and the consistency you want to achieve.
Step 5- Reheating
Defrost in the refrigerator 1-2 days in advance of using. When ready to serve, place the gravy in a small sauce pan. The gravy will hold the shape of the storage container. Don’t panic! This is right. Reheat the gravy slowly, over a low heat. Once it starts to break down and loosen up, you can use an immersion blender or simply continue to whisk- it will return to its proper consistency. Once hot and silky smooth, it is ready to serve.
Pro Tip!
Clear off your stove top and set your gravy aside until ready to serve by using a mini slow cooker, typically used for dips and fondue. It keeps the gravy nice and hot for hours. Simply make the gravy 30 min to an hour in advance of needing it and then I transfer it to the mini pot.
A mini crock pot typically used for dips will keep gravy hot for hours
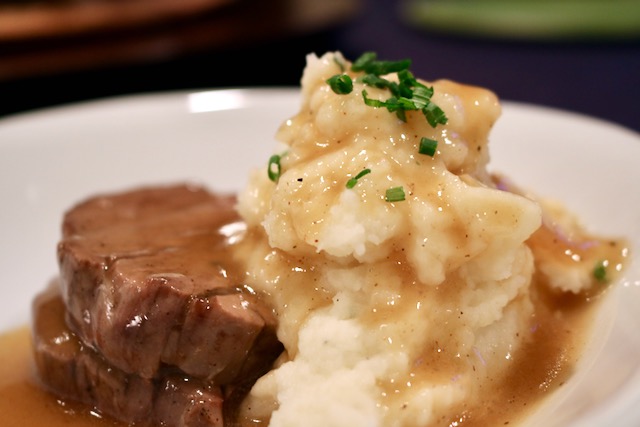
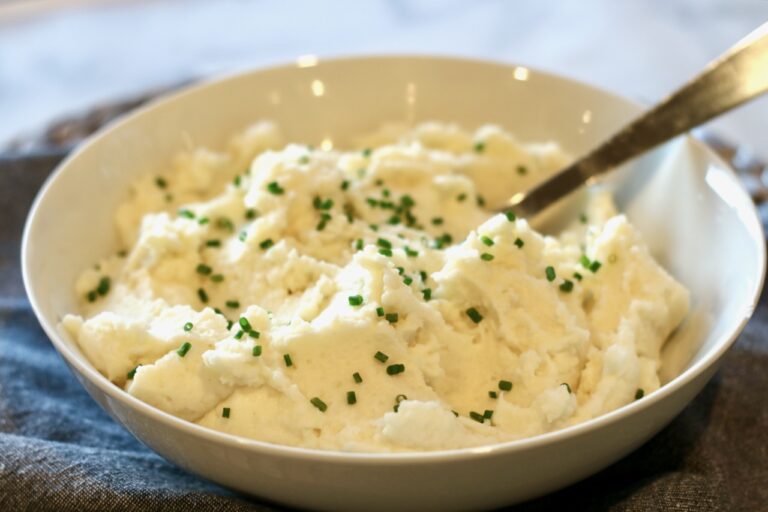
Make Ahead Mashed Potatoes
Light, fluffy mashed potatoes are everyone’s favorite side dish! With these tips for make ahead mashed potatoes, the cook can enjoy the mash as much as the guests.
[vc_row][vc_column][vc_custom_heading text=”Be the hostess with the mostest” font_container=”tag:h2|text_align:left|color:%23e69b10″ use_theme_fonts=”yes”][mk_dropcaps style=”fancy-style” background_color=”#727272″]W[/mk_dropcaps][vc_column_text css=”.vc_custom_1546966115711{margin-bottom: 0px !important;}”]When entertaining for any crowd, large or small, I try and get as much done as possible before my guests arrive. The less I have to do when my guests are here, the more smoothly my day or evening goes, and the better time I have!
Of course, there are always things that I need to do last minute, but the less of them there are, the more successful my event is.[/vc_column_text][mk_blockquote font_family=”none”]There is nothing worse than walking into an awkwardly silent home![/mk_blockquote][vc_single_image image=”2874″ img_size=”640xx480″ add_caption=”yes” alignment=”center”][vc_column_text css=”.vc_custom_1546966129816{margin-bottom: 0px !important;}”]Here are some of the things I have learned to always do to ensure a great time and fantastic meal![/vc_column_text][vc_custom_heading text=”Feaster’s Tips:” font_container=”tag:h2|text_align:left|color:%23e69b10″ use_theme_fonts=”yes”][vc_column_text css=”.vc_custom_1546965477904{margin-bottom: 0px !important;}”]
I love to pick a theme and build the menu, cocktails and decor around it. I love hosting Italian Night where I play Italian music, serve classic chicken parmesan and garlic bread on a red check table cloth and pair it with a delicious Barolo or Chianti.
I plan a menu that can be mostly prepped or prepared ahead of time and I choose things that can cooked at the same temperature. That last part is every important!
I platter anything that will be served cold or room temperature into serving bowls or serving dishes ahead of time. These are things like cheese platters, condiments that will be served in bowls, shrimp cocktail, and so on. I store everything right on or in the platter. This reduces clean up, and makes it easy to serve.
I always make sure to have an empty sink and dishwasher before anyone arrives. This will make clean up throughout the event go more swiftly.
I always make sure to have empty trash and recycling bins before the start of my event.
I set the table or buffet well in advance. Usually do this at least one day ahead of time, but for larger events, I have done it 3-4 days in advance to help me visualize how the event will go and what is missing.
For parties and events that I know are coming up, I shop for all dry goods and beverages weeks in advance. This is especially helpful during the holiday season when stores are full and we are all always in a rush. It just makes shopping for the fresh ingredients more enjoyable.
I start making ice about one week in advance and bag it in zip locks to be sure we have enough for cocktails.
[/vc_column_text][/vc_column][/vc_row][vc_row][vc_column][vc_column_text css=”.vc_custom_1546966166539{margin-bottom: 0px !important;}”]My number one rule for hosting anything from a date night for two to a party of epic proportions, is to always make sure music is playing when someone steps through the door! Music is the best way to set the tone for your event and immediately helps people feel comfortable and at ease.[/vc_column_text][/vc_column][/vc_row][vc_row][vc_column][/vc_column][/vc_row]
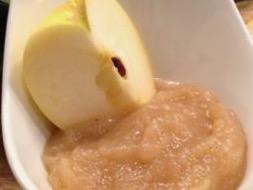
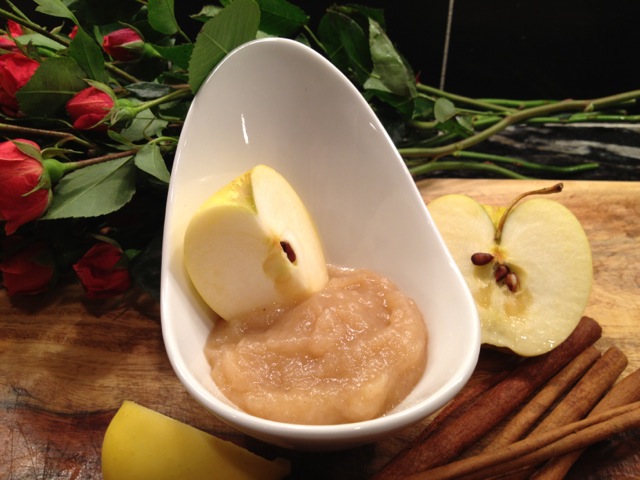
There are some aromas that come from the kitchen that permeate a house and bring comfort to the soul. Roasted chicken, mulled wine and applesauce are among my favorites. When I was growing up, my mom made applesauce every fall when apples were found everywhere in New York state. I’ve kept the tradition alive and I honestly have no idea why I don’t make it all year long! I guess only making it during the fall is what makes it special.
Homemade apple sauce couldn’t be easier to make, and there isn’t a person, of any age, who won’t be scraping the bottom of the jar.
All you need to do is find some fresh, crisp apples, peel, core and toss them in a heavy bottomed pot. Add about a quarter cup of water, a pinch of cinnamon, and pinch of sugar. Then walk away and let the smell of simmering apples fill your home.
Occasionally, give it a stir. Add more water if needed just to keep it from burning. As it breaks down, you can smash with a potato masher to help it along. That’s it. Its done. Taste for seasoning.
If you prefer a smooth apple sauce, you can puree it with an immersion blender. If you like it chunky, just stop cooking it when reaches your desired level of chunkiness. It’s all about your preference.
Homemade applesauce is one of those simple, culinary joys in life, that I am most grateful for. Thanks Mom!
1/4cupsugar(optional if you prefer enhanced sweetness)
Instructions
In a heavy bottomed pot (or whatever saucepan you have) combine apples, water and cinnamon. Bring to a boil over medium, to medium-high, heat. Reduce heat, and simmer. Stir occasionally to prevent burning.
If the sauce is starting to stick, add a 1/4 cup of water as needed.
Once apples have broken down, you can help them along with a potato masher, if desired. If you are seeking a smooth consistency, use an immersion blender.
Taste for seasoning and adjust. Different apple types have different sugar content so if more sweetness is needed, stir in some sugar and let it cook for another 5-10 minutes on low. (Sugar is rarely needed but it is a preference.)
[vc_row][vc_column][mk_dropcaps style=”fancy-style” background_color=”#727272″]I[/mk_dropcaps][vc_column_text css=”.vc_custom_1523050991039{margin-bottom: 0px !important;}”]t’s not just the food that has made Terra a favorite for me. (Although it’s a huge factor.) It’s the food combined with the exceptional service and the relaxing atmosphere. We love to sit out on the patio in the summer and watch the passers by stroll down Greenwich Avenue or inside in the winter months where the smell of the roasting chicken in the brick oven tantalizes your taste buds. I forget about time when we are there and we can just sit back, relax and enjoy. All these things combines makes Terra a top choice for us when dining out.
SaveSave[/vc_column_text][/vc_column][/vc_row][vc_row][vc_column][vc_media_grid element_width=”6″ initial_loading_animation=”none” grid_id=”vc_gid:1526757244299-81f7a3bc-0893-9″ include=”2516,2517″][/vc_column][/vc_row][vc_row][vc_column][vc_column_text css=”.vc_custom_1526757208884{margin-bottom: 0px !important;}”]The menu offers something for everyone but I do have some favorite dishes. First up, the item I crave the most- Carpaccio of Beef with Arugula, Parmesan, Mushrooms and Truffle Vinaigrette. This dish is impossible for me not to order when we dine at Terra. It has ruined my ability to order carpaccio from anywhere else. Thats it. That’s all I have to say. Its amazing.
On a a cold afternoon, nothing beats the fresh Tomato Soup. It’s like sipping on silk. I make a pretty good tomato soup myself, (if I do say so myself!) but since I started eating Terra’s tomato soup, I don’t even bother to make my own anymore.
[/vc_column_text][vc_single_image image=”2624″ img_size=”large” add_caption=”yes” alignment=”center”][/vc_column][/vc_row][vc_row][vc_column][vc_column_text css=”.vc_custom_1526757214627{margin-bottom: 0px !important;}”]If you not in the mood for a traditional entree and would prefer something lighter, Terra has great personal pizzas. They are thin crust and wood fired right behind the bar. My favorite is crumbled sausage and hot cherry peppers and yes- they are hot!
However, if you are in the mood to dine on a full entrees, you can’t go wrong with anything on the menu. But I do have two personal favorite dishes. The Veal Chop Milanese and the Roast Chicken. Terra does Veal Chop Milanese ‘right.’ If you are a veal lover like myself, you will know what I mean by this. It’s served on the bone, pounded paper thin, breaded, fried and served with lemon. It’s simple and stunning. We order this more than any other entree. But I can’t let it take away from how much I love the Wood Oven Roasted Amish Chicken. Its juicy, crispy, seasoned to perfection- it’s everything roasted chicken should be and never is. I can smell it as I write this and will inevitably crave it until I get to have it again.
I recommend Terra to anyone who is looking to have a nice night out and enjoys high quality food. So next time you are ‘on the Ave,’ as we locals say, don’t let Terra pass you by![/vc_column_text][/vc_column][/vc_row][vc_row][vc_column][vc_custom_heading text=”Recommended for:” use_theme_fonts=”yes”][mk_custom_list style=”mk-icon-ok”]
Upscale Food: Italian, Mediterranean
Good for Couples: (not great for large groups.)
Patio in Summer: It’s not very big, but if you can snag a table during summer it’s a plus.
Customer Service: Exceptional
Location: Doesn’t get much better than being on Greenwich Avenue
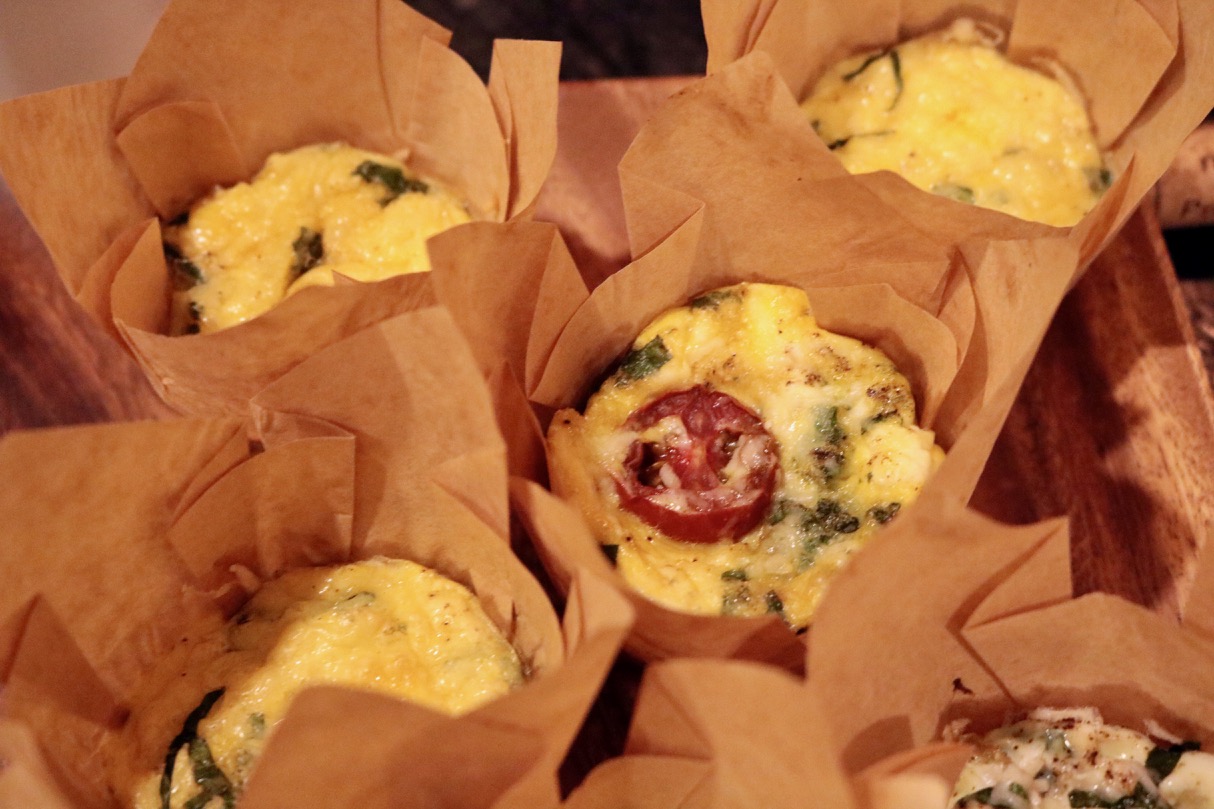
It wasn’t too long ago that I had friends coming in from out of town and I was planning a simple brunch for us to enjoy at home. While doing the shopping, I came across individual frittatas begin sold in a disposable muffin tin for a price too high to believe! This is what inspired this make ahead breakfast idea and ever since that first try, I have been hooked on making my own egg muffins, or more eloquently named, individual egg frittatas.
The flavor combinations are endless. Here is a list of some of my “go-to” combinations.
Spinach, tomato and feta
Ham, caramelized onion and swiss
Mushroom, spinach and gruyere
Bacon, potato and cheddar
Broccoli & cheddar
The thing I love about making individual egg frittatas is that you can make several days worth at once and just simply reheat as needed. Of course you can reheat in the microwave, however I prefer them reheated them in the convection oven at 350 for about 6 – 8 minutes.
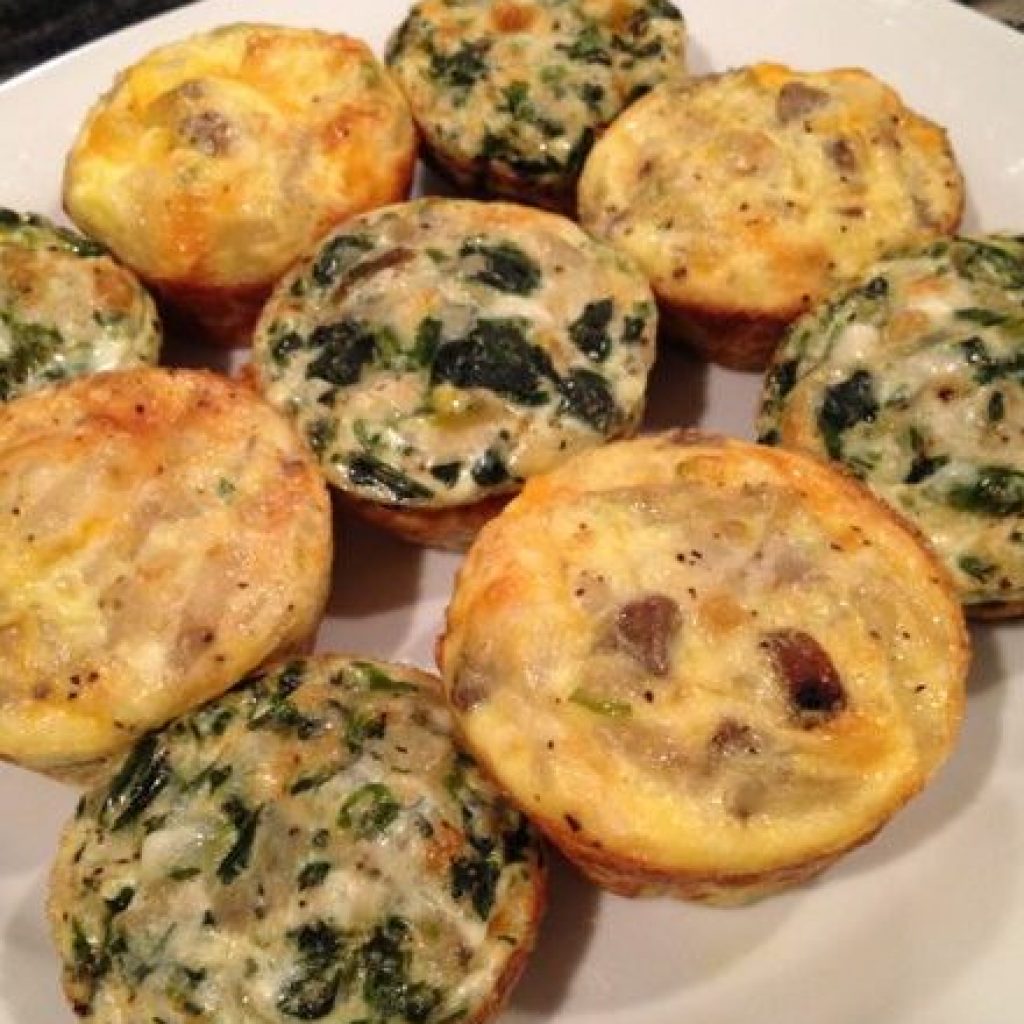
Feaster’s Tip:
Save yourself the time and frustration and learn from my mistakes – use a silicone muffin pan to bake these in to prevent them from sticking and breaking the frittata.
Using a silicone muffin tray works like a dream and the egg never sticks to the pan. They pop right out!
These individual egg frittatas are great for kids and adults and can even be eaten on the go.
I especially make these when I know I have a busy work week so I have no excuse not to eat a homemade breakfast.
6tablespoonsany combination of cooked meats or vegetables(sliced or diced)
6 tbspshredded cheese of choice(approximately)
kosher salt & fresh ground pepper
Instructions
Preheat oven to 400 degrees
Spray a 6 cup Silicone muffin tray lightly with olive oil spray. Set aside.
Whisk 4 large or extra large eggs.
Fill each cup 2/3 of the way up with egg mixture. (The eggs puff up considerably when cooking so DO NOT OVERFILL.)
Add your cooked and seasoned meats, vegetables and cheeses to each egg cup. Swirl in ingredients lightly using a toothpick to distribute.
Cook for about 20-22 minutes.
Remove from pan and serve immediatly, or remove and let individual frittats cool on a baking rack then store in fridgerator for up to 3 days for reheating.
Notes
The mini egg frittatas will collapse as they cool. The is normal.
I recently had the pleasure of sharing a glass of wine with a Food Scientist. I wasted no time in asking her all kinds of questions about natural vs organic foods, GMO vs non-GMO, wild fish vs. farmed fish and fresh food vs processed food. It was a enlightening conversation that I enjoyed very much.
During our conversation, she asked me if I had heard of the book ‘The China Study.” I had told her that I had not. She went on to explain that it is a complicated read, even by her standards, but that she can’t deny the premise of the book which, to summarize, suggests that the more animal protein you consume, the faster the cancer gene is likely to become active.
I found this interesting ‘food for thought.’ I also found it incredibly depressing but also, I wasn’t surprised.
Inspired by this conversation and the new knowledge that I had, I have been challenging myself to cut down on my meat intake. I didn’t think it would be that hard because I really love vegetables. As it turns out, despite that I enjoy eating vegetables and even have a abundant vegetable garden, it’s been much more difficult than I had anticipated to reduce my animal protein intake.
After struggling to make this dietary change, which was not a removal of meat from my diet, but rather a reduction, I realized just how addicted we are to consuming animal protein as our primary food intake. In a continued effort to move away from the meat but still feel satisfied, I threw myself into research about fish to see how it compared to the negative health impact of meat consumption. My greatest fears were realized that fish is just as bad as meat to consume on a regular basis.
What’s one to eat when one is love with clams, and roasted chicken, and a really great steak?
This little experiment of mine to reduce my animal protein intake continues to challenge me. It has made me realize, “The China Study” or not, it’s time to expand my weeknight meals to include more vegetables and curb my now recognized addiction to animal protein.
By posting this online for everyone to read, I hope to challenge myself to come up with some great vegetarian meals to share and to inspire you to add more vegetables (raw whenever possible) to your menus.
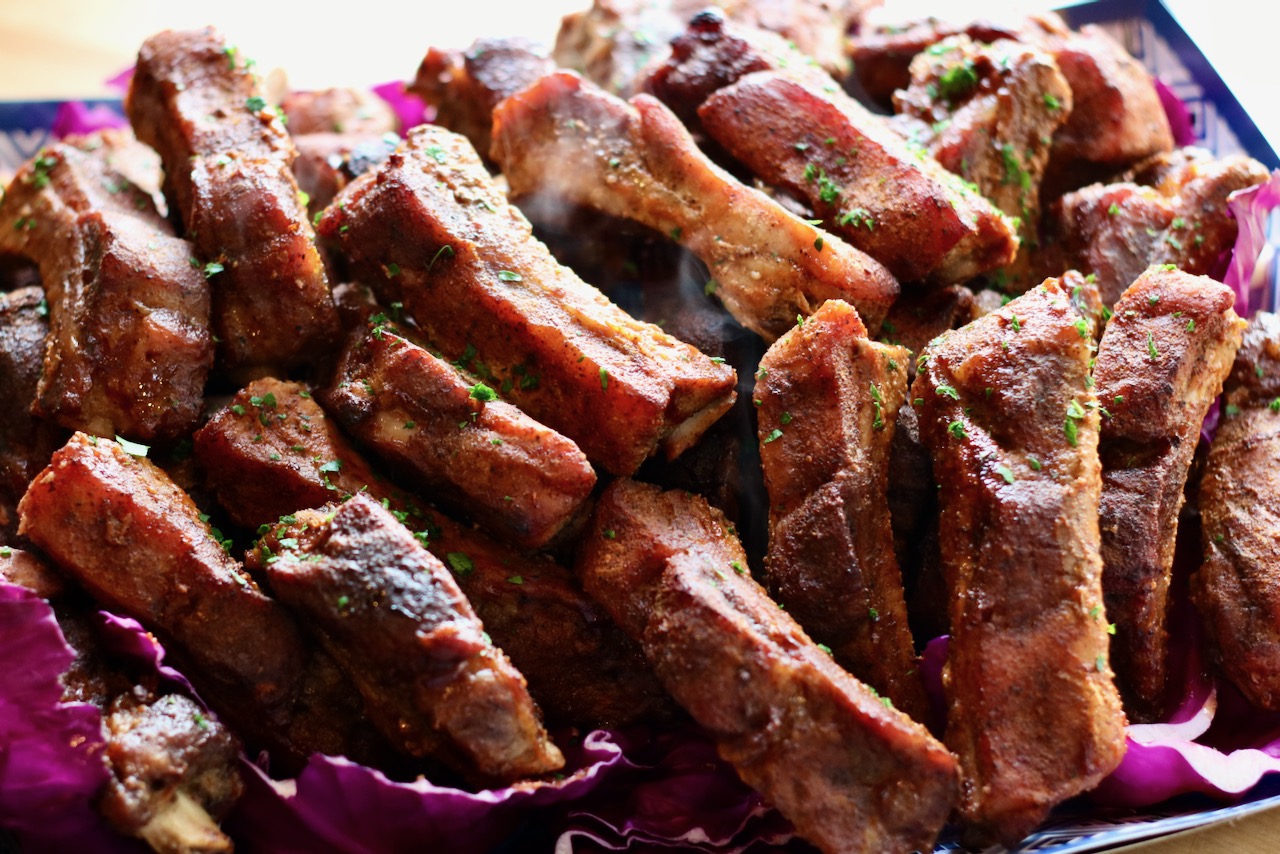
Oh, baby! These mouthwatering barbecue-style baby back ribs are oven-baked, irresistibly tender, and simply put – absolutely delicious!
Few foods rival the satisfaction of sinking your teeth into succulent, tender ribs that melt right off the bone. While barbecue purists might argue that the only way to achieve such perfection is through hours of smoking over low heat, I’m here to tell you that you can achieve that same mouthwatering result right in your own kitchen with this oven-roasted back ribs recipe. I have tested and trusted this recipe technique for years and it is foolproof if you follow all my tips & tricks for perfect baby back ribs!
The key to succulent baby back ribs is cooking them low and slow for about 3 hours – so you do need to plan ahead. However, you can make them a day in advance which is helpful when you are planning to feed a crowd.
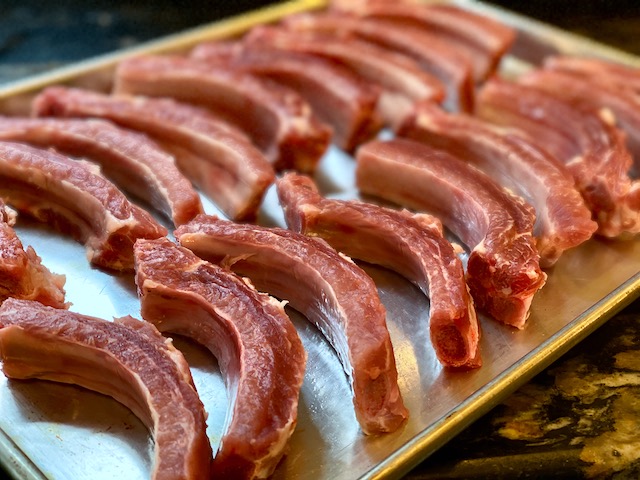
If serving ribs as the primary main course, I estimate 8-10 ribs per person. If serving with other items at a gathering, I estimate about 3 ribs per person.
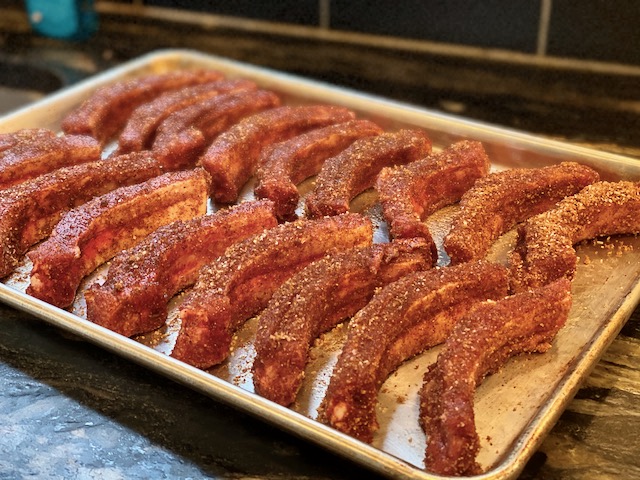
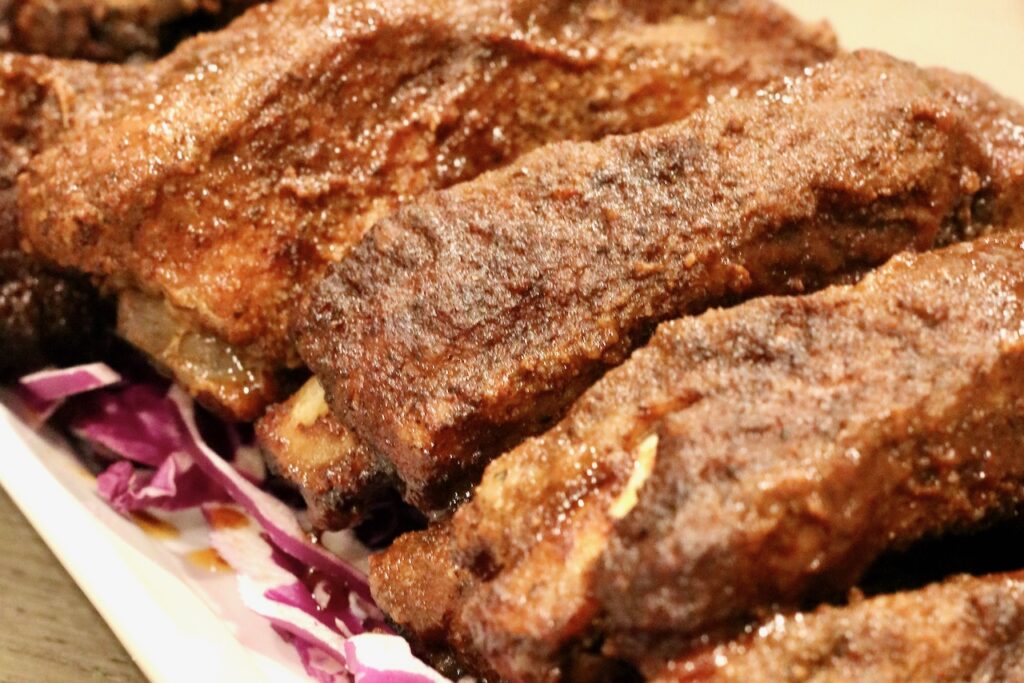
I like to treat each Rib individually, rather than as a whole Rack. You can add a seasoning rub up to 24 hours in advance, or just before baking. Drain the ribs of any rendered fat and excess moisture and let cook. Right before serving, slather with your favorite sauce , heat & serve. Racks of ribs are great. But individual Ribs elevate presentation, impress your guests, and are great for gatherings!
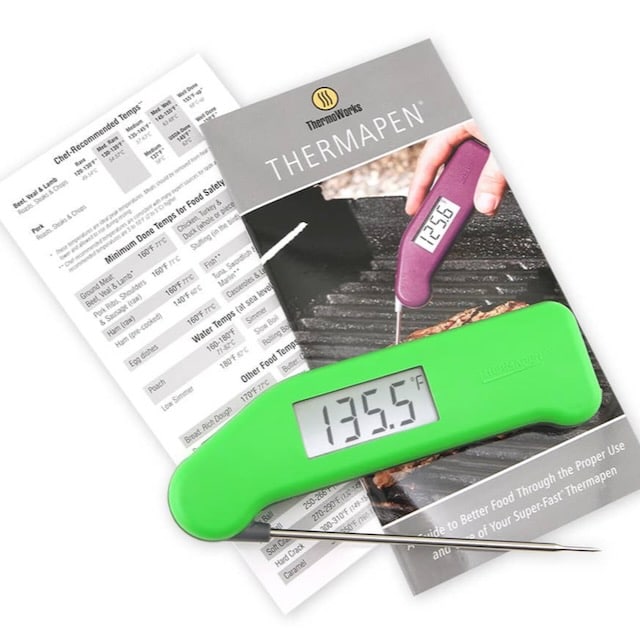
What temperature are Ribs “fall off the bone” ready?
200 – 203°F is the the sweet spot for collagen breakdown and fall off the bone ribs. When the ribs are nearing done, use a digital read thermometer to test the temperature in the thickest part of the ribs. Sometimes this can take longer that you think to reach this temperature but trust me… your patience will pay off!
Thermoworks Thermapen One®
A new standard of accuracy for the discerning cook
The Thermapen® ONE was designed with speed and accuracy in mind. If you are a cook who values precision, this thermometerl will revolutionize your cooking experience.
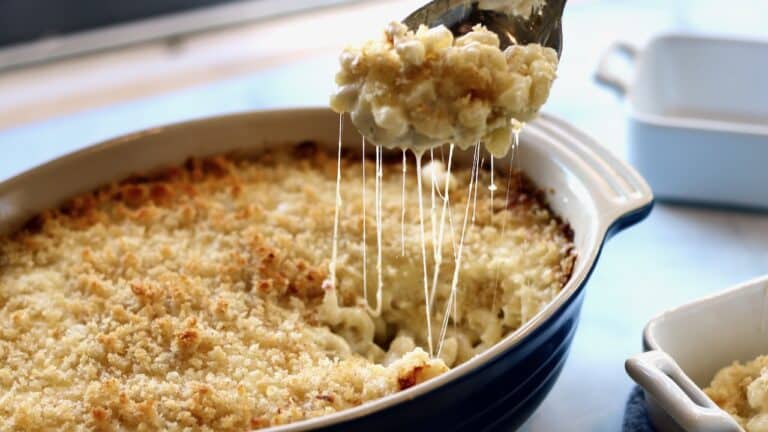
When serving 2-4 people with ribs as the main course, I like to serve Mac & Cheese as the side dish. (Who can resist ribs with mac & cheese? Not this girl!) When serving to a larger crowd such as at a barbecue, I keep it simple and serve cold or room temp side dish such as Potato Salad with Summer Herbs and Vinaigrette or Corn & Basil Salad.
Ina Garten’s Overnight Mac and Cheese
Boil pasta for 4 minutes and combine with cheeses and heavy cream. Let sit overnight overnight then top with more cheese and bake. Ina Garten’s overnight mac & cheese recipe is easy, rich, gooey, and delicious.
If you want to serve individual ribs rather than racks, slice the ribs into individual ribs and cover with dry rub seasoning. Do the same with full racks of ribs.
Line a sheet of foil with a piece of parchment paper. (I don’t like when food touches tin foil. It sticks, effects the flavor and studies have been done regarding health impacts.)
Reassemble the ribs like a puzzle into their original half or full rack formation on the parchment and then wrap tightly into the foil packet.
Cook according to instructions below. Let cool and refrigerate until ready to serve- up to 2 days.
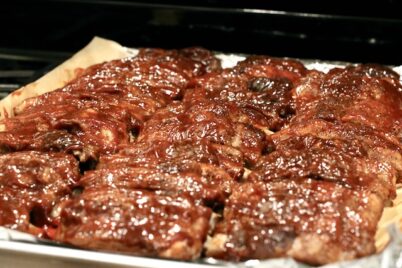
When ready to serve, preheat oven to 400 degrees F. Lay ribs on a parchment lined baking sheet (for easy clean up) and baste ribs with your favorite Barbecue sauce. Bake for about 8-10 minutes until heated through.
Pile high on a serving plater and serve with extra sauce on the side.
These oven baked BBQ ribs will having coming back for seconds
Prep Time10 minutesmins
Cook Time2 hourshrs45 minutesmins
Course: Main Course
Cuisine: American, bbq, southern
Ingredients
Baby Back Ribs
BBQ Sauce (I recommend Sweet Baby Ray’s original BBQ Sauce)
Homemade or store bought rub
Instructions
Preheat oven to 350°F.
Flip the ribs upside down and check to see if the membrane is still in tact. If so, slide a knife under the back membrane until you can rip it back. With a paper towel, grab it and pull. It should come right off. (If you do not know how to do this, there is a video linked below.) Note: Some BBQ enthusiasts don't agree with this step so the rib meat doesn't fall apart. It's totally you're call.
Portion your ribs into your preferred serving sizes. (Singles, doubles, half racks)
Cover the ribs in your favorite dry rub, or make one of your own.
Place the seasoned ribs, meat side up, so there is a "tunnel" underneath them and wrap them loosely-ish in parchment lined tin foil packets. These can be big or small packets accommodating a half or full rack. You essentially want to reassemble them into their original full rack leaning on each other.
Bake at 350°F oven for 45 min. Then, lower temp to 250°F and bake for another 2 hours. Check for doneness. The meat should be very tender, but still attached to the bone. (We aren't making pulled pork here!) If using an instant read thermometer, you are looking to reach a goal temperature of 200°F- 205°F.
If serving immediately, remove the foil and parchment, drain any excess liquid fat that has gathered in the pan and then coat the ribs with BBQ sauce and broil for about 5 minutes to caramelize the sauce. Serve with extra BBQ sauce on the side. If serving at a later time, let cool and refrigerate. When ready to serve, coat with BBQ sauce and bake in a preheated oven at 400F for about 10 minutes or until heated through. Serve with extra BBQ sauce on the side.