Roasted Shrimp Cocktail

roasted shrimp cocktail

Ina’s Garten’s Roasted Shrimp Cocktail is easy & elevated

I make tons of Shrimp Cocktail! Why? Because people love it. When you serve shrimp cocktail at any size gathering, every last piece gets eaten, every time. People. Love. Shrimp. Cocktail.

However, we need to stop for a moment and discuss the quality of most of the shrimp cocktail that is being served out there. Water logged, flavorless excuses for shrimp are not how this delicate seafood should be served. Shrimp Cocktail should be meaty, dry, and slightly briny. It should have tons of flavor all on its own. It should not be wet, and without flavor like those horrid shrimp rings at the grocery store- those just hurt my soul.

It’s very easy to take Shrimp Cocktail to a whole other level, so why not do it? All it takes is good quality shrimp and this recipe. One of the most delicious Shrimp Cocktail recipes out there is Alton Brown’s The Shrimp Cocktail. It’s truly fabulous, but it requires a brine bath, rinsing and drying, which adds extra ingredients, a good deal of time and steps. I rarely make Alton’s recipe unless it’s small batch and prefer a more simple, equally delicious version.

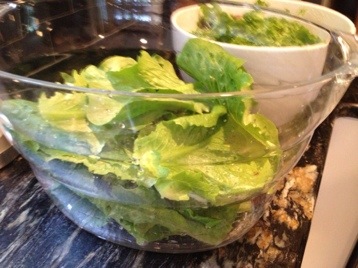
When not committed to a brine and rinse, I recommend this easy Roasted Shrimp Cocktail recipe that is featured in not just one, but two, Ina Garten’s Cookbooks- Back to Basics and Cook Like a Pro.  It couldn’t be easier and is perfect for serving a crowd! Simply clean the shrimp (or buy cleaned), toss with olive oil, salt & pepper, add shrimp to a sheet pan in a single layer and roast for about 8 minutes.

Tips on How to Make Shrimp Cocktail:

  • Source good shrimp.
  • Don’t overcook the shrimp! Shrimp come in different sizes so 8 minutes is a guide. Adjust accordingly and remove from oven when just cooked through.
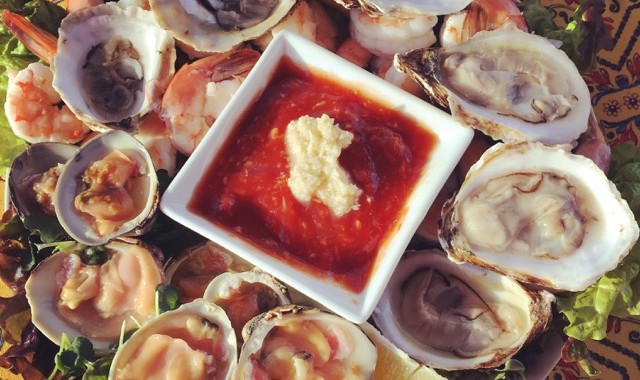
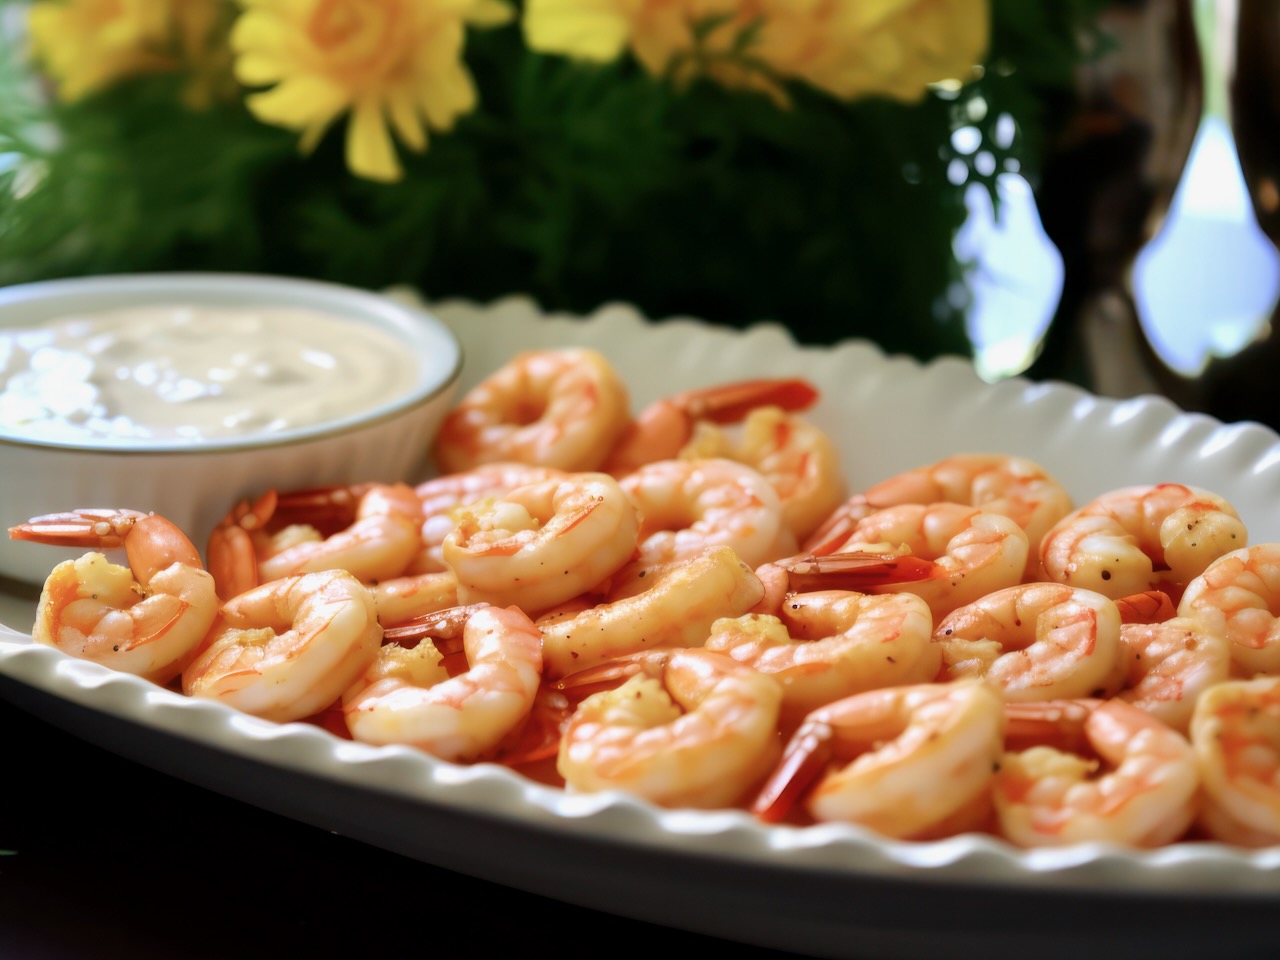
  • Don’t underestimate the importance of a good cocktail sauce. Serve with extra horseradish on the side for those who like it spicy.
  • Garnish with chopped parsley or chives to add some color to the plate.

Looking for a twist on Shrimp Cocktail? Explore More shrimp recipes!

Fresh shrimp, tomato juice, hot sauce, cucumber, & avocado are combined with seasonings to deliver a refreshing and exciting shrimp appetizer. The perfect starter for a summer gathering.
One of my favorite things to grill is shrimp and every single time I make these simple, grilled shrimp I get the same reaction- “WOW! Why are these so good?!”

Roasted Shrimp Cocktail

Roasting shrimp elevates the flavor of the shrimp and brings this simple, classic dish to a whole new level! 
Prep Time10 minutes
Cook Time7 minutes
1 hour
Total Time17 minutes
Course: Appetizer
Cuisine: Seafood

Ingredients

  • 2 lbs 12 to 15-count shrimp
  • 1 tbs olive oil
  • 1/2 tsp kosher salt
  • 1/2 tsp fresh ground black pepper
  • 1 lemon
  • your favorite cocktail sauce

Instructions

  • Preheat the oven to 400 degrees F.
  • Peel and devein the shrimp, leaving the tails on. (Or take ’em off if you prefer!) 
  • Toss them in a bowl with the Olive Oil, Salt & Pepper. Spread them in a single layer on a sheet pan. 
  • Roast for about 8 minutes, flipping once, just until pink and firm and cooked through. Set aside to cool.
  • Serve with lemon wedges and your favorite cocktail sauce. 

Notes

These can be made up to a day in advance. Store in a glass, air tight container. 

Chicken with Forty Cloves

chicken with 40 cloves of garlic

Decadent and Delicious

We have a screened-in porch and after ten years, we finally gave it some much needed attention.  We worked hard at some serious DIY projects and together, we added a pallet wall to the porch, hung hammocks, and built our very own farmhouse style table.  We turned it into the porch we always wanted.

Finally, after months of hard work, it was time for Feast & Merriment with friends and neighbors. The inaugural dinner was one I gave great thought to.  I wanted to create the feeling of being on a farm in France, enjoying intensely flavorful comfort foods, and sipping delicious wines with friends. (Granted, I have yet to make it to the country side of France, but this is what I picture in my head. So I’ll just roll with it.) I finally decided that the star of the evening would be the French classic, Chicken with 40 cloves. 

chicken with 40 cloves on porch

The evening, and the chicken, were simply divine. I recommend this recipe for a special occasion served with a rich and buttery chardonnay.

chicken with 40 cloves of garlic

Tips for this recipe:

  • This is a wonderful recipe, but before you commit to it, you should know that it is an intermediate level recipe and a good amount of work to prepare. You need to commit to it and be sure to carve out enough time.
  • Double or triple the sauce. You won’t regret it.
  • Factor in extra clean up time for after searing off all the chicken- it splatters, takes longer than you think and not something you want to do with company in your kitchen. Once you get past that step, you’ll be on your way!  I recommend searing the chicken, setting it aside, cleaning up, re-grouping, and then you’ll be on your way.

Chicken with Forty Cloves

Prep Time1 hour
Cook Time45 minutes
Total Time1 hour 45 minutes
Course: Main Course
Cuisine: French

Ingredients

  • 3 whole heads garlic, about 40 cloves
  • 2 (3 1/2-pound) chickens, cut into eighths
  • kosher salt
  • freshly ground black pepper
  • 1 tablespoon unsalted butter
  • 2 tablespoons olive oil
  • 3 tablespoons Cognac, divided
  • 1.5 cups dry white wine
  • 1 tbs fresh thyme leaves
  • 2 tbs all-purpose flour
  • 2 tbs heavy cream

Instructions

  • Separate the cloves of garlic and drop them into a pot of boiling water for 60 seconds. Drain the garlic and peel. Set aside.
  • Dry the chicken with paper towels. Season liberally with salt and pepper on both sides.
  • Heat the butter and oil in a large pot or Dutch oven over medium-high heat. In batches, saute the chicken in the fat, skin side down first, until nicely browned, about 3 to 5 minutes on each side. Turn with tongs or a spatula; you don’t want to pierce the skin with a fork.
  • If the fat is burning, turn the heat down to medium. When a batch is done, transfer it to a plate and continue to saute all the chicken in batches. 
  • Remove the last chicken to the plate and add all of the garlic to the pot. Lower the heat and saute for 5 to 10 minutes, turning often, until evenly browned. 
  • Add 2 tablespoons of the Cognac and the wine, return to a boil, and scrape the brown bits from the bottom of the pan. 
  • Return the chicken to the pot with the juices and sprinkle with the thyme leaves. Cover and simmer over the lowest heat for about 30 minutes, until all the chicken is done.
  • Remove the chicken to a platter and cover with aluminum foil to keep warm.
  • In a small bowl, whisk together 1/2 cup of the sauce and the flour and then whisk it back into the sauce in the pot.
  • Raise the heat, add the remaining tablespoon of Cognac and the cream, and boil for 3 minutes. 
  • Add salt and pepper, to taste; it should be very flavorful
  • Pour the sauce and the garlic over the chicken and serve hot.

Notes

Be sure to serve the chicken with a nice, crusty bread to soak up any remaining sauce. Trust me, you will want to. 

Egg-cellent Experiments

Creamed Spinach Baked Eggs

We love a good bacon, egg & cheese sandwich at my house. But sometimes you really have to change it up, especially since we have been house bound for most of 2020 and going out for Sunday Brunch has pretty much been pulled off the table. So I’ve been working on sassing up Sunday breakfasts on my own table.

The purpose of this post is to share some of my experiments in the kitchen to get that creative culinary mind of yours going, and thinking of new ways to serve up eggs at your house.

I’ve tried making eggs so many ways over this past year in quarantine, and I have learned so much, that I want to share some of it with you.

What I have learned

I’ve learned that baked eggs are hard to make. The whites never set before the yolks are well over cooked. I tried different size baking dishes, about 8 different recipes, I tried different locations in the oven and of course different temperatures. None of it worked. I became determined and realized the best way to control the doneness of baked eggs is to separate the whites from the yolks and add the yolks only after the whites start to set.


I’ve learned the exact timing of boiling eggs to get perfectly jammy yolks and well cooked whites. (Add the eggs to cold water and bring the water to a boil. When the water starts to boil, start a timer for 3 minutes. Remove the eggs and let rest for a minute or two until cool enough to handle. Perfectly jammy eggs. Every time.)

I have learned that a good hash is equally rustic and impressive. Hash is simply seasoned potatoes of any variety mixed with whatever vegetables you have on hand, seasoned with whatever you want to season it with, and it always seems to go great with eggs.

I’ve learned that the only thing better than a Bacon, Egg & Cheese sandwich is a mini Bacon, Egg & Cheese sandwich.


I’ve learned that breakfast Crostinis are an awesome addition to any Sunday morning! Especially if you have some leftover steak. (Learn the basics on how to make crostini here.)

I’ve learned that Hollandaise Sauce is not that hard to make. Now, I’m making Eggs Benedict whenever I get the chance.

I learned that you can use a pre-made flatbread and make a breakfast pizza. Next time I’ll use a béchamel sauce on it too.

I learned that I really do love a creamy, custardy quiche. Who can resist it?


Tips on Buying Eggs

Eggs are really not where you want to pinch your pennies. Mass produced, generic supermarket eggs come from chicken warehouses that are seriously repulsive if you care to do the research. The nutritional composition of low quality eggs is…well, low. The chickens are fed poor quality, soy supplemented, feed. They are given a variety of antibiotics to stop the spread of the high amount of diseases caused from the chickens being forced to live in incredibly crowded quarters. They are given hormones to help them produce more eggs. All of the antibiotics and hormones and lack of ability to move naturally or lay eggs naturally, gets passed on to us, the eaters.

Don’t be fooled by terms like “natural” and “free-range.” Free Range often refers to the ability for the chicken to move. That could mean they can move 5 inches. It can mean they have access to a single exit and entrance of the chicken coop for 5000 birds. It’s not a quality indicator.

Instead, look for eggs that indicate how much free range space is given. Good eggs will also indicate if the eggs are soy free, if the chickens are pasture raised. And look for vegetarian fed diets.

Utility Eggs vs Farm Eggs

The chicken’s diet is a direct indicator of the color of the yolk. Typically, the healthier the chicken and the healthier the diet, the more intensely yellow the yolk will be.

In the image below, left is a basic utility egg. On the right is a farm egg. Note the intensity of color of the yolk in the farm egg and the clarity of the whites compared to the basic egg.

My preferred Eggs

I have a few local farms and farmers markets near me so I usually buy my eggs there. However, sometimes I need to buy them from the grocery store. When I do, my preferred brand is Oliver’s Organic Eggs. They are pastured raised, vegetarian fed, soy free, give no hormones, antibiotics and do not liven cages. They are provided over 70 ft of pasture per hen. I’m a fan.

Aweee Shucks!

For the love and learning of shellfish

We love shellfish around here. All of it- any kind, prepared any way. But we really love fresh shucked oysters and clams. We’ve been working on mastering the art of shucking- and let me tell you, it ain’t easy! We are finally making strides in this department this picture certainly proves that!

Oyster Resources and Recommendations:

Check out Oysterology.com  It’s an incredible resource and their database is unbelievable.

Learn more about the history of Oysters

Oysters played a big role in history. This books talks specifically their presence in New York City many years ago. Get your read on- The Big Oyster

The best Oysters in Westchester.

Saltaire Oyster Bar in Port Chester, NY. Hands down- the best oysters around. Be sure to make a reservation first – the secret is out.

Best Oysters are best for beginners.

Typically West Coast Oysters are what I recommend. They tend to be smaller and less briny.

Roasted Oyster Recipe

Roasted Oysters in Tray
Print Recipe
5 from 2 votes

Roasted Oysters

These baked oysters are succulent and rich and oh so delicious! 
Prep Time35 minutes
Cook Time10 minutes
Total Time45 minutes
Course: Appetizer
Cuisine: Seafood
Keyword: oysters

Ingredients

  • 1 stick butter
  • 1/4 cup finely chopped fresh parsley (and/or any combination of basil, tarragon or chives)
  • 1/8 cup minced celery with leaves (optional, but recommend!)
  • 2 tablespoons finely minced shallots
  • 1 1/2 teaspoons grated lemon zest
  • 1 tablespoon finely minced garlic
  • Kosher salt and freshly ground pepper
  • 3 ounces gruyere cheese (or similar nutty cheese)
  • Sprinkle of breadcrumbs- optional
  • 12-24 fresh oysters (in the shell)

Instructions

  • If you have a oyster roasting pan now is the time to use that! If you don’t, prepare a baking sheet with a roasting grate to support the oysters, or make a bed of dried rice or rock salt to nestle the oysters into on the sheet pan to keep them supported so they do not spill their liquor or the butter sauce you will add.
  • Preheat the oven to 425 degrees F. 
  • Open the oysters with an oyster knife. (if you don’t know how to safely do this, don’t make this recipe!)  
  • Meanwhile, melt together the butter, herbs, shallots, lemon zest, garlic and a dash of salt and pepper. (Feel free to add a dash of white wine) Be careful not to burn the butter sauce but cook it enough to cook down the shallots and garlic. 
  • Once all oysters are in place on your roasting tray, add a heaping teaspoon of the melted butter mixture on top of each oyster. Top with about a teaspoon of shredded cheese followed by a pinch of breadcrumbs, if using. 
  • Roast the oysters until the the oysters are just cooked through and the cheese is melted and turning golden brown. (About 8 to 10 minutes) Serve immediately.

Notes

If your cheese is not browning or you really want a nice dark brown color, Put the oysters on broil for the last 2 minutes.  

Chicken Scarpariello

Chicken Scarpariello

Chicken Scarpariello is a classic Italian dish, often served family style. It is made with Chicken, hot or sweet Italian Sausage,  bell peppers, onions, potatoes and hot cherry peppers. It is a great dish for feeding a crowd- if you can handle the heat!

This recipe takes some time at the stove so plan accordingly. I also don’t feel right not telling you that there is a significant splatter effect that takes place while searing the sausage. However, once all these ingredients are put together in the pot, the flavors come together for a spicy, sweet, savory dish. You can find Chicken Scarpariello at many Italian restaurants, but this recipe is so much better than what you would get out.

The Recipe

Chicken Scarpariello

This chicken recipe is savory and spicy and fit for a crowd! 
Prep Time40 minutes
Cook Time1 hour
Total Time1 hour 20 minutes
Course: Main Course
Cuisine: Italian

Ingredients

  • 1/4 cup olive oil
  • 1.5 lbs chicken cut into small serving pieces
  • .5 lb Italian sausage cut in 1-inch pieces (sweet or hot or both)
  • 1 small red bell pepper julienned
  • 2 garlic cloves minced and crushed
  • 3 hot cherry peppers sliced (bottled in vinegar)
  • 1 onion sliced
  • 1⁄2 1/2 teaspoon salt
  • 1⁄8 tsp fresh ground black pepper
  • 1 tbsp fresh rosemary leaves crushed
  • .5 cup chicken broth canned or fresh
  • 1/4 cup dry white wine such as Pinot Grigio
  • 1 tbsp all-purpose flour
  • 1 tsp fresh lemon juice
  • 1 potatoes peeled and diced into 1 inch cubes or similar
  • 1 lb fresh mushrooms sliced (optional)

Instructions

  • In a deep skillet or dutch oven, heat oil. Add chicken and sausage in batches; brown on all sides. removing pieces to a plate as they brown. (be careful of the splatters.) 
  • Drain oil leaving 2 tablespoons of the drippings in the pan. Over medium heat, add the mushrooms, red bell peppers, sliced cherry peppers, onion, potatoes, and garlic; saute until tender.
  • Return chicken and sausage to skillet. Add salt, black pepper, the rosemary , the broth, the wine, and lemon juice. 
  • Bring to a boil; lower heat and simmer, covered, until chicken is tender, about 25 minutes.
  • Remove chicken and sausage from skillet; arrange on a warm serving platter.
  • Skim excess fat from mixture. In a small glass cup, mix flour (or cornstarch) with 1/4 cup water until blended. Stir into liquid in skillet. Bring to a boil while stirring constantly for about 1 minute, or until mixture thickens.
  • Add meat back into sauce or spoon sauce over chicken and sausage, garnish with fresh chopped parsley and serve with crusty bread.

Notes

Use sweet sauce and reduce the hot peppers to control the spice level, keeping in mind that the recipe is intended to be a spicy dish. (Not recommended for people who like mild foods.)

The Perfect Pizzelle

Italian pizzelle cookie

Pizzelles are a traditional Italian treat, best described as a ‘waffle cookie.’ They are super thin, crispy and insanely addicting! When you are cooking them, they produce the same smell that leaves your mouth watering when you smell the Belgium waffles cooking on the side of a ski slope. (If you’ve never experienced that smell, trust me when I tell you that there is no better smell!)

But what is it? A pizzelle is basically a waffle cone. (And who doesn’t love a waffle cone?) The ingredients are mixed together to become a batter and then cooked on a special waffle iron. When they come off the iron, they are pliable and can either let them set as a cookie, or they can be formed and left to set into the shape of a cone. They can also be rolled and used as for making cannolis.

My absolute favorite cookie to make (and eat!) are Classic Italian Pizzelle Cookies!

I grew up eating pizzelles and I will grow old eating pizzelles. But I don’t just love eating this classic cookie, I love making them too.

Unfortunately, you did need special equipment to make pizzelle cookies.  They make a variety of waffle irons to choose from including non-stick and light-weight options. Personally, I am old school and my pizzelle iron is heavy-duty, cast aluminum version and very similar to the one that I remember my great-grandma using. I believe somethings just shouldn’t change and this is one of them. If you ever decide to invest in a pizzelle iron, you will be able to enjoy making these traditional Italian cookies for family, friends, neighbors and more for many years to come. It’s one kitchen appliance that I really enjoy owning and I think you will too!

This is the pizzelle iron I own and recommend:

If you are a traditionalist in the kitchen and interested in buying a Pizzelle maker, I included a link to the one I own. I purchased it from Amazon many years ago and have used it countless times.  I can recommend this product with confidence to anyone looking to purchase one for themselves, or as a gift for the cook in their life. 🙂

Feaster’s Tip:

Use a pancake batter dispenser for the pizzelle batter. It works like a dream and makes the process of dolloping the batter onto the iron much faster and more consistent.

Classic Italian Pizzelle

Prep Time5 minutes
Cook Time1 hour
Total Time1 hour 5 minutes
Course: Dessert

Ingredients

  • 3 large eggs
  • 3/4 cup sugar
  • 3/8 tsp kosher salt
  • 1 tsp real vanilla extract (or anise if preferred)
  • 1 3/4 cups all-purpose flour
  • 2 tsp baking powder
  • 8 tbsp melted butter

Instructions

  • Beat the eggs, sugar, salt, and vanilla until well combined and smooth. (about 4  minutes on kitchen aid low setting)
  • Stir in the flour and baking powder, mixing until smooth.
  • Stir in the melted butter and mix until smooth.
  • Heat your pizzelle iron and lightly grease with vegetable or canola oil. 
  • Add about a tablespoon of batter to the center of the pizzelle iron and press for about 45 seconds or until golden brown. 
  • Carefully remove the pizzelle and place on to a cooling rack. 
  •  Once cooled, dust with confectioner’s sugar. 

Notes

Once cookies are cooled completely, they can be stored in an air tight container for at least one week.

Cooking out of my comfort zone

Last year was a looooong year. My attention was focused on my day job- I over committed myself to committees and projects and social obligations. It left me overwhelmed and with no time to spend on myself, traveling or working on any of my hobbies- like Feast & Merriment! But it’s a new year, and although my work schedule hasn’t changed much, I am over take-out and boring pan-seared chicken. So, I am committed to make the time to cook and to cook what I love. I am resolved to try new recipes and have my meals be totally and completely ‘Sassyfying!’

One of the recent challenges I embarked on was a rack of lamb. I love lamb- I always have. I grew up eating it with my grandmother. My uncle would sear individual loin lamb chops in a cast iron pan with olive oil, salt and pepper to an even medium. She liked them ‘pink’ inside, and we ate them with classic mint jelly. (Mint jelly is no longer my favorite sauce, but back them it was delicious and marked a special occasion!)

Remember to step out of your comfort zone in the kitchen once in a while. If you don’t, you’ll be stuck making the same ‘ole things all the time.

I’ve grilled and pan seared lamb over the years, but I never roasted a rack. No particular reason except that it’s expensive and I was scared to screw it up. But how do you learn if you don’t try- right? I did not head out to the butcher expecting to come home with a rack of lamb- it wasn’t even on my radar. But it was featured and on sale and decided to be impulsive.

I brought it down to room temperature and made a herb rub for it. I melted some butter and olive oil together, added minced garlic, chopped parsley, chopped rosemary, salt, pepper, dried thyme, dry mustard and lemon zest. I mixed it together to a paste consistency (tasted it) and then rubbed it all over the lamb. I let it sit for about an hour until ready to roast.

I heated the oven to 425 and cooked the roast, fat side up, for about 30 minutes- checking it for doneness every few minutes since I wasn’t sure how long it would take. Once I decided to pull it out, I let it rest for 10 minutes before slicing. I decided to serve a very good quality, thick, tzatziki sauce in place of a mint sauce- it was an excellent decision and I can imagine having lamb with out tzatziki again.

In conclusion, remember to step out of your comfort zone in the kitchen once in a while. If you don’t, you’ll be stuck making the same ‘ole things all the time. I stepped out of my comfort zone with this lamb and it was well worth the risk. I can’t wait to make it again!

Key Lime Pie

A slice of the Florida Keys

Sometimes cooking something that reminds you of someone, something, or some place, is a great way to remember and relive experiences. It’s certainly not the same, but it’s a great way to transport yourself or bring those memories into your home. For me, a slice of Key Lime Pie helped fill my soul on this cold, NY Sunday with a slice of Key West Life.

Key West, Florida is our favorite place in the world- and we don’t get there nearly enough. I miss it all the time, but I never miss it more than in the dead of winter. So, rather than sitting around on a lazy, cold, Sunday and dreaming of the Keys, I decided to make some Key Lime Pie and bring a little bit of Key West life to us.

I love Key Lime pie, but I had never made one from scratch before. So, after reviewing some recipes I decided to try one that I found on the Food Network website, courtesy of Joe’s Stone Crab Restaurant and I did use actual Key Limes! (What a work out to squeeze those little guys!)

Once the pie was finished and was setting, I decided to round out our Key West meal and make some Mahi Mahi Fish Sandwiches for dinner, inspired by our favorite Key West fish sandwich from B.O.’s Fish Wagon. B.O.’s Fish Wagon is one of our most frequented lunch stops while in Key West. It’s a actual shack, it has long lines, and when they run out of fish for the day- the day is over and you’re out of luck. The secret is super fresh fish, grilled white onions, fresh bread and a quality Tarter sauce. B.O.’s uses a Key Lime Tarter Sauce, but for our purposes, I used Ina Garten’s Tarter Sauce.

After our Mahi sandwiches hit the spot we were primed up for the feature item of the evening…The Key Lime Pie.

The first bite was dreamy- the recipe was just perfect! I ate my slice slowly, gently, and let my mind wonder to memories of strolling around the streets of Key West wondering where the night would take us, stopping for a slice of Key Lime pie somewhere along the way.

Summer Corn Salad

corn & basil salad

Tastes like summer

I love most vegetables…corn is not one of them! I think it’s over used, always over cooked (but that’s a subject for a whole other post!) and makes a mess! However, this corn salad is a staple when we bbq, attend a picnic or just want a break from the standard summer pasta salads – it’s my go-to summer salad recipe and I just love it! In recognition of this Labor Day weekend and all the Backyard BBQ’s and boating trips we will all be enjoying, I wanted to share this simple, delicious recipe with you! It’s sure to hit the spot!

The Recipe

Corn & Basil Salad

Corn and grape tomatoes are tossed with an apple cider vinaigrette and finished with lots of fresh basil – the perfect summer side dish. 
Prep Time15 minutes
Cook Time5 minutes
Total Time20 minutes
Course: Side Dish
Cuisine: American
Servings: 5

Ingredients

  • 5 ears of corn shucked clean
  • 3 tablespoons apple cider vinegar
  • 3 tablespoons olive oil
  • 1 teaspoon kosher salt
  • 1/2 teaspoon black pepper
  • 1/2 cup julienned fresh basil leaves
  • 1 cup halved grape tomatoes (optional)

Instructions

  • In a large pot of boiling salted water, cook the corn for 3 minutes until the starchiness is just gone. Drain and immerse it in ice water to stop the cooking and to set the color. When the corn is cool, cut the kernels off the cob, cutting close to the cob.
  • Mix together in small bowl vinegar, olive oil, salt, and pepper.
  • Gently combine kernels (and tomatoes, if using) with the vinaigrette.
  • Just before serving, toss in the fresh basil. Taste for seasonings and serve cold or at room temperature.

[/vc_column_text][/vc_column][/vc_row]

Fried Zucchini Flowers

fried zucchini flowers

My favorite fried summer treat!

Fried zucchini flowers are a special, Italian, seasonal treat and one of my all time favorite things to eat.

Zucchini plants produce large, beautiful flowers for the bees to come and pollinate which results in gorgeous zucchini fruit. But they have another wonderful purpose on this earth- for eating! You occasionally can find zucchini flowers available in a specialty food store but I have never seen them look fresh enough to purchase. I do order them at select restaurants at select times of year, but really, nothing compares to picking your own and frying them up within minutes of picking.

The Recipe

Fried Zucchini Flowers

Ingredients

  • Zucchini Flowers
  • Olive Oil
  • All Purpose Flour
  • 2 Eggs
  • Salt
  • Pepper
  • Cayenne pepper and/or paprika (optional)
  • Fleur de sel

Instructions

  • If you are picking your own zucchini flowers, pick the flowers when they are a healthy size, have not yet begun to wilt and are closed. Gently twist the bottom and pull out the insides of the flower. It should come out in one piece like in the picture here. 
  • Heat oil just to frying temperature. (Don’t let it smoke! It’s ready when it takes one minute to fry a cube of bread or you can see the oil start to swirl on it’s own.) 
  • In a medium size bowl, season the flour with kosher salt, fresh ground pepper, paprika and a dash of cayenne pepper.
  • Whisk 2 eggs in a separate bowl.
  • Dredge the flowers in the flour, shake off excess flour and dip in the egg.
  • Fry for about 2 minutes on one side and about 1 minute on the other side. (They fry very quickly so don’t walk away! Fry just long enough to cook off the egg and flour and produce a crispy flower.)
  • Drain on paper towel and season immediately with a sprinkle of flour del sel.  Enjoy hot.

Grow your lettuce in a window box

Home grown lettuce…what a treat! I grow mine in window boxes right on my deck. This allows me to have more control over insects and those pesky rabbits! It’s also quite convenient to walk right outside and trim a few leaves for a salad and pop right back into the kitchen!

Monster Madness!

A pile of assorted sandwich triangles with various fillings, topped with green and black olives, becomes a scene of monster madness!

Cooking for Kids!

I love a good theme party! Thankfully for me, I have a gaggle of nieces and nephews so the theme parties are never in short supply! When I found out my niece was having a Monster High party for her 7th birthday, I had no idea what that was. At all. I had to stop what I was doing and Google it and I still didn’t really understand! Basically, I learned that it is a Saturday morning cartoon about monsters who go to high school. Ok Got it.

In addition to my pretty epic costume that I created, I thought we needed some theme food. I spent some time on Pinterest and found an image that inspired to make these fantastically fun “monster” sandwiches!

They were a hit and the birthday girl, Lili, who can be quite the picky eater, was more than excited that she got to have ‘more than one!’ Everyone had a blast picking out which ‘monster’ they wanted to eat!

I made half the sandwiches on white bread and half on wheat bread and opted for classic combinations of Ham & Swiss and Turkey & Cheddar. I served mayonnaise and mustard on the side so everyone could dress them how they like.

So next time you have picky eater on your hands or an event with a theme, think about making your food more fun! It’s sure be a hit of ‘Monster Proportions!’