Savory Shredded Turkey Recipe is a Delectable Delight
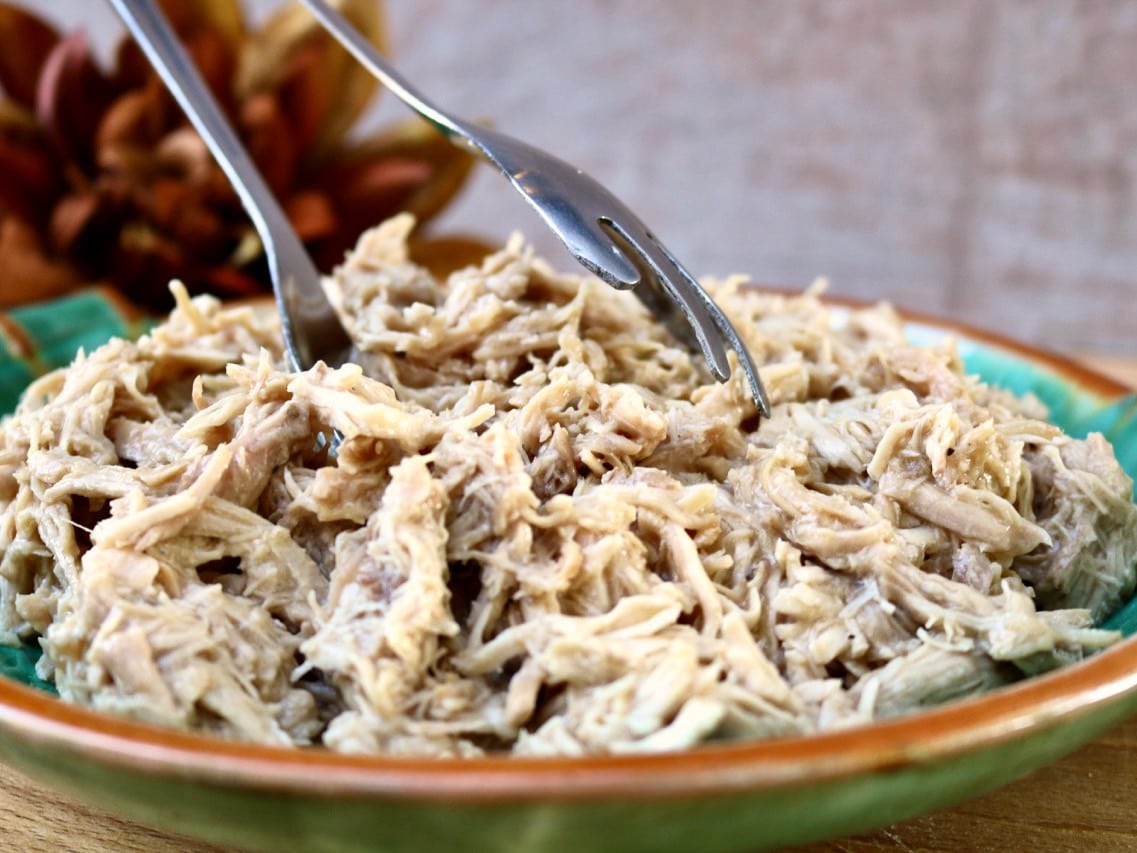
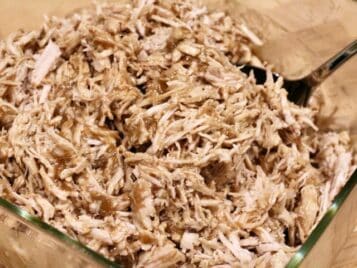
The slow cooker shredded turkey recipe is a savory symphony that begins with a plump, succulent turkey cooked to tender perfection. Seasoned generously with aromatic herbs like thyme, rosemary, and sage, this dish delivers a flavorful punch. Slow-cooked to achieve unparalleled tenderness, the turkey is then delicately shredded, revealing its moist and juicy interior.
The meat’s succulence can be further enhanced by tossing it with a luscious, make-ahead homemade gravy, infused with rich turkey drippings and aromatic spices. This shredded turkey recipe is a comforting delight that has multiple uses such as in soups, wraps and sandwiches, quesadillas, in salads, ravioli or shell stuffing, and my personal favorite- Thanksgiving Flatbread Pizza where a flatbread is layered with Cranberry sauce, shredded turkey, stuffing and then smothered in cheese and gravy for the ultimate Thanksgiving leftovers bite!
Thanksgiving Leftovers Pizza
Flatbread style pizza is layered with tart cranberry sauce, covered in shredded turkey, topped with savory stuffing then smothered with cheddar cheese and finished with gravy!
This shredded turkey recipe couldn't be easier and can be served as a main dish, or used as an ingredient to make other dishes. You can scale the recipe up or down as needed, and whereas I use Turkey Breasts in this recipe, you can use any combination of dark or white meat thighs and breasts.
Prep Time3 minutesmins
Cook Time6 hourshrs
Total Time6 hourshrs3 minutesmins
Course: Main Course
Cuisine: American
Keyword: turkey
Ingredients
fresh boneless turkey breast
approx 3 cupschicken stock
1Onion- quartered
4-5garlic cloves – peeled and smashed with side of a large knife
salt, pepper
Instructions
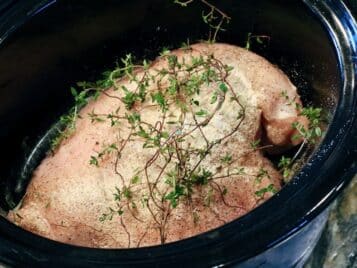
Pay dry fresh turkey breast and season with salt & pepper.
Place onion pieces on bottom of slow cooker. Place Turkey into slow cooker. If you have herbs handy, you can also add them in the pot.
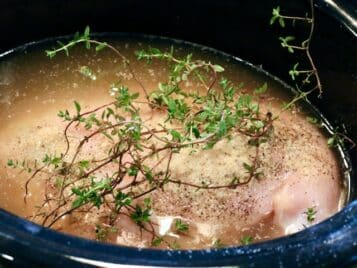
Pour enough chicken stock over the turkey to just cover it
Turn crock pot on high for about 4 hours or low for 6-8 hours. Meat should be fork tender.
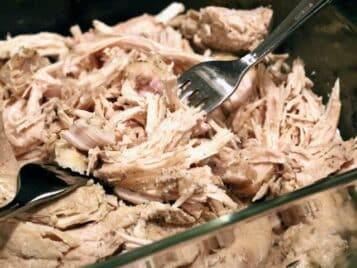
When done, carefully remove meat to a large bowl. When cool enough to handle, shred adding some broth as you go to prevent drying out.
You can drain the juices from the crockpot through a fine mesh sieve and use it to make a quick gravy if you would like. Or, simply season with salt and pepper to taste and serve the moist delicious, shredded meat as is.
Notes
Serving ideas:
Serve on a roll with cranberry sauce, lettuce and cheddar cheese.
Serve over mashed potatoes and smothered in gravy.
Make Turkey Tacos
Serve over warm Brussel sprout salad
Make a Thanksgiving pizza (personal favorite and most requested!)
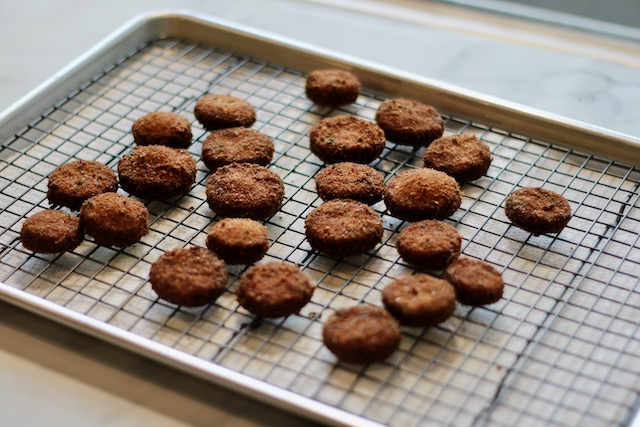
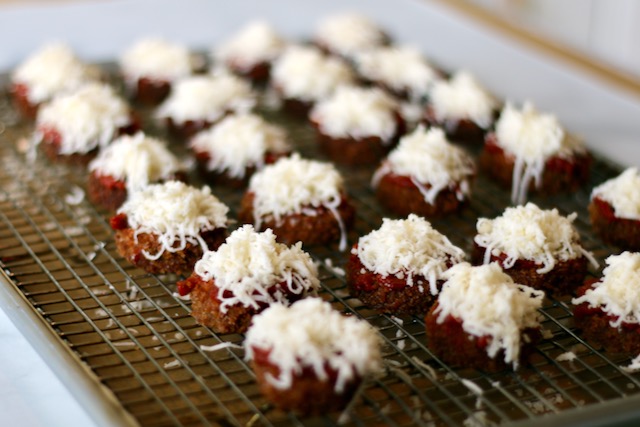
A fusion of Italian flavors in a bite-sized form what’s better than that?! Each petite disc of tender eggplant is delicately coated in a crisp golden breadcrumb crust, crowned with a dollop of rich marinara sauce and smothered in melty mozzarella cheese. These bite-sized wonders encapsulate the essence of traditional eggplant parmesan, delivering a burst of robust flavors in a single bite.
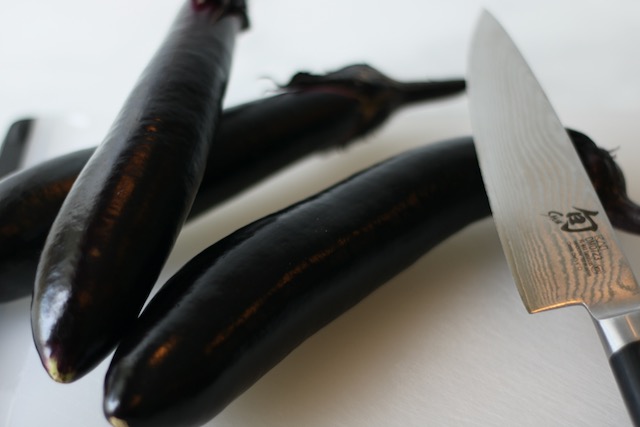
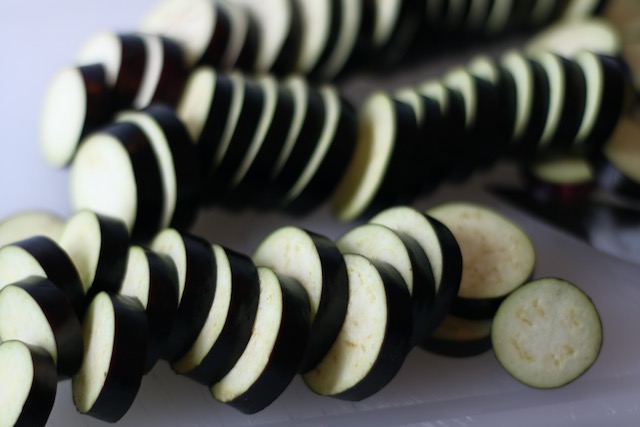
Slice Japanese Eggplants
Slice Japanese Eggplants in 1/2 inch circles. Japanese eggplants are very easy to grow but also easy to source in the summer months.
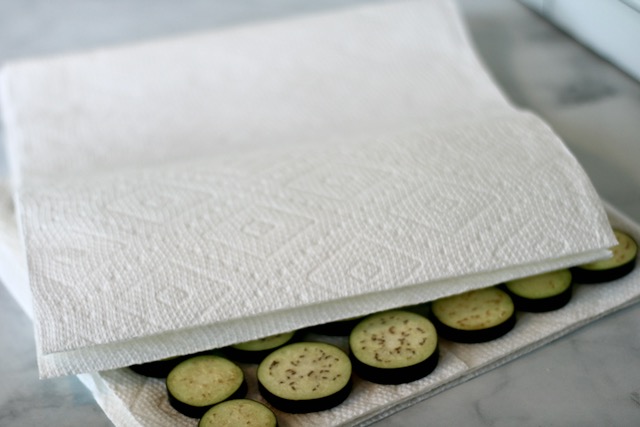
Remove Excess Moisture
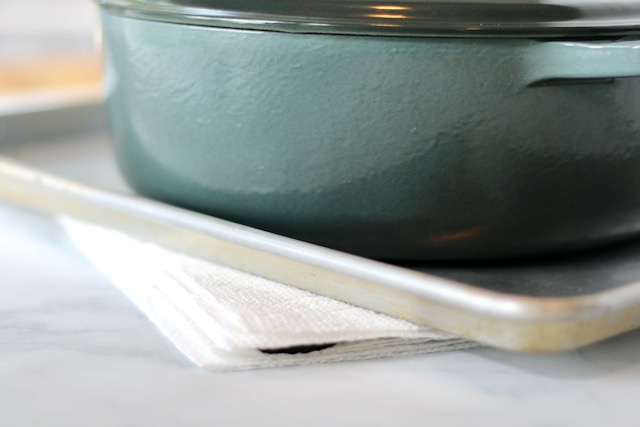
Lay slices of eggplant between sheets of paper towel and set a sheet pan with a weight on top. (A heavy cast Iron pot works well here.) Let the excess moisture absorb for 30 minutes to an hour.
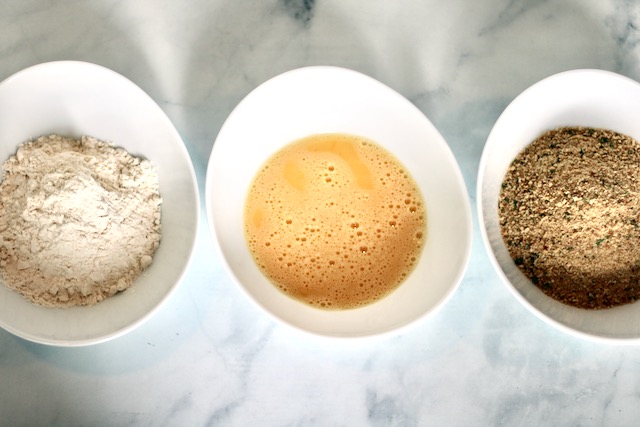
Dredging station
Set up a standard dredging station of Flour, Egg and Breadcrumbs.
Panko vs Seasoned Breadcrumbs: I have used both panko and classic Italian seasoned breadcrumbs. Both work well, but the panko does result in a more “crunchy” bite. The preference is personal.
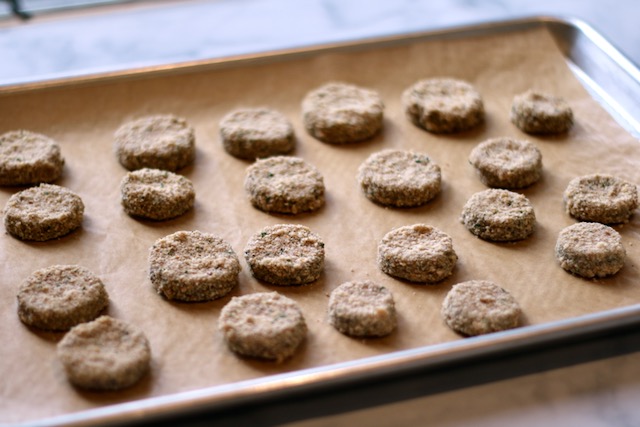
Set breaded Eggplant aside
Place the breaded eggplant slices on a sheet pan and refrigerate for at least an hour. (You can actually leave them at this stage in the fridge for a several hours if you want to.)
Tip: Refrigerating your breaded items like eggplant or chicken cutlets for at least an hour before frying results in better sticking and ultimately a better end result.
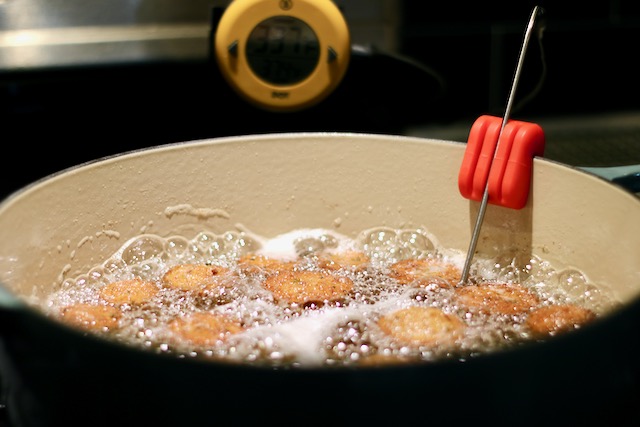
Fry Eggplant
Set a Probe Thermometer, like the Dot seen here, into a pot of Canola oil. Set temperature for 375°F. Once the eggplant goes in, it will drop in temperature. Adjust the stove temperature accordingly to get it back up past 350° and hold around 350°-375° while frying until golden brown.
If frying in batches be sure to wait for the temperature to reach 375° again before dropping.
Season & cool
Use a spider (Large slotted spoon made specifically for frying) to remove the eggplant slices from the hot oil and place on a raised grid over a paper towel lined sheet pan. Sprinkle with salt.
Top & Bake
Set oven to 450°F. Remove the paper towel if using from under the raised grid and top with Marinara sauce and a blend of shredded Mozzarella and Parmesan cheese. Bake for about 5 minutes or until hot and starting to brown.
Garnish & Serve
Garnish with finely julienned slivers of basil and serve
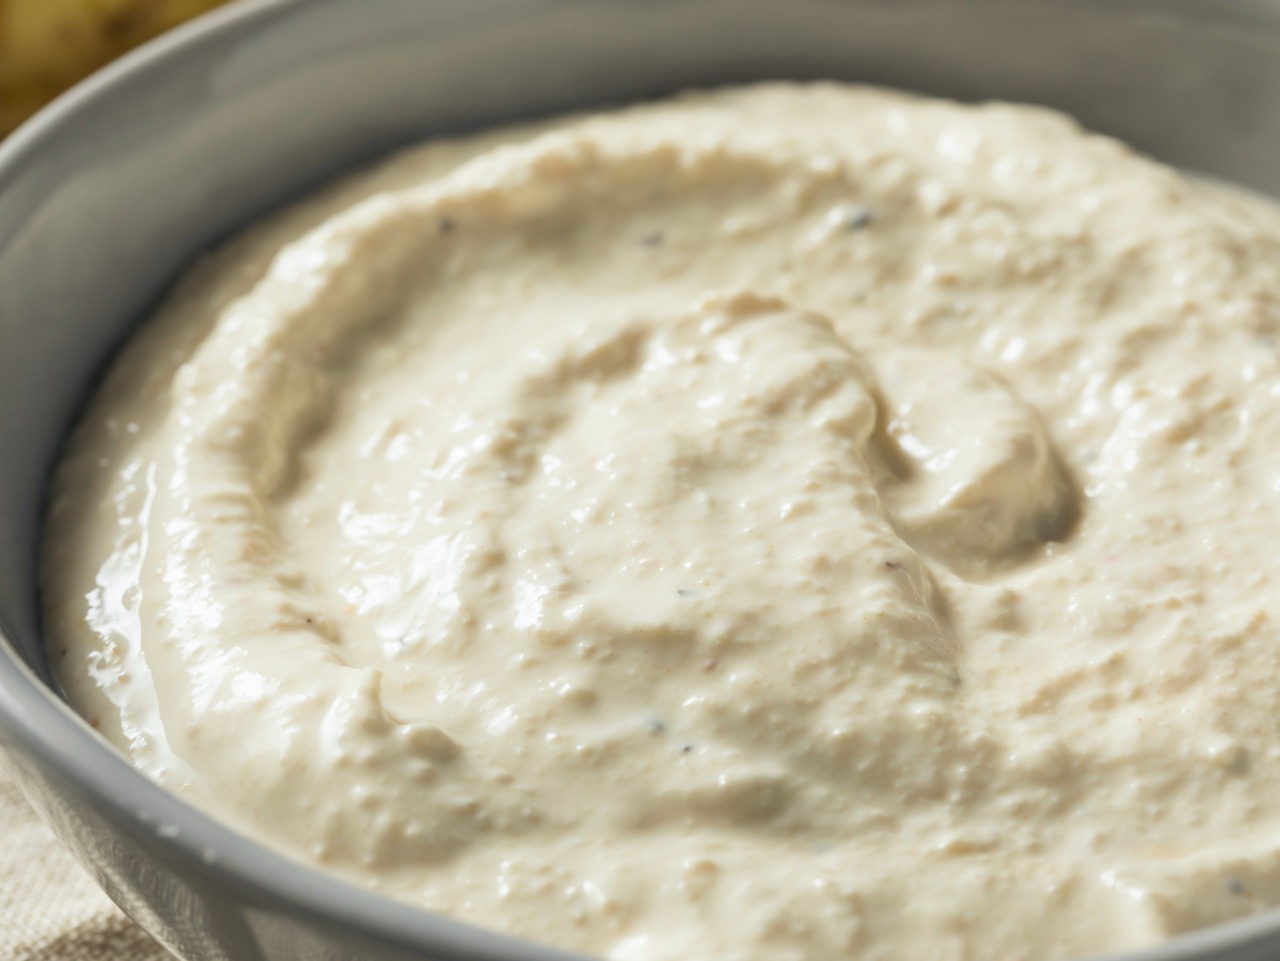
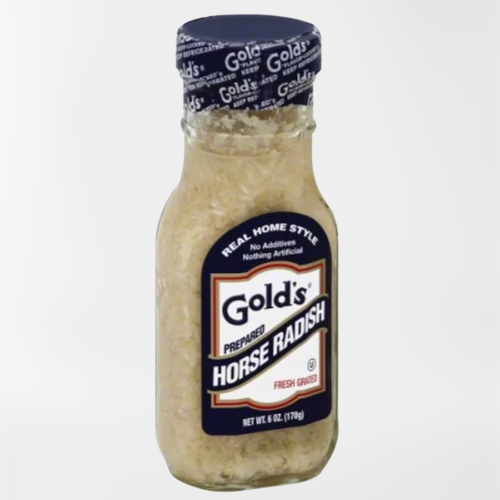
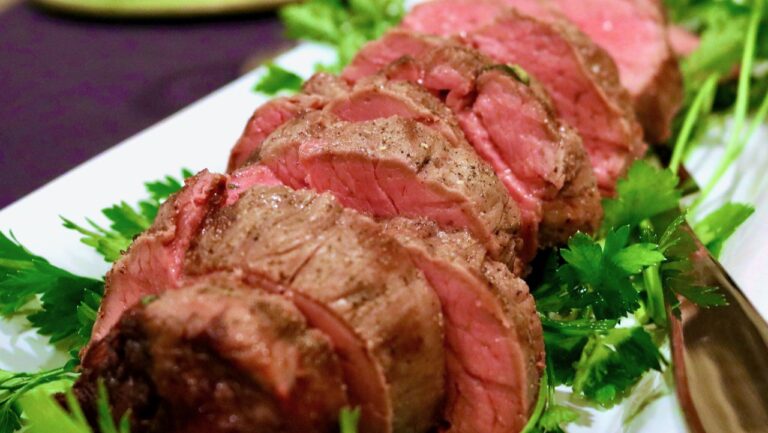
Horseradish sauce, also known as horseradish cream sauce, is a timeless, classic accompaniment to special occasion roasts such as beef tenderloin, prime rib and baked ham. In its most simple form is a sauce made with horseradish and some kind of cream base such as sour cream or mayonnaise. Ina Garten’s Horseradish recipe is more refined and uses a combination of mayonnaise, sour cream, mustard, horseradish and seasonings and it is as perfect as this sauce can get. This is the ONLY recipe you need for horseradish sauce.
What is Horseradish anyway?
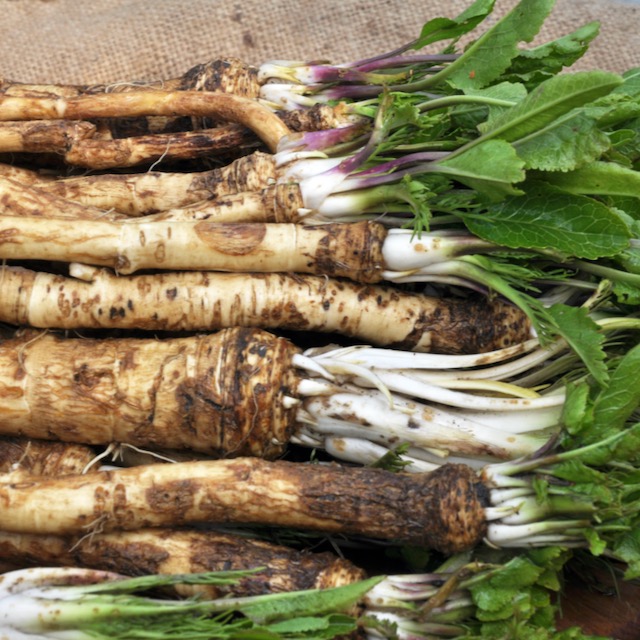
Horseradish is actually a root vegetable best known for its pungency. It has been grown worldwide for thousands of years and used as both spice or condiment, and also for medicinal purposes. It’s a very facilitating plant!
It has little or no aroma in raw form, but once cut or grated, it produces a kind of mustard oil that is extremely pungent to the sinuses. When it is grated directly into vinegar, such as in the case of jarred horseradish which is what we use to make cream sauce, cocktail sauce or bloody mary’s, it is much more mild and approachable for everyday cooking.
Fresh, dug-out root horseradish with leaves on the pile
Prepared Horseradish sound in the refrigerated department at the grocery store
What to serve with Horseradish Sauce
Horseradish sauce is most often served alongside prime rib, beef tenderloin roasts, and baked ham.
Be sure to make extra because the only thing better than a perfectly roasted beef with horseradish sauce is leftovers piled high on a sandwich. My personal favorite is thinly sliced beef such as leftover prime rib or beef tenderloin on a ciabatta roll or brioche, layered with aged cheddar cheese, and smothered with horseradish cream sauce. You’ll thank me later!
Ina Garten’s Slow Roasted Beef Tenderloin Recipe
Roasting Beef tenderloin at a low temperature ensures an even cook from edge to edge. With a few easy tips, this is a no-fail, foolproof recipe.
Why you should make your own Horseradish Cream Sauce
Horseradish sauce is something that is significantly better homemade. Not only does it take less than five minutes to put together, but it could be made several days in advance. There is just no reason not to make it yourself.
And while are many other delicious sauces that can be served alongside holiday roasts chimichuri sauce, mustard sauce, and even a basil aïoli, nothing is quite as crave-able as a perfectly cooked cut of tender beef smothered in a spicy horseradish cream sauce.
Helpful Tips for making Horseradish Sauce
Make it up to one week in advance and store in an airtight container such as mason jar.
Make it yours! We like it spicy so we often add extra horseradish.
Each brand of prepared horseradish is unique so be sure to taste the finished sauce for seasoning, and adjust accordingly.
To ensure a thick sauce, drain the horseradish before using if it appears watery.
When serving with beef, I like to take the chill off the sauce before serving.
More delicious sauces to serve with meats:
Pesto: The classic basil pesto is a go-to sauce that everyone enjoys.
Chimichurri Sauce: This herbaceous vinegar sauce is an excellent sauce to serve with all varieties of meats and vegetables.
Tzatziki Sauce: This yogurt based cucumber sauce can be served with anything!
Basil Parmesan Sauce: Fresh basil is Puréed with mayonnaise and seasoning for a savory side sauce.
Horseradish cream sauce is most often served alongside beef roasts, baked ham and of course, sandwiches! This easy recipe can be made up to one week in advance.
Total Time10 minutesmins
Course: condiment
Servings: 8people
Author: Recipe by Ina Garten
Ingredients
1 1/2cupsgood mayonnaise
1/3cupsour cream
3tablespoonsDijon mustard
1 1/2tablespoonswhole-grain mustard
1tablespoonprepared horseradish
Kosher salt and freshly ground black pepper
Instructions
Whisk together the mayonnaise, sour cream, mustards, horseradish, and 1/4 teaspoon salt in a small bowl. Taste for seasoning. Refrigerate until ready to serve and up to one week.
Grilled Shishito Peppers are an easy to prepare appetizer that is perfect for summer gatherings or to include in tapas night. Shishito peppers are healthy, fun and very inexpensive. There are many ways to prepare these peppers, but I love them simply grilled with a fresh squeeze of lemon and sprinkled with Fleur de sel.
What are Shishito peppers?
Shishito pepper’s roots can be traced back to Japan, however they are now grown in many regions around the world. They have a gentle, grassy, slightly citrus flavor and a thin skin that absorbs other flavors well. They are a surprisingly good source of fiber, which can help stimulate digestion, and vitamins B6, C, and K, which can help protect and boost the immune system. The peppers are also a good source of potassium, vitamin A, and folate.
Grow your own
Shishito peppers are a popular culinary item around the country right now. They are versatile, cheap and easy to share, but did you know they are also very easy to grow?
Shishito Pepper plants require low maintenance and are extremely prolific, making them an ideal plant for a beginner gardener.
Are Shishito peppers spicy?
Approximately 1 in 10 Shishitos will have some kick to it, while the majority are mild. Earlier in the season, you are less likely to get too many spicy ones but the odds increase as the growing season comes to an end. The unknown is what makes it fun! (Unless of course you really don’t like any heat.)
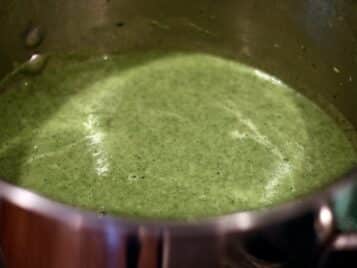
This broccoli soup may look like it is loaded with cream or another dairy, but the big surprise here is that it is not. This broccoli soup recipe contains only a handful of common ingredients, that once blended together, create a luscious, satisfying, guilt- free, comfort food.
Honestly, I really don’t know how something this easy to make and healthy for you, could taste this good. That said, you do have to be a broccoli lover! If you are, this recipe is for you!
Broccoli Soup is a Family Favorite
Ever since childhood, broccoli soup has been a favorite in my immediate family. Looking back, I think the obsession started when Panera Bread moved into our community. First my dad became mildly obsessed with Panera’s broccoli cheddar soup and then the rest of us followed suit. While Panera may have inspired me, this version of broccoli soup is much, much better!
Simple Ingredients
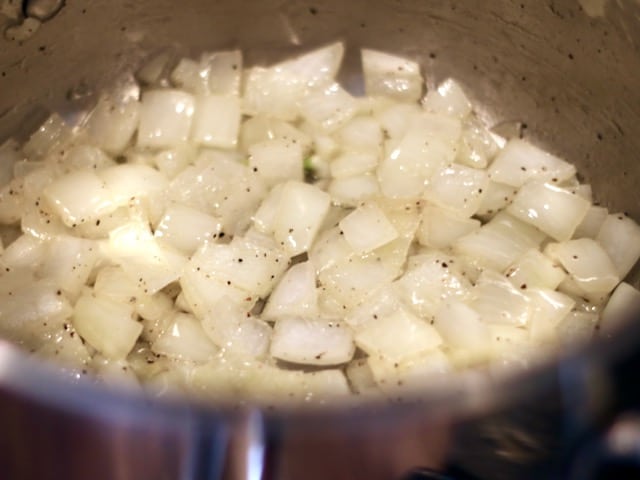
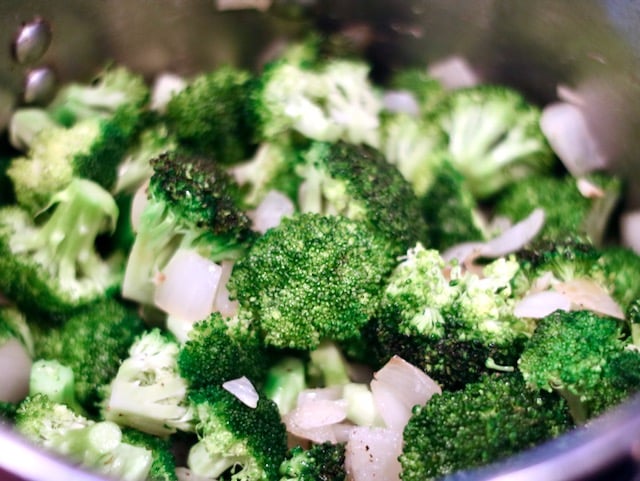
It may be hard to believe, but this soup only has 4 main ingredients- Butter, Broccoli, Onion and Chicken Stock. To make this a vegetarian recipe, simply substitute the chicken stock with vegetable stock.
Garnished with a swirl of good quality extra virgin olive oil, and a sprinkling of either Parmesan cheese, shredded Gruyere cheese, or shredded cheddar cheese takes this soup right over the top.
While I always encourage the use of cheese whenever possible, this is one recipe where the cheese actually is optional. I recently had the opportunity to make this broccoli soup recipe for my cheese obsessed father and sister, and when my dad said “this is so good it doesn’t even need any cheese!” I knew it was a winning recipe.
Achieving a creamy texture without using cream
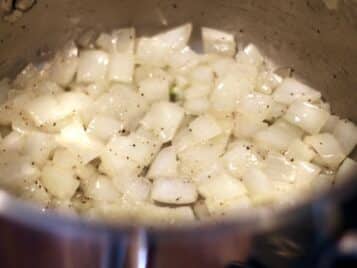
The secret to achieving a smooth, luscious, creamy texture to this soup is the onions. By sautéing the onions low and slow, the onions become very mild and once blended, create a creamy texture that resembles a soup that is often loaded with heavy cream or half-and-half.
Make it Ahead
This broccoli Soup recipe is an excellent make ahead soup. Make up to 3 days in advance and reheat slowly on the stovetop. Taste for seasoning and serve. This broccoli soup also freezes exceptionally well. I always make a large batch and freeze half, usually in individual portions.
This broccoli soup recipe contains only a handful of common ingredients, that once blended together, create a luscious, satisfying, guilt-free, comfort food. To make this soup vegetarian, simply replace the chicken stock with vegetable stock.
Prep Time5 minutesmins
Cook Time20 minutesmins
Course: Soup
Cuisine: American
Keyword: broccoli, soup
Servings: 4people
Ingredients
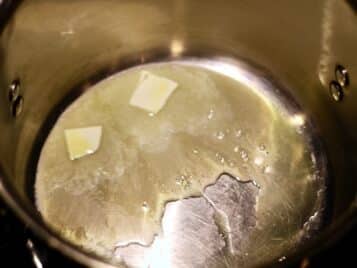
1TbsUnsalted Butter
1largeonion – 1" chopped
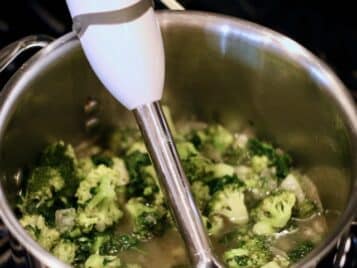
6cupsBroccoli Florets (cut to approx same size)
1QTlow sodium chicken stock
2cupsfrozen chopped spinach(optional but recommended!)
Instructions
Melt butter over Medium Heat. Add a Swirl of EVOO.
Sauté onion on medium-low with pinch of kosher salt & fresh cracked pepper until softened, but not browned. About 10 minutes.
Add Broccoli to the onions and stir to combine. Saute for about 5 min, stirring often. When Broccoli has turned bright green and started to soften, Add the chicken stock. Stir to combine and cover.
Raise the heat and bring to a boil. Reduce heat and simmer for about 15 minutes or until broccoli is easily pierced with a knife .Optional step: I always add a handful of frozen spinach at the very end. This helps the achieve a vibrant green color without impacting flavor or texture.
Puree the soup using an immersion blender, which can be used right away but watch out for splashes! Puree until smooth. If you don't have an immersion blender, wait for the broccoli to cool and when the soup is cool enough to handle, puree in batches in a food processor or blender until smooth.
Taste the soup and adjust seasoning. (You will probably want to add a teaspoon of salt and touch of pepper.) Heat to order, refrigerate or freeze.
Serve with a swirl of good quality EVOO and option garnish of sprinkle of parmesan cheese or cheddar cheese.
Like Soup? Check out of my most popular recipes:
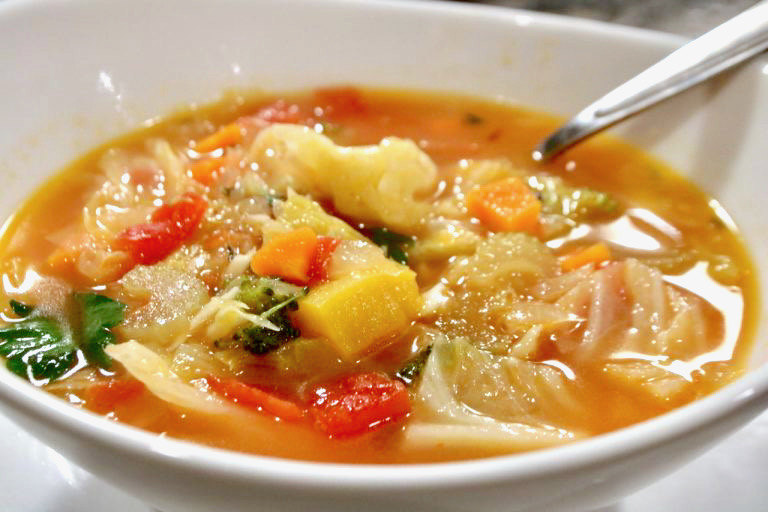
Healing Cabbage Soup
With just a handful of ingredients, it’s easy to prepare and requires minimal effort. Yet the resulting dish is nothing short of magical—a hearty and flavorful soup that’s as soothing to the soul as it is nourishing to the body. The results can be felt almost immediately.
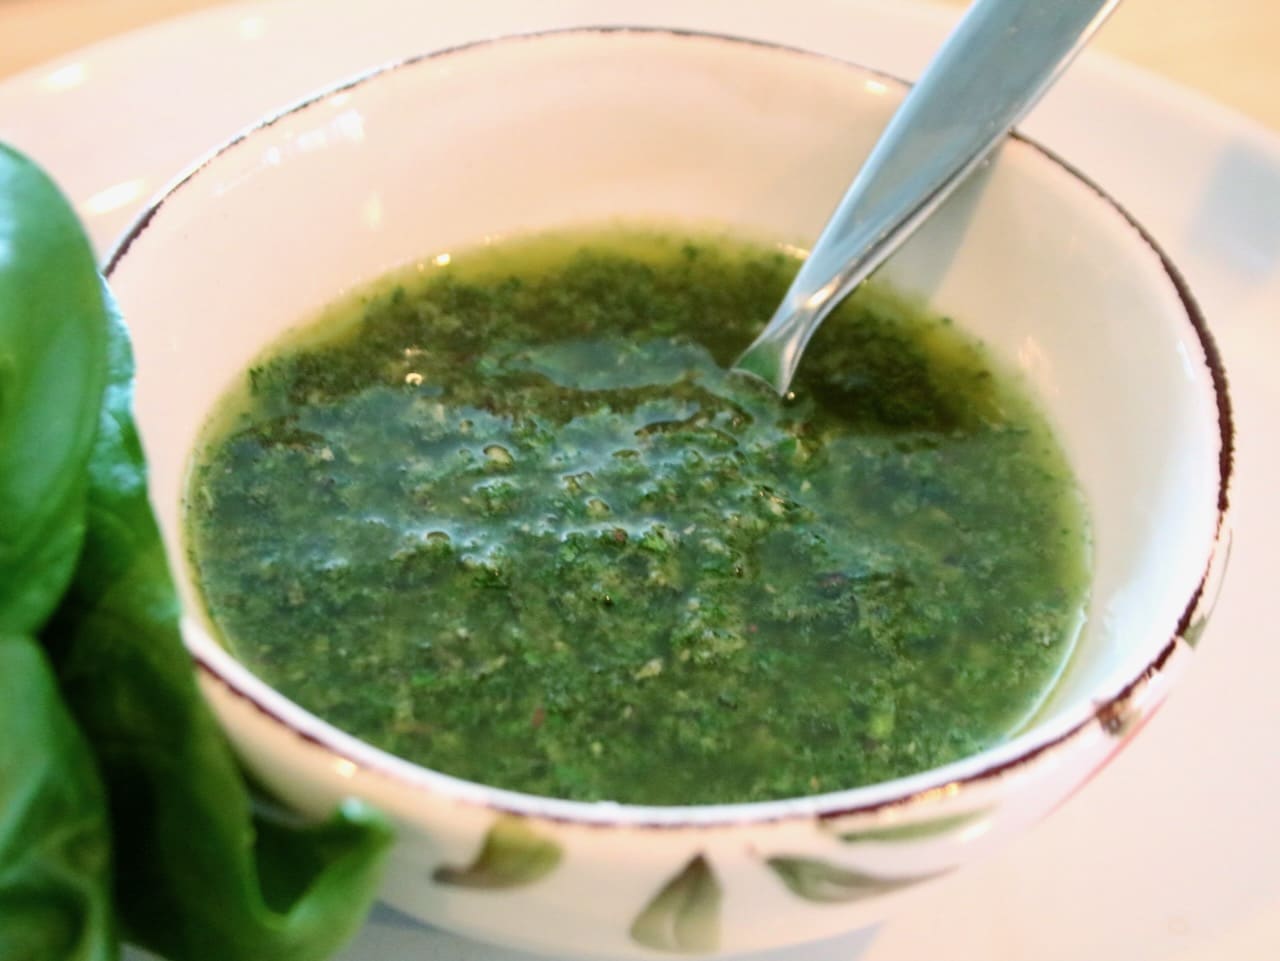
Originating from Argentina, this vibrant green sauce has been making waves across the globe with its bold, herbaceous flavor profile and zesty kick. A perfect accompaniment for steak, chicken, pork and vegetables.
What is Chimichurri Sauce?
At its core, chimichurri is a simple sauce made from a blend of fresh parsley, garlic, vinegar, olive oil, and chili pepper flakes. However, within this seemingly straightforward concoction lies a world of depth and complexity, with each ingredient playing a crucial role in achieving the perfect balance of flavors. The bright acidity of the vinegar cuts through the richness of the olive oil, while the garlic adds a pungent kick and the chili flakes provide a subtle heat that lingers on the palate.
How to Store Chimichurri
Store fully prepared Chimichurri it in an airtight container in the refrigerator for at least one week. Chimichurri also freezes very well. If frozen, just let it thaw in the refrigerator overnight. Always serve at room temperature.
This vibrant green sauce has been making waves across the globe with its bold, herbaceous flavor profile and zesty kick. A perfect accompaniment for grilled meats and vegetables.
Prep Time10 minutesmins
Course: sauce, Side Dish
Cuisine: American, International, Mediterranean
Keyword: parley sauce, steak sauce
Servings: 6people
Ingredients
1cupfirmly packed fresh flat-leaf parsley- trimmed of thick stems
1tbsp minced shallot
2garlic cloves
2tbspfresh oregano leaves(can sub 2 teaspoons dried oregano)
1/3cupextra virgin olive oil
2tbspred or white wine vinegar(Up to 1/4 cup depending on taste)
1.5tspkosher salt
1/8tspfreshly ground black pepper
1/4tspred pepper chili flakes
zest from one lemon
Instructions
Finely chop the parsley, fresh oregano, shallot and garlic (or process in a food processor several pulses until slightly chunky). Place in a small bowl.
Stir in the olive oil, vinegar, salt, pepper, lemon zest and red pepper flakes. Taste for seasoning and adjust accordingly.
Serve immediately or refrigerate. If chilled, return to room temperature before serving. Chimichurri will stay in the refrigerator for at least one week and also freezes well.
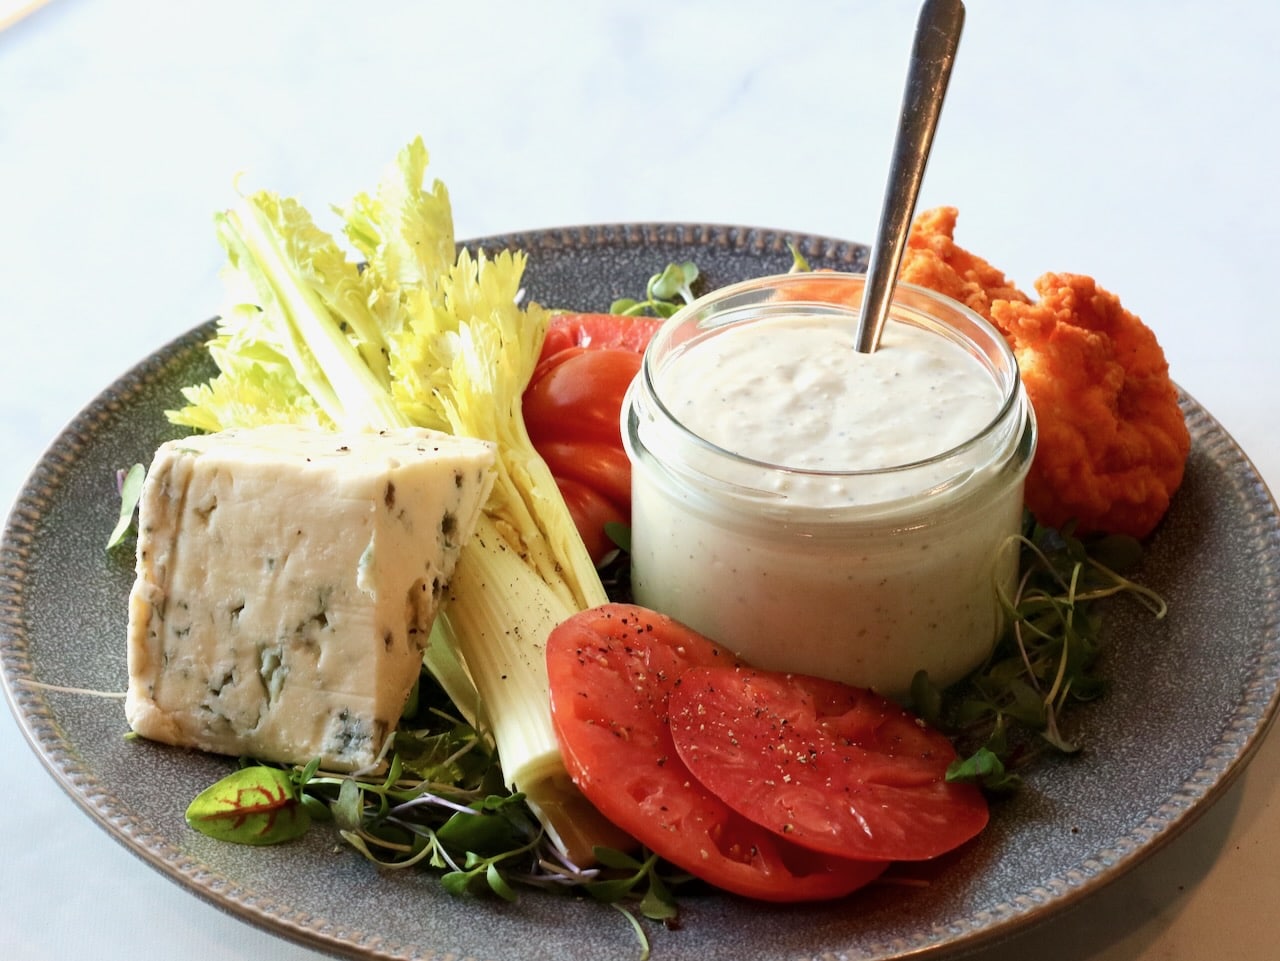
Homemade Blue Cheese dressing is easy. And significantly better.
Making you own blue cheese dressing isn’t only easy, it’s also significantly better than anything you can find in a store. In fact, this recipe is by far, the best I have ever had. It’s yet another winning recipe from Ina Garten, and I’m never looking for another!
Blue Cheese dressing (often used a dip) is a classic accompaniment to our nation’s beloved Buffalo wings, the classic wedge salad and a popular dip on a crudité platter, to name a few. If you aren’t familiar with blue cheese’s flavor profile, it can be very pungent, stinky and an acquired taste for many. For a long time, I really wasn’t into it. However, I have come to appreciate a really good blue cheese dressing or dip when it is paired correctly, and made correctly.
Buffalo Shrimp served with Homemade Blue Cheese Dressing
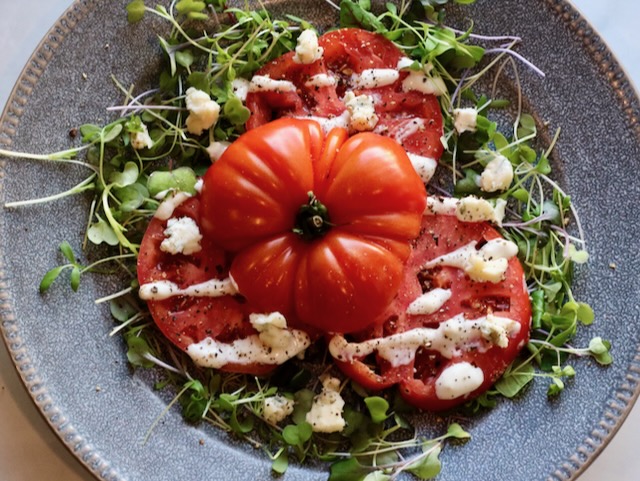
Heirloom Tomato with Blue Cheese Dressing
Choosing the right blue cheese
The trick to making a blue cheese dressing that isn’t overwhelming, but strong enough to hold up to equally strong flavors like buffalo sauce, is choosing the right cheese. There are many variations of blue cheese including Maytag, Roquefort, Stilton, Gorgonzola, and Cabrales. Each is unique and have their own place in pairings. If you want to learn more about what makes each unique, check out this article from Delishably.
In the case of a dressing, or a dip, you want something that is strong enough to stand on its own, but also won’t overpower the other flavors it is being paired with. (And trust me, blue cheese can over power very easily!)
Roquefort blue cheese is the right choice here for the perfect balance of texture and flavor in a dressing.
Make it ahead
You can make this Blue Cheese dressing to serve on a salad or as a dip up to 3 days in advance. Just assemble and store in a mason jar or other air tight container and place in the refrigerator until ready for use.
Perfect over a salad, heirloom tomatoes, and buffalo wings. This creamy blue cheese dressing is unbelievably easy and delicious. You will never buy store bought again!
Ingredients
4ouncesRoquefort blue cheesecrumbled
1cupHellman’s mayonnaise
1cupHeavy Cream
2tablespoonsTarragon Vinegar
1teaspoonKosher salt
1/2teaspoonfreshly ground black pepper
Instructions
Place the cheese, mayonnaise, heavy cream, vinegar, salt and pepper in the bowl of a food processor fitted with a steel blade. Process until smooth, but not pureed, or desired consistency has been achieved.
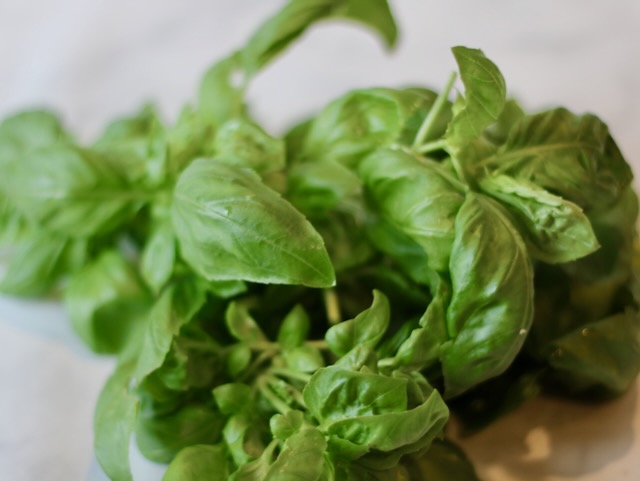
Pesto is a well known and loved by many for its savory, summery flavor. It’s easy to make and the best way to preserve summer’s most prolific growing herb. Because it freezes remarkably well, this allows us the opportunity to enjoy its herbaceous flavor for months after the growing season has ended.
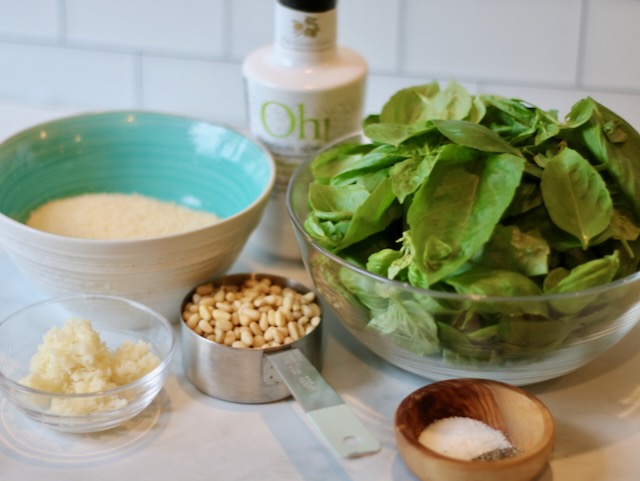
Pesto’s main Ingredients
5 -6 cups fresh basil Leaves
1/2 cup pignoli nuts (AKA pine nuts)
1 cup freshly grated Parmigiano-Reggiano
1.25 cups good quality EVOO
2-3 tablespoons minced garlic
History of Pesto
The earliest documentation of the original pesto recipe dates back to sometime in the mid 1800’s in Genoa, Italy. Basil, garlic, nuts and Parmigiano-Reggiano were ground or crushed together with a mortar and pestle and smothered in olive oil to be used as a sauce or a spread. Centuries later, nothing has changed! The core recipe remains fully intact and is enjoyed by people all over the world to this very day. This cannot be said for too many other recipes, which I think is a remarkable testament to this traditional recipe.
Cooking with Pesto
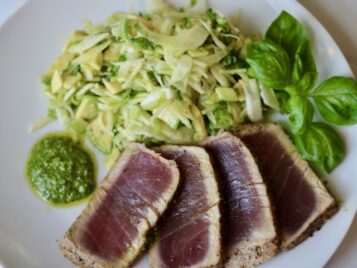
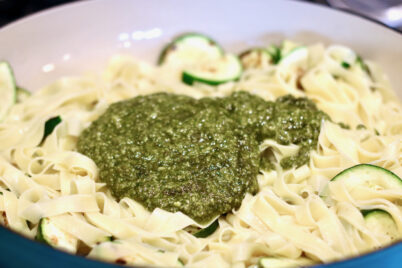
Pesto goes with everything! More often than not, I use it as a condiment rather than a sauce. I enjoy adding a dollop to eggs, crostini toasts with goat cheese, served on the side of grilled chicken, flank steak or any kind of fish, drizzled over roasted vegetables or a freshly sliced summer tomato. It’s uses are endless.
When serving pesto on hot pasta, use some caution. It does turn brown quickly and the oil breaks down, so use it sparingly to avoid an overly oily pasta dish. Do not add it to the pasta until ready to serve.
When dressing a cold pasta salad, mix the pesto with a little bit of mayonaise which will help stabilize it and keep it from oxidizing or getting too oily.
Inspiration Gallery
Seared tuna with pesto
Soft scrambled eggs with pesto & herbs
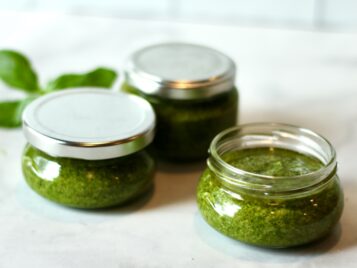
Store in small jars and freeze
Potato & basil hash with fried eggs & pesto
Chicken with Pesto, Tomato & Mozzarella
Homemade Pasta with zucchini and pesto
Basil Growing Tips
Basil is an extremely prolific herb and the more you harvest it, the more bountiful it becomes. When harvesting, clip the basil right above the first set of four leaves and it will continue to produce plentifully. Continuously prune and harvest basil, even when you don’t need it to prevent it from bolting. Once the basil bolds and shows signs of going to seed, the leaves become bitter and are no longer useable in recipes.
Make it your own
I always found it interesting that so many different recipes exist for pesto, yet they all use the same handful of ingredients- how many variations could there be? Over time I have learned that pesto is personal!
You can take the exact same ingredients as someone else and the result can be astonishingly different. The freshness of the nuts, the kind of basil, the quality of oil and cheese, the type of salt, all play a role in the end result. Additionally, the quantities used and even the temperature of the room and how long you process it for can produce a similar, yet notably different result. You have to make it yours, and make it just the way you like it.
Helpful Tips:
Use the best quality ingredients that you can
When tasting to adjust for seasoning, remember that your flavors will marry together after sitting, which will soften the garlic intensity.
Parmesan cheese is naturally salty, so keep that in mind when adjusting your seasonings.
Do NOT over process the pesto or run the processor more than necessary. If it gets warm, the mixture will separate. If the processor is getting warm, add an ice cube to keep the mixture cool. On a hot summer day, you can chill the processor container and blade before using.
Store in small jars and freeze
How to Store Pesto
Fill small jars with pesto and drizzle a light coating of EVOO over the top to prevent oxidation. Cover and use within 2-3 days or freeze up to 6 months.
An important note about salt:
All salt is not created equal. The type of salt you cook with will absolutely impact your finished meal. If you use 1 tbs iodine salt as a substitute, then your final dish is likely to be much more salty than the recipe intended. I only cook with Diamond Course Kosher Salt. That is why I can recommend it with confidence. Whatever you choose to cook with, be mindful and remember you can always put the salt in, but you can’t take the salt out!
More delicious sauces to serve with meats:
Pesto: The classic basil pesto is a go-to sauce that everyone enjoys.
Chimichurri Sauce: This herbaceous vinegar sauce is an excellent sauce to serve with all varieties of meats and vegetables.
Tzatziki Sauce: This yogurt based cucumber sauce can be served with anything!
Basil Parmesan Sauce: Fresh basil is Puréed with mayonnaise and seasoning for a savory side sauce.
Use pesto as a sandwich spread, on pasta or toss with vegetables. Pesto has endless uses, freezes well in small portions and makes a great gift.
Prep Time10 minutesmins
Cook Time5 minutesmins
Total Time15 minutesmins
Cuisine: Italian
Ingredients
.5cuppignoli or walnuts(It’s very important to make sure to use fresh nuts)
2-3tbspchopped fresh garlic (Amount depends on intensity of the garlic & your taste preference)
5 cupsfresh basil leaves, packed down lightly
1tspkosher salt
3/4tsp fresh ground pepper
1.25cupsextra virgin olive oil
1cupgood quality, fresh grated parmesan cheese
Instructions
Add the nuts and garlic into a food processor using the blade attachment. Process for about 15 seconds.
Add the basil, salt and pepper.
With the processor running, slowly pour in the olive oil through the feed tube and blend until the pesto is pureed well.
Add the parmesan and pulse until combined.
Use immediately or portion into air tight containers filling almost to the top. Add a thin layer of olive oil to the top to seal out any extra air and then secure with lid and freeze.
Notes
Tip: Do not over process the pesto or run the processor more than necessary. If it gets warm, the mixture will separate. If the processor is getting warm, add an ice cube to keep the mixture cool.
Overnight Mac & Cheese is a “make ahead” mac and cheese recipe that was published in Ina Garten’s Modern Comfort Food cookbook. After this recipe was published, home cooks around the country started talking about it online, on daytime tv, in magazines and everywhere in between. Simply put, the ratings have been all over the place making it a superbly controversial Ina Garten recipe because she is known for nothing but 5 star review recipes and this was not.
While some reviews of this overnight mac and cheese recipe have been stellar, some have been terrible, which actually intrigued me, but also discouraged me from making it. But I have to admit, the idea of using less pots and making it advance was exceptionally appealing. So despite the controversial reviews I decided I had to try it for myself, and see once and for all, what this recipe was all about.
First Impressions
The key to this Mac & Cheese’s success is using the right cheese.
“Wow! Wow, wow, wow! This is damn good Mac and Cheese!” That is what went through my head (and my tastebuds) after taking the first, cheesy bite! However, after making it more than once, I can tell you exactly how easy it could be to mess this recipe up. I’m here to tell you how to avoid making some rookie mistakes so you can easily count on this recipe to deliver on some serious “wow” factor results.
What is the difference between Ina’s overnight mac & cheese and Ina’s classic mac & cheese?
The Classic Version
Ina Garten’s Mac & Cheese uses flour, butter and milk. It is reliable, decadent and traditional. Get the recipe
The Overnight Version
In the recipe for Ina Garten’s Overnight Mac & Cheese it relies only on heavy cream and cheese to become rich and creamy.
The main difference between Ina Garten’s Mac & Cheese Recipe and Overnight Mac & Cheese Recipe is the use of a Roux. Classic Mac and Cheese recipes rely on a roux (equal parts fat and flour) as the base to the cheese sauce. A Roux helps to thicken and bind the cheese sauce, so it’s a pretty important part of any cheese sauce recipe.
However, in this Overnight Mac & Cheese recipe, it skips the Roux entirely. Ina Garten is relying on the natural starch in the pasta to thicken the sauce. It goes against everything any cook has ever been taught about how to make Mac & Cheese, and this alone makes the recipe innovative and intriguing.
Step By Step- Overnight Mac & Cheese
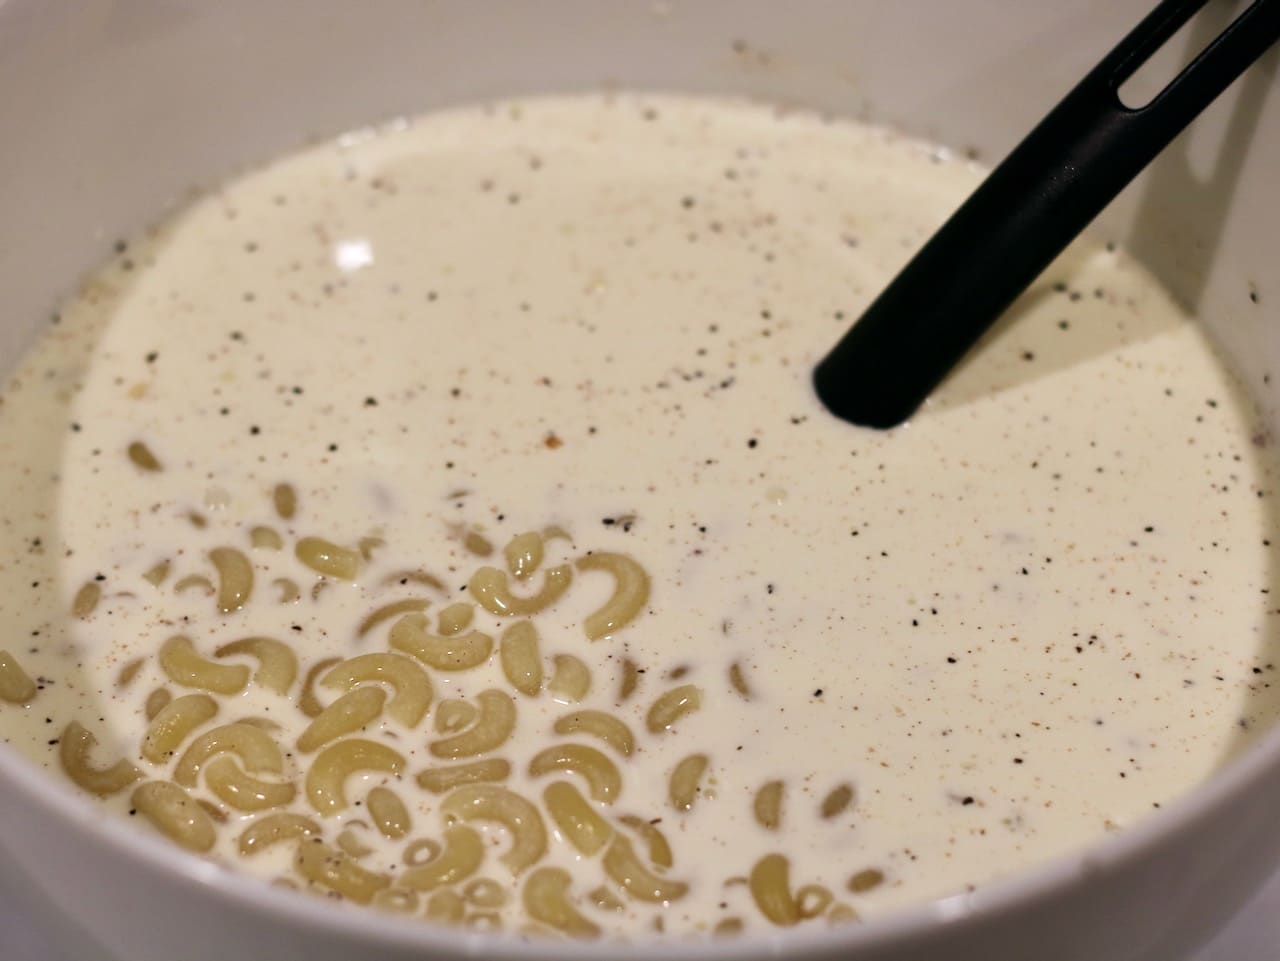
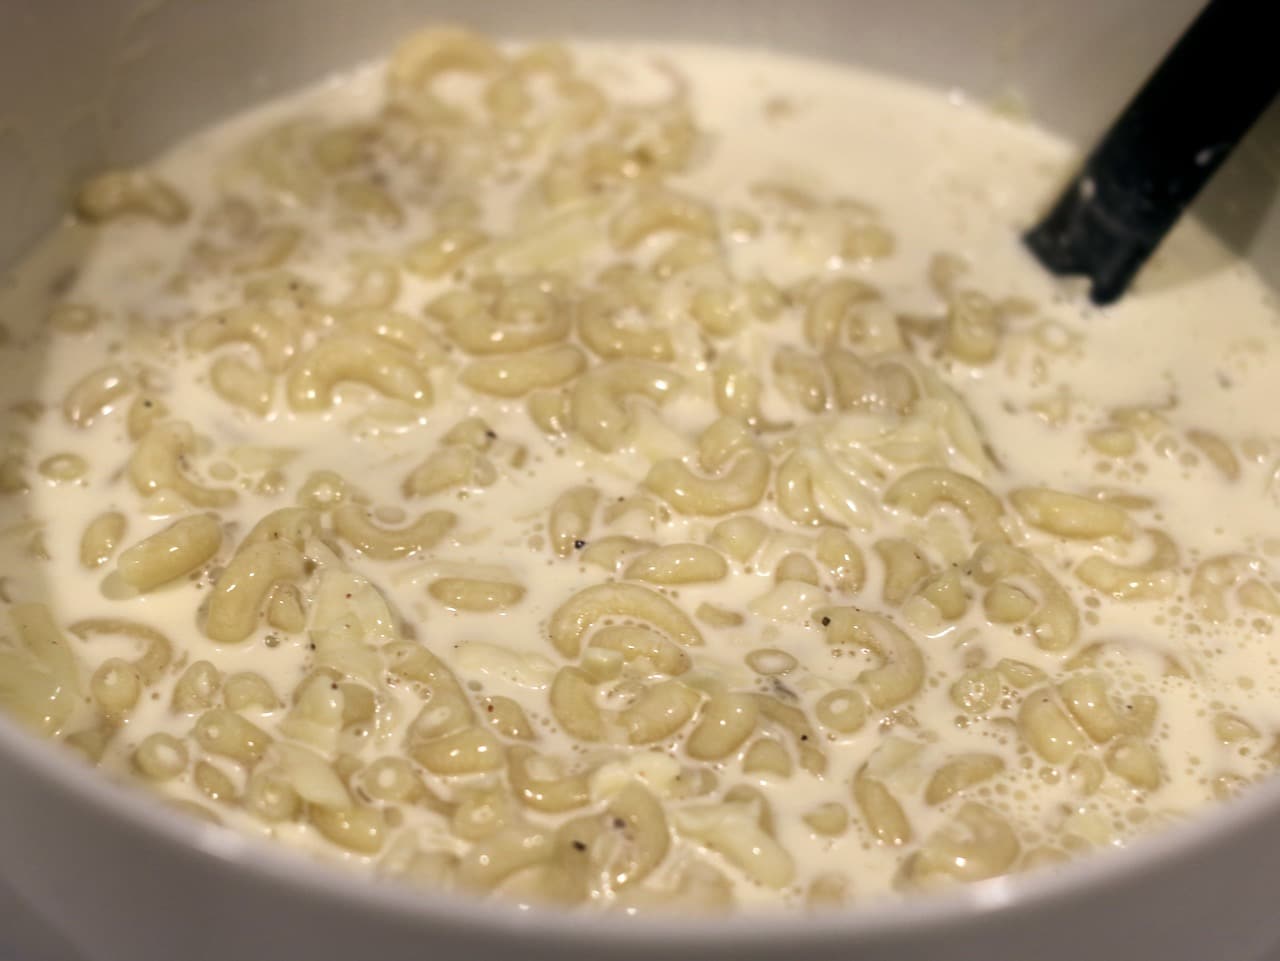
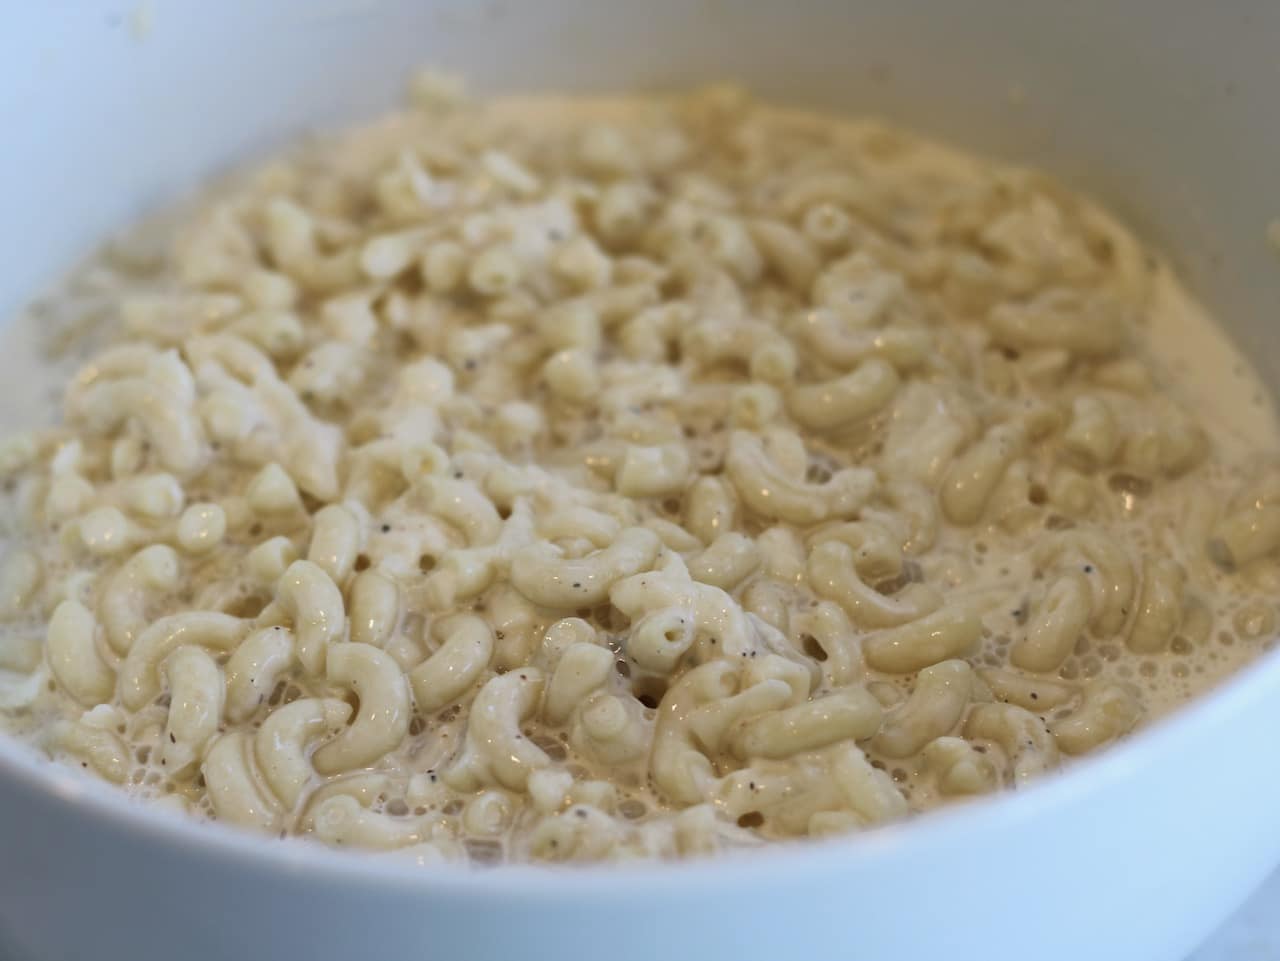
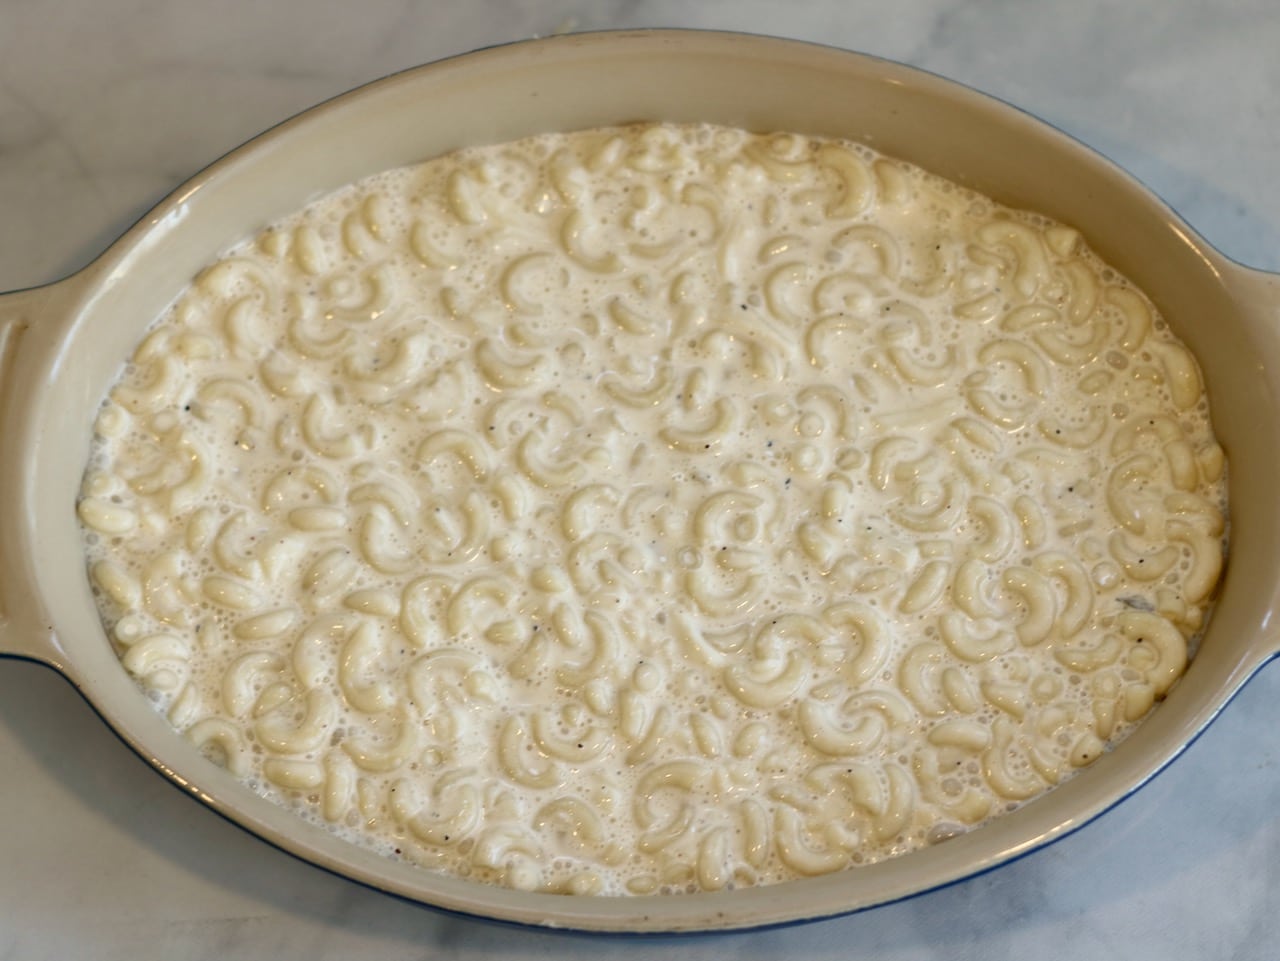
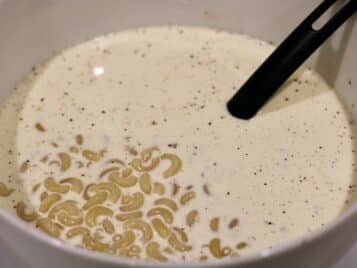
HOUR 1: It appears like there is too much liquid
HOUR 6: The liquid is absorbing into the pasta and thickening
HOUR 24: Almost all the liquid has absorbed and is ready for cooking
Pour into a oven safe dish and bake
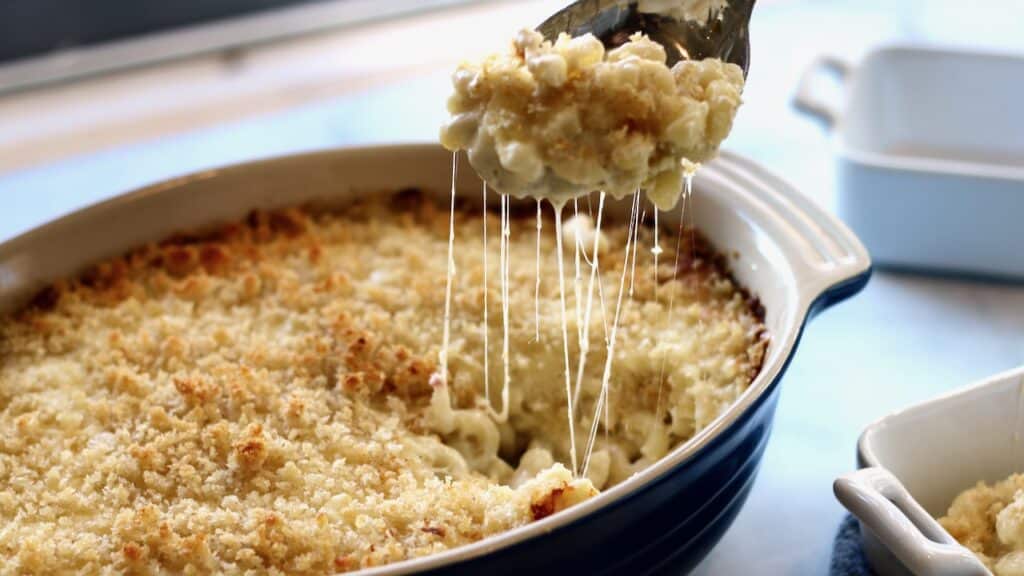
Ok, so no roux- just the pasta & cream sitting together doing their thing for 24 hours. What else is different? Well, it’s a lot less mess! The original recipe requires a pot for pasta water, a pot for the cheese sauce, and a pot for warming the milk. This recipe requires just the pasta water pot and the bowl it will eventually sit in overnight. Thats it! No pile of pots, no flour mess, no overheated milk stuck to the edge of the pan. This is a pretty big plus from a home cooks point of view.
About Ina Garten’s Original Mac & Cheese
This recipe follows a very traditional approach to a baked Homemade Mac & Cheese. If you want to introduce other ingredients such as broccoli and chicken, or truffle and mushrooms, the classic recipe is going to hold together better. This is because of the Roux. However, the flip side of that is that if you are a beginner cook, you probably have no idea how to make a Roux! (But it’s pretty easy so don’t be scared. The Food Network has a good article and video on How to Make a Roux that is really helpful for beginners.)
The Roux also helps the dish resist “breaking” as fast and thats really important. The culinary term of “Breaking” is used when oil visibly separates from the rest of the dish. The fats separate from the solids and you end up with an oily pool gathered at the bottom on the dish, which is never what you want. It will ultimately happen to any homemade Mac & Cheese as it sits, and if reheated. If you like a classic baked mac & cheese (like the kind your grandma used to make) then this classic recipe is for you.
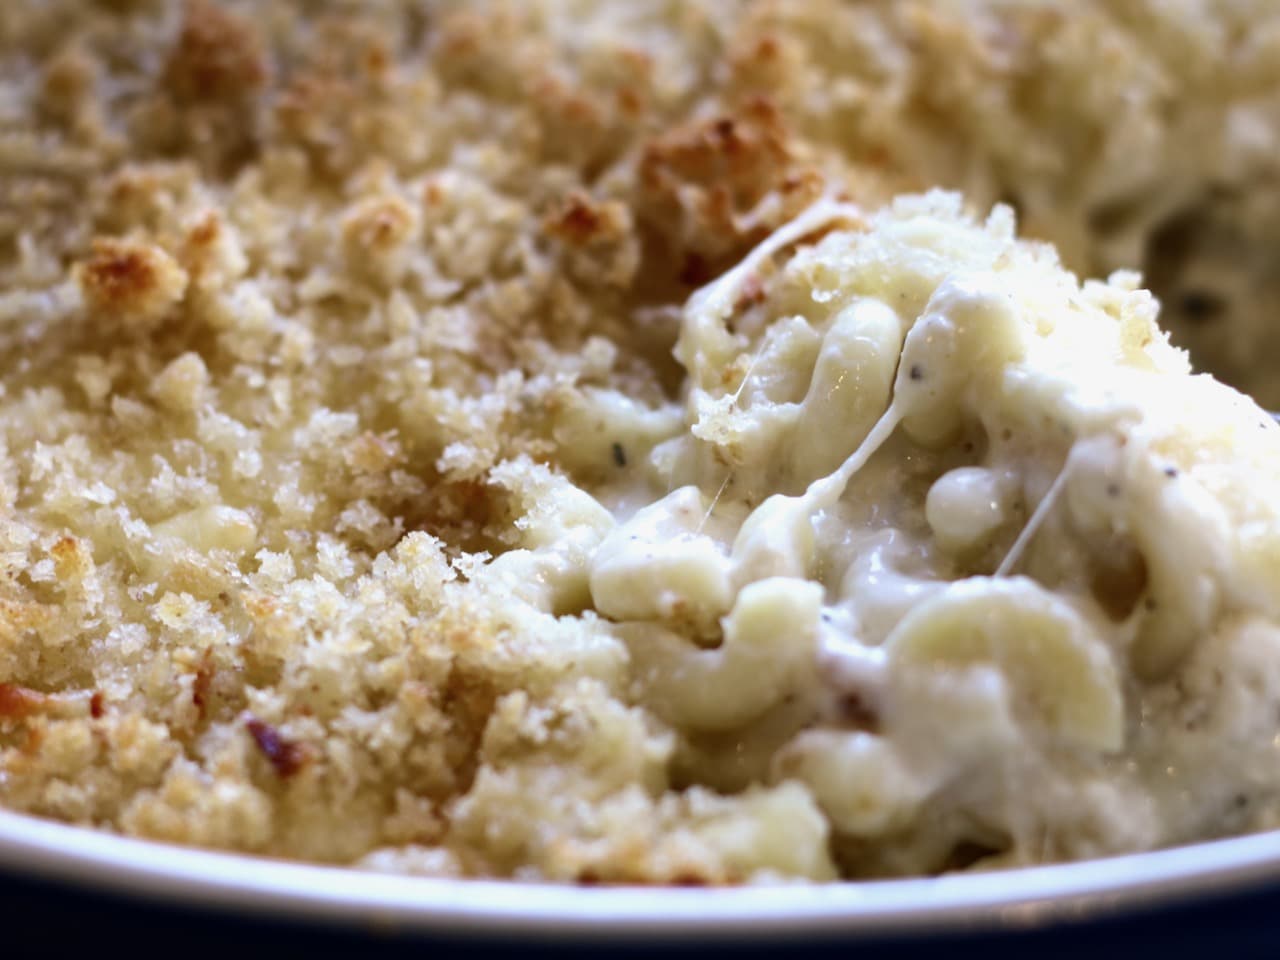
About Ina Garten’s Overnight Mac & Cheese
As I mentioned, the Overnight Mac & Cheese recipe does not use a Roux. The flour used in the Roux can often thicken it too much and reduce it’s cheesy factor, like in the case of a Bachemel in a Mousakka or in very traditional Italian Lasagna. By using only heavy cream and cheese, this result is a “wetter” style macaroni & cheese. If you like the consistency of stovetop Mac & Cheese but also enjoy a crunchy topping, this recipe is for you. However, the overnight version is more susceptible to breaking and needs to be served and eaten rather quickly to reduce breakage risk. (But don’t worry- it won’t stand a chance of sitting around too long!)
Which mac and cheese recipe is better?
Determining which is the better Mac & Cheese recipe is a question that is very difficult to answer. There are things I like about each, so in all honesty, one is not better than the other- they are just really different and you need to know why. I suppose the best way to describe it is that Ina’s original Mac & Cheese version is more like a pasta casserole and Ina’s Overnight Mac & Cheese version is more like a stovetop Mac & Cheese with a crumbly topping. The original may seem a little thicker and hold together a bit more, but the overnight is richer due to the heavy cream. (Sorry, you can’t substitute low fat here or you won’t get the same result.)
What is the best cheese for Mac & Cheese?
Ah, the age old question and debate over what cheese is best for mac & cheese! The important thing you need to know about when selecting a cheese or cheeses is that all cheese does not melt the same. The fat content and texture of a cheese influences how well a cheese melts.
The best cheeses for mac & cheese
Ah, the age old question and debate over what cheese is best for mac & cheese! The important thing you need to know about when selecting a cheese or cheeses is that all cheese does not melt the same. The fat content and texture of a cheese influences how well a cheese melts.
Mozzarella (not fresh!)
Monterey Jack
Sharp Cheddar
Colby
Swiss
Hällerhocker (expensive but unforgettable!)
Cheese to use with caution
Cheddar – avoid aged, hard cheddars
Gruyere – invest in good quality
Havarti
Provolone – choose soft, not aged
Fontina
Cheeses to avoid at all costs in Mac & Cheese
Pre-Shredded Cheeses*
Fresh Mozzarella
Feta Cheese
Goat Cheese
Brie
Hard Aged cheeses
*Pre-shredded cheeses may seem convenient, but contain anti-clumping additives to keep the shreds separate so they don’t stick together in the package. This carries over to the food and impacts their melting ability and reduces the stringy, stretchiness we are looking for in a great mac & cheese. Therefore, you must grate your own. Tip: Shred the cheese a day before so you have less to do!
Q & A about Mac & Cheese
Q- Can you make mac and cheese the night before?
Absolutely! Both versions of the featured Mac & Cheese recipes here can be made the day before, taken out of the fridge an hour before baking, cooked and serve! This allows you to make the mess the day before and really enjoy it yourself.
Q- How do you store mac and cheese overnight?
It is best not to store and reheat cooked mac & cheese. It is best consumed fresh or made in advance and then baked to order. However, if you must, let it cool, cover and refrigerate. Reheat low and slow.
Q- How do you reheat Mac & Cheese
Reheating Mac & Cheese can be tricky because it will almost certainly break and loose all the melty cheesiness we love. The only way to bring it back to its former glory is low and slow. This can be done most successfully using the double broiler approach, and I have also had positive results for larger quantities using a slow cooker on warm and very low.
Overnight mac & cheese takes the pots, pans, roux, and last minute mess out of the equation and the result is a rich, gooey, delicious mac & cheese!
Prep Time15 minutesmins
Cook Time25 minutesmins
Inactive time1 dayd
Course: dinner, Side Dish
Cuisine: American
Keyword: mac & cheese
Servings: 4
Calories: 100kcal
Author: Inspired by Ina Garten
Ingredients
Kosher salt and freshly ground black pepper
8ounceselbow macaroni or cavatappipreferably Italian
3cupsheavy cream
3cupscombination of grated melting cheeses such as sharp white cheddar, gruyere, jalapeño jack, mozzarella, etc.(divided and 1.5 cups set aside)
¼teaspoonground nutmeg
2tablespoonsmelted butterplus extra for the dish
1½cupsfine fresh white bread crumbs5 slices, crusts removed, see note
Instructions
Twenty-four hours before you plan to serve, bring a large pot of water to a boil. Add 2 tablespoons salt and the macaroni and cook for exactly 4 minutes. Drain and set aside.
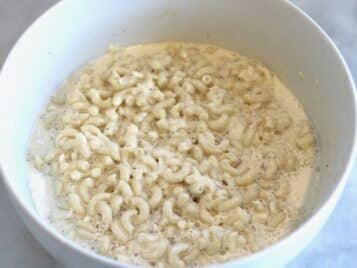
Meanwhile, in a medium (10-inch) bowl, combine the cream, nutmeg, 1.5 Cups of the grated cheese, 2 teaspoons salt, and 1 teaspoon pepper. When the pasta is done, stir it into the cream mixture, cover the bowl with plastic wrap, and refrigerate for a full 24 hours. Stir gently every few hours to ensure distribution. The pasta will absorb the cream and expand.
When ready to cook, allow the mixture to sit at room temperature for about an hour. (I recommend using gloved hands or a spoon to gently break up any clumped pasta) Meanwhile, preheat the oven to 400 degrees.
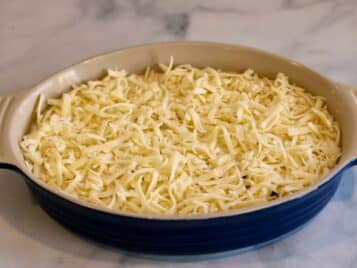
Butter a 2-quart gratin dish, transfer the mixture to the dish and spread it evenly.
Add the 1.5 cups cheese and sprinkle it evenly on top.
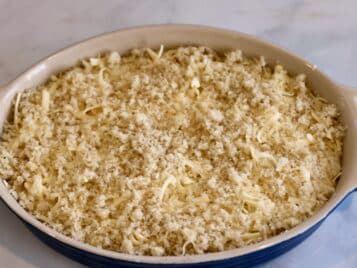
Combine the bread crumbs and 2 tablespoons butter and sprinkle evenly on top.
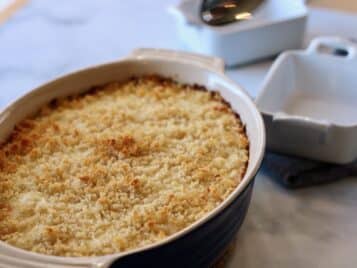
Bake for 20 to 25 minutes, rotating halfway through, until golden brown and crusty. Serve hot.
Note: To make 1½ cups of fresh bread crumbs, remove and discard the crusts from 5 slices of white bread. Dice the remaining bread and put it in the bowl of a food processor fitted with the steel blade and process until you have fine crumbs.
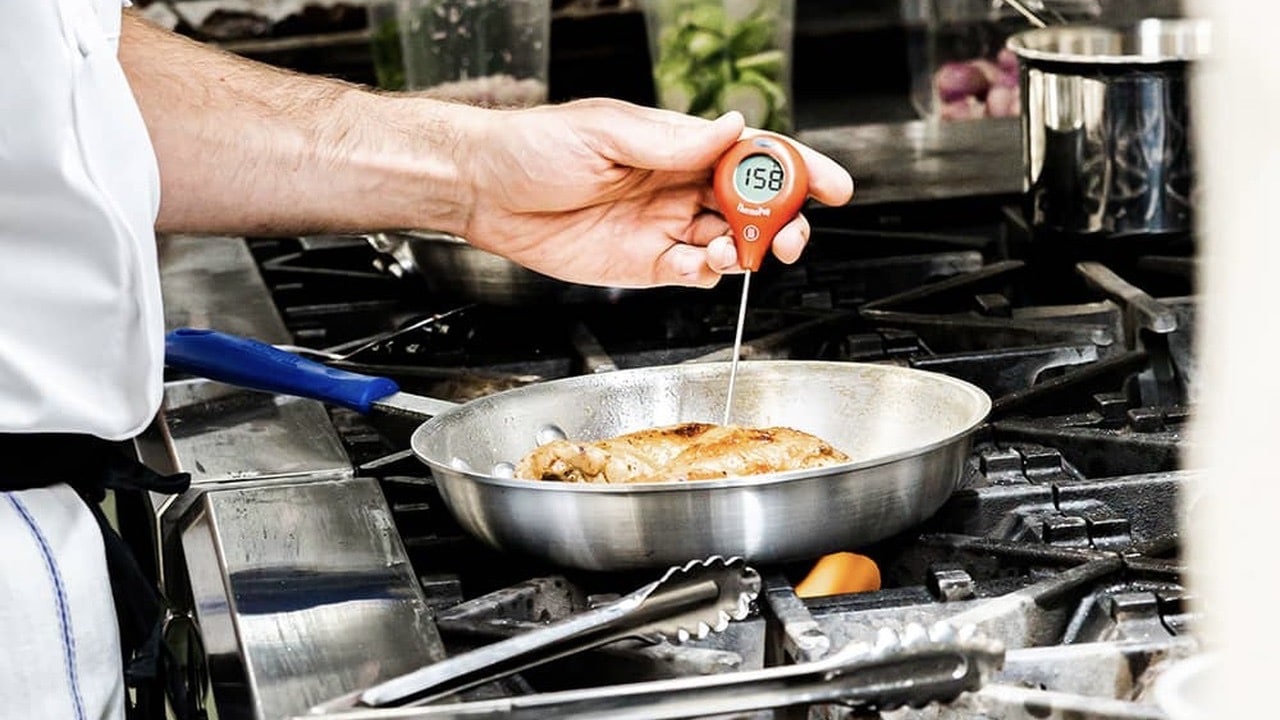
The Thermoworks ThermoPop is an excellent food thermometer for any chef, including the novice chef who is just getting started with working with meat thermometers, as well as the professional cook who simply wants a quick, reliable temperature reading. No bells and whistles, just the real deal. Or I should say, the real temp!
The ThermoPop features big digits and a backlight for dark conditions. The power button is easy to use, and the durable construction (made in the USA) is built to last. The ThermoPop comes in nine fun colors to brighten up your cooking experience! It measures a temperature range from -58 to 572°F (-50 to 300°C) and is switchable between °Celsius & °Fahrenheit.
Thermoworks ThermoPop Pricing
The real advantage of the ThermoPop over the other Thermoworks products is the price point. Recently reduced to just $21.00 (Was $35.00), it simply can’t be beat. And truth be told, I own the more expensive Classic Thermapen and I love it, but I use the ThermoPop more! It’s just convenient and the wide variety of bright colors make it fun to use!
As a home cook who enjoys encouraging and empowering others to learn to love cooking, I find the ThermoPop makes a great gift. It is affordable, non-intimidating and reliable.
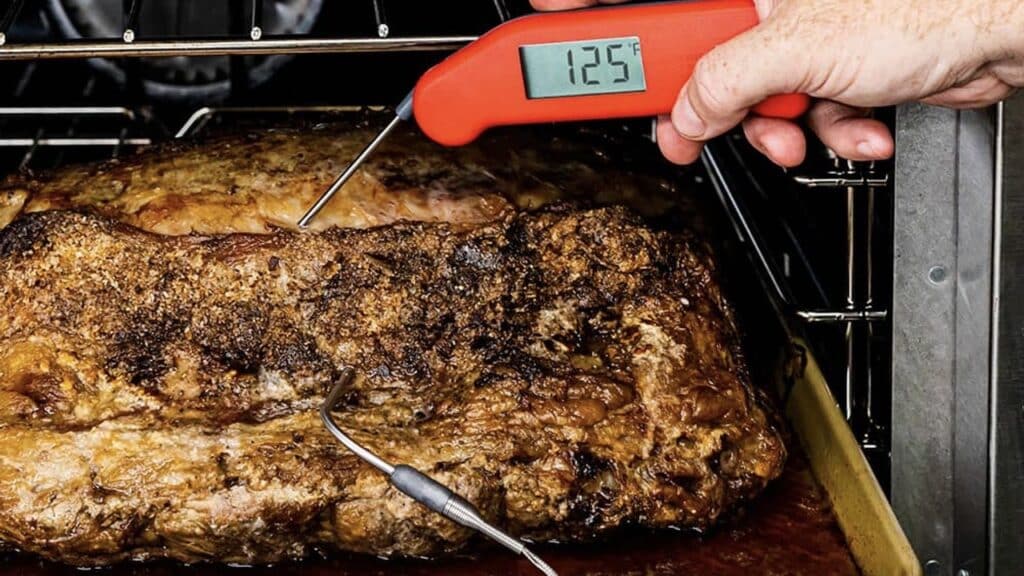
The Thermoworks Classic Super-Fast Thermapen is the leading digital thermometer on the market used by chefs everywhere!
The Classic Thermapen takes readings in less than three seconds, is accurate to less than a degree, and is designed to last for a long time to come. It turns on by opening the probe, so there are no one and off buttons to worry about, and it folds up for easy storage or travling. It’s large display makes it easy to read which reduces any reading errors.
Remove the guesswork- take your beef’s temperature!
There Classic Thermapen comes in a a wide selection of colors, originally developed to meet the needs of people in the food industry who use color coding to prevent cross contamination by dedicating tools to specific food products. However, for us home cooks, it’s just fun to choose your favorite color! (Just be sure to clean your probes after use to keep your chicken juices off your beef!)
When you order a Thermoworks Classic Thermapen, you don’t just receive the food thermometer. Thermoworks also sends you a 20 page guidebook: “Using Your Thermapen: A Guide to Better Food Through the Proper Use and Care of Your Splash-Proof Thermapen”. This booklet contains everything you need to know about proper cooking temperatures, instructions for customizing and cleaning your Thermapen, diagrams and more. Its a fantastic resource!
The Thermopen on/off function works by opening and closing the probe. However, if you leave the probe open, it will auto-shut off in 10 minutes to preserve battery life. It has a temperature reading range of -58.0 to 572.0°F (-49.9 to 299.9°C) and accuracy readings within less than 1°. It also comes with a NIST-Traceable calibration certificate to ensure accuracy.
Use a Thermapen whenever you need accurate temperatures.
Knowing the internal temperature of a roast, a steak, fish, chicken and more ensures you are safely serving food as well as serving it at its optimal temperature for enjoyment. No one likes a well done steak, and if you do, you probably should just stop reading! But protein isn’t the only thing you can you the Thermapen for. Deep frying temperatures vary depending on what you are frying and getting that temp right is vital to your frying or candy making success.
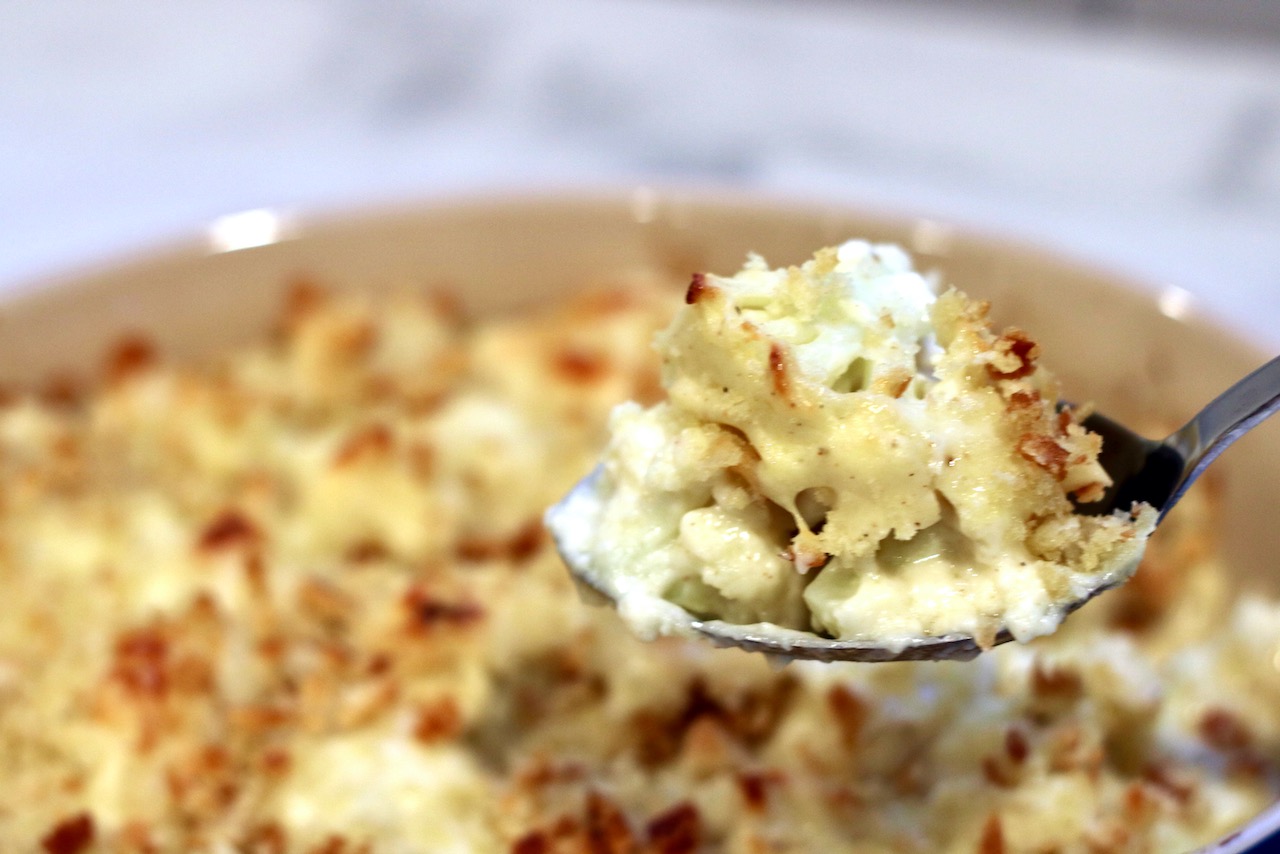
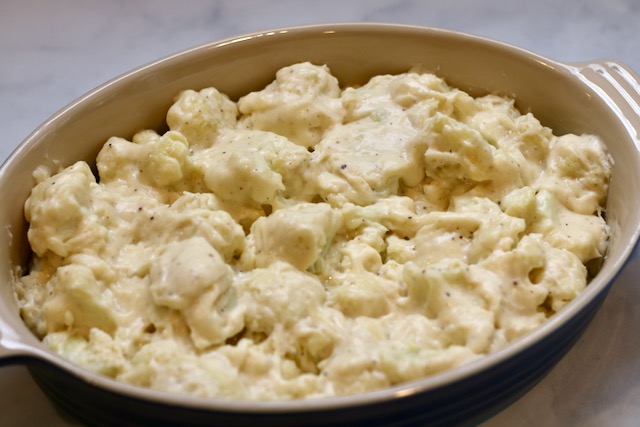
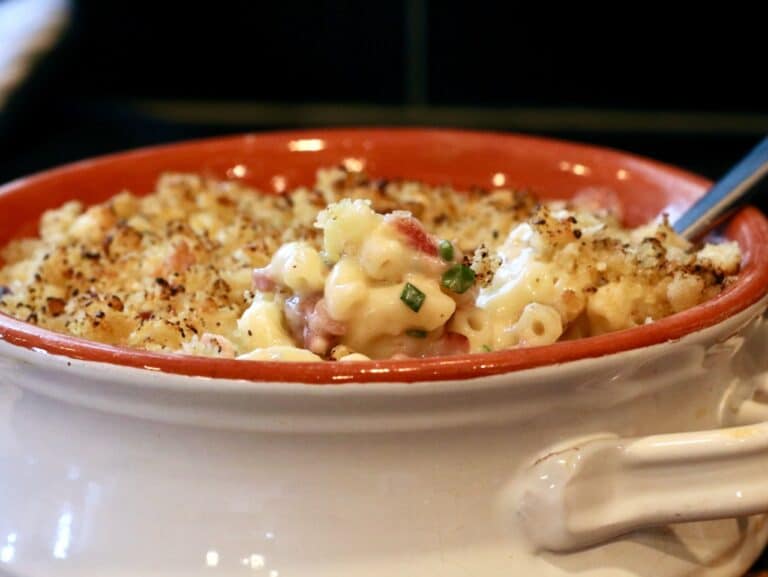
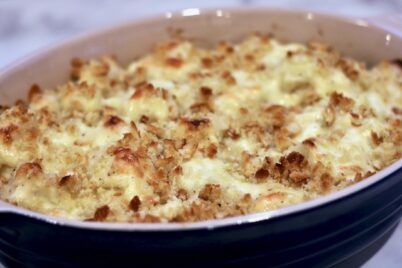
I am always looking for new cauliflower recipes and when I came across this one, I knew I found a new favorite! Substituting Cauliflower for Macaroni and baking it in a creamy cheese sauce makes a great side dish that is still satisfying but a lot less carbs than mac & cheese.
Macaroni & Cheese is my all time weakness. I can’t not order it when on a menu. Mention the word Truffle or Lobster in the same sentence and I’m a goner. But even I have limits and know I can’t always have Mac & Cheese anytime I want it. So when the craving strikes or a main dish is in need of a cheesy, delicious side dish, this Cauliflower Recipe is what I turn to. And it’s so, so good!
The fancy name for this dish is actually Cauliflower Au Gratin. Let me interpret- Cauliflower smothered in cheese sauce! While I dare not call it healthy, it is certainly a healthier version of mac & cheese. Added bonus – Cauliflower is a Cruciferous vegetable that is very low in carbs and high in fiber, which is never a bad thing. I guess what I am trying to say is that when I make this recipe, I only feel half as bad about indulging in it. Actually, who am I kidding? I never feel bad about anything having to do with cheese sauce.
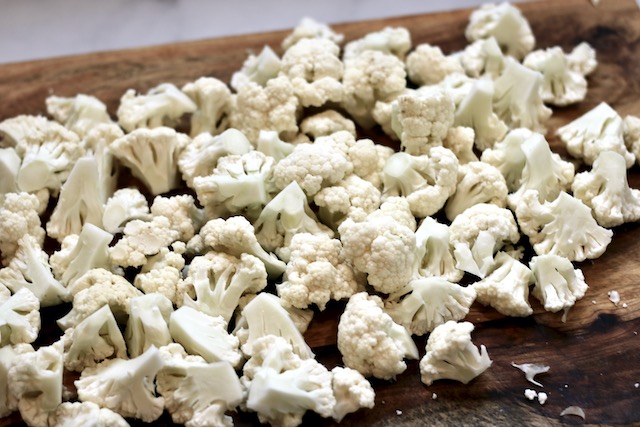
1. Cut Cauliflower into 1″ florets, steam and set aside to dry and cool.
2. Make a cheese sauce (the same one I use for Mac & Cheese recipe) and combine with the cauliflower florets.
3. Top with fresh bread crumbs and Bake at 375F for about 25 minutes.
4. Let rest for a few minutes because it’s very hot!
Pro Tips:
Make sure the cauliflower is completely dry after steaming. If it has residual moisture the cheese sauce will be wet rather than gooey.
You can make this a Gluten Free recipe by substituting cup for cup flour in the cheese sauce.
This makes an excellent side dish for grilled steaks.
Can be made in advance up to 24 hours up to adding the breadcrumbs. Remove from refrigerator an hour before baking to take chill off. Then top with buttered breadcrumbs and bake according to instructions.
How to buy and store Cauliflower:
Look for a clean, compact head with tightly closed florets. Avoid heads with loose or crumbly florets, brown spots or dull color. The leaves should look fresh and green. When storing it, Wrap the whole head in a plastic bag or plastic wrap, and put it in the crisper drawer to allow air exchange. Placing it stem-up will help avoid condensation on the head. Depending on the freshness when you purchase it, it should last five days. But like any vegetable, the sooner it is eaten after being picked, the better it will be.
Ina Garten’s Mac & Cheese
Life is better when Mac & Cheese is in it so stop the search – this is the best baked Mac & Cheese recipe you’ll ever need.
Cauliflower florets are steamed and then baked in a rich cheesy sauce and topped with fresh breadcrumbs for a delicious side dish.
Prep Time20 minutesmins
Cook Time30 minutesmins
Course: Side Dish
Cuisine: American, French
Servings: 4people
Ingredients
13-pound head cauliflower, cut into 1 – 1.5inch large florets
2tablespoonsunsalted butterdivided
3.5tablespoonsall-purpose flour
2cupshot milk
1tspKosher salt
1/2teaspoonfreshly ground black pepper
1/4teaspoongrated nutmeg
pinchcayenne pepper
1.5 – 2cupfreshly grated Gruyere & white sharp cheddar cheese (equal amounts of each) –1/4 cup of the shredded cheese combination set aside for topping.
1/2cupfreshly grated Parmesan
Bread Crumb Topping
1/2cupfresh bread crumbs (Use a food processor to make fresh breadcrumbs out of cubed baguette, rustic loaf or just your favorite sandwich bread!)
1tbsunsalted butter
1/4 cup shredded cheese (equal parts gruyere and cheddar)
Instructions
Preheat oven to 375 degrees F
Make the Gratin
Steam the cauliflower florets for about 5 minutes, until tender but still firm. Dry and cool in a single layer on paper towel or a tea towel.
Heat the milk over med-low heat, in a small saucepan until hot, but not boiling.
Melt 2 tablespoons of the butter in a med – large size pot over low-med heat. Add the flour, stirring constantly with a wooden spoon for 2 minutes.
Slowly whisk in the hot milk to the butter-flour mixture and stir/whisk until it comes to a low boil. Boil, whisking constantly, for 1 minute, or until thickened. (It should lightly coat the back of a wooden spoon.) Off the heat, stir in 1 teaspoon of salt, 1/2 tsp the pepper, 1/4 tsp nutmeg, the parmesan cheese & the grated gruyere / cheddar mixture (ensuring to reserve 1/4 cup of the grated cheese mixture for the topping.)
Gently stir in the cauliflower into the cheese mixture.
Distribute the cheesy cauliflower mixture into a 8 x11 or similar sized baking dish.
Sprinkle the remaining 1/4 cup of the Shredded cheeses over the top of the cauliflower.
Make the Topping
Melt 1 tbs in a small saucepan
Off the heat, stir in the breadcrumbs
Sprinkle the breadcrumb mixture evenly over the gratin.
Bake
Bake for 25 to 30 minutes, until the top is browned and the sides sizzling.
Notes
This dish can be made in advance either up to an hour and set aside, and baked to order. Or, up to 24 hours, refrigerated, taken out one hour ahead, and then baked according to baking instructions.